There are some chips that no matter how much the industry moves away from them still remain, exerting a hold decades after the ranges they once sat alongside have left the building. Such a chip is the 386, not the 80386 microprocessor you were expecting but the LM386, a small 8-pin DIP audio amplifier that’s as old as the Ark. the ‘386 can still be found in places where a small loudspeaker needs to be powered from a battery. SolderSmoke listener [Dave] undertook an interesting exercise with the LM386, reproducing it from discrete components. It’s a handy small discrete audio amplifier if you want one, but it’s also an interesting exercise in understanding analogue circuits even if you don’t work with them every day.
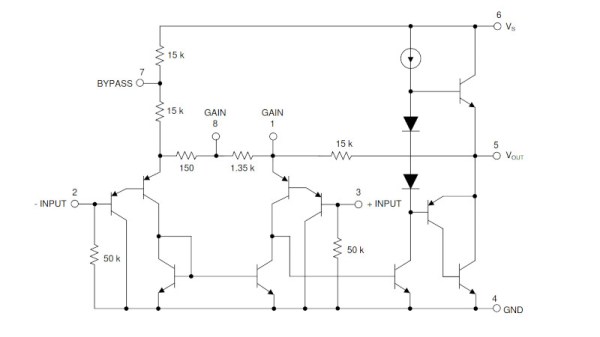
A basic circuit can be found in the LM386 data sheet (PDF), but as is always the case with such things it contains some simplifications. The discrete circuit has a few differences in the biasing arrangements particularly when it comes to replacing a pair of diodes with a transistor, and to make up for not being on the same chip it requires that the biasing transistors must be thermally coupled. Circuit configurations such as this one were once commonplace but have been replaced first by linear ICs such as the LM386 and more recently by IC-based switching amplifiers. It’s thus instructive to take a look at it and gain some understanding. If you’d like to know more, it’s a chip we’ve covered in detail.