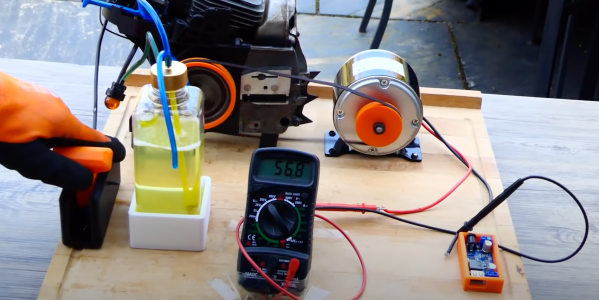
Reverse Engineering A Topfield VFD Front Panel

Hackers love the warm glow of a vacuum fluorescent display (VFD), and there’s no shortage of dead consumer electronics from which they can be pulled to keep our collective parts bins nicely stocked. Unfortunately, figuring out how to actually drive these salvaged modules can be tricky. But thanks to the efforts of [Lauri Pirttiaho], we now have a wealth of information about a VFD-equipped front panel used in several models of Topfield personal video recorders.

The board in question is powered by a Hynix HMS99C52S microcontroller and includes five buttons, a small four character 14-segment display, a larger eight character field, and an array of media-playback related icons. There’s also a real-time clock module onboard, as well as an IR receiver. [Lauri] tells us this same board is used in at least a half-dozen Topfield models, which should make it relatively easy to track one down.

After determining what goes where in the 6-pin connector that links the module with the recorder, a bit of poking with a logic analyzer revealed that they communicate over UART. With the commands decoded, [Lauri] was able to write a simple Python tool that lets you drive the front panel with nothing more exotic than a USB-to-serial adapter. Though keep in mind, you’ll need to provide 17 VDC on the appropriate pin of the connector to fire up the VFD.

What’s that? You don’t need the whole front panel, and just want to pull the VFD itself off the board? Not a problem. Our man [Lauri] was kind enough to document how data is passed from the Hynix microcontroller to the display itself; critical information should you want to liberate the screen from its PVR trappings.

If you manage to get your hands on one of these modules, it would be an ideal addition to a custom media streamer. Though we suppose simply turning it into a network-controlled clock would be a suitable alternative if you’re looking for something a bit easier.

Continue reading “Reverse Engineering A Topfield VFD Front Panel”

Pomodachi: A Productivity Pet You Feed By Working

Being productive doesn’t have to be a lonely endeavor. Even if you’re a lone wolf, who wouldn’t benefit from having a cute little productivity pet to cheer them on? That’s the idea behind [droxpopuli]’s Pomodachi, which combines a hardware implementation of the Pomodoro technique with a virtual pet. It adds some fun, but doesn’t overly gamify time tracking to the point of distraction. And this is way more fun than just sticking a pair of googly eyes on a tomato-shaped timer.

Inside the box is an Adafruit HalloWing M4 Express and a NeoKey FeatherWing with two Kailh box white switches for a satisfying clack. [droxpopuli] printed up a PyPortal-inspired case and added a glass lens for a spiffy tube TV look.

Pomo himself is a cute little jack-o-lantern looking creature with a teddy bear face and no arms or legs. He could eat with his face, but prefers to be fed. That’s where you come in. You feed him by completing a set of four 20-minute work intervals.

Don’t worry about keeping track of time, because he does that for you and spends the time foraging for food. When it’s break time, Pomo lets you know and suggests an activity. This is when you press the button and feed him. If your productivity begins to flag a bit, don’t freak out — there’s a multiplier for catching up, and you have seven chances before Pomo runs away forever.

The Pomodoro Technique is pretty great for productivity, and it’s versatile, too. Here’s a hydration-based Pomodoro that will flood your desk if you don’t drink enough water.

[via Hackaday.io]

USB Mouse Hack For Pachyderm Protection

When most of us think of seismometers, our minds conjure up images of broken buildings, buckled roads, and search and rescue teams digging through rubble. But when [Subir Bhaduri] his team were challenged with solving real world problems as frugally as possible as part of the 2020 Frugal Science course, he thought of farmers in rural India for whom losing crops due to raiding elephants is a reality. Such raids can and have caused loss of life for humans and elephants alike. How could he apply scientific means to prevent such conflicts, and do it on the cheap?

Whether inspiration came from using a computer mouse with the cursor speed turned up to “orbital velocity” is debatable, but [Subir] set forth to find out if such sensitivity could be leveraged for the seismic detection of the aforementioned elephants. His proof of concept is a fantastically frugal low cost seismograph using an optical mouse and some cheap PVC pipe and fittings.

We invite you to watch the video below the break to find out how it works. You’ll be impressed as we were by [Subir]’s practical application of engineering principles. And keep your eyes open for the beautiful magnetic damper hack. It’s a real treat!

If pontificating pesky pachyderms p-waves piques your interest, perhaps you’ll appreciate previous projects which produce data with piezo pickups and plumbing parts.

Continue reading “USB Mouse Hack For Pachyderm Protection”

Google’s Periodic Table

One of the nice things about the Internet is that you don’t need huge reference books anymore. You really don’t need big wall charts, either. A case in point: what science classroom didn’t have a periodic table of the elements? Now you can just look up an interactive one from Google. They say it is 3D and we suppose that’s the animations of the Bohr model for each atom. You can debate if it is a good idea to show people Bohr models or not, but it is what most of us learned, after all.

While the website is probably aimed more at students, it is a handy way to look up element properties and it is visually attractive, too. You probably remember, the columns are no accident in a periodic table, so the actual format doesn’t vary from one instance of it to another. However, we liked the col coding and the information panel that appears when you click on an element.

Continue reading “Google’s Periodic Table”

Filtering Coffee Through 3D Printed Glass

Typically, when we think of 3D printing, we think of gooey melted plastics or perhaps UV-cured resins. However, there’s a great deal of research going on around printing special impregnated filaments with alternative materials inside. [Ahron Wayne] has been working on these very materials, and decided to make himself a brew with a prototype print.

Tasty, but [Ahron] notes you shouldn’t drink in the lab.
The subject of [Ahron]’s experimentation is a glass-impregnated filament under development by The Virtual Foundry. The filament is full of tiny glass particles, and the idea is that it can be printed like any regular plastic filament. From there, it’s heated in what’s known as a debinding process, which removes the plastic in the print. Then, it’s heated again in a sintering process to bond the remaining glass particles together.

It’s a complex process, and one that leads to some shrinkage in dimensions as well as porosity in the final part. However, where some might see failure, [Ahron] saw opportunity. The porous printed part was used to filter coffee, with the aid of a little vacuum from what sounds like a water venturi.

[Ahron] notes it’s not a particularly efficient way to make coffee but it did work. We’ve seen exciting work with steel-impregnated filaments, too. Video after the break.

Continue reading “Filtering Coffee Through 3D Printed Glass”

Hacked IKEA Air Quality Sensor Gets Custom PCB

Last month we brought word of the IKEA VINDRIKTNING, a $12 USD air quality sensor that could easily be upgraded to log data over the network with the addition of an ESP8266. It only took a couple of wires soldered to the original PCB, and since there was so much free space inside the enclosure, you didn’t even have to worry about fitting the parasitic microcontroller; just tape it to the inside of the case and button it back up.

Now we’ve got nothing against the quick and dirty method around these parts, but if you’re looking for a slightly more tidy VINDRIKTNING modification, then check out this custom PCB designed by [lond]. This ESP-12F board features a AP2202 voltage regulator, Molex PicoBlade connectors, and a clever design that lets it slip right into a free area inside the sensor’s case. The project description says the finished product looks like it was installed from the factory, and we’re inclined to agree.

Nothing has changed on the software side, in fact, the ESP-12F gets flashed with the same firmware [Sören Beye] wrote for the Wemos D1 Mini used in his original modification. That said [lond] designed the circuit so the MCU can be easily reprogrammed with an FTDI cable, so just because you’re leaving the development board behind doesn’t mean you can’t continue to experiment with different firmware builds.

It’s always gratifying to see this kind of community development, whether or not it was intentionally organized. [lond] saw an interesting idea, found a way to improve its execution, and released the result out into the wild for others to benefit from. It wouldn’t be much of a stretch to say that this is exactly the kind of thing Hackaday is here to promote and facilitate, so if you ever find yourself inspired to take on a project by something you saw on these pages, be sure to drop us a line.

Rotary Time Tracker Puts A New Spin On Productivity

Like many of us, [quincy] feels the distracting pull of non-work programs on what has become a mixed-use computer. So what’s the answer to the puzzle of work-life balance? We’re not sure, but time management and keeping track of tasks will probably get you most of the way there. The only problem is that keeping track of these things is boring and tedious and way too easy to forget, even for the fun tasks.

Similar commercial gadgets exist to serve this time-tracking purpose, but [quincy] wanted something much cooler that would work the same way: turn the indicator to the current task, and the status gets recorded on a computer. Rather than some smart polygon with informative stickers on each face à la the Timeflip2, [quincy] built a rotary task manager that serves the same purpose, but does it with magnets.

Our favorite part aside from the magnets has to be the clever binary encoding work. [quincy] is using three photoresistors and a single green LED to create a 3D-printed gray encoder that sidesteps the need to ever flip two bits at once. An Arduino takes care of reading the 3-bit code and converting it back into a decimal. There are more updates to come, including the main .ino file, but you can start printing the pieces while you wait.

If you have trouble staying on task, maybe you need a Pomodoro timer. We’ve seen a few over the years, ranging from the minimal to the sculptural.