PC Watercooling Prototype Is Pumpless

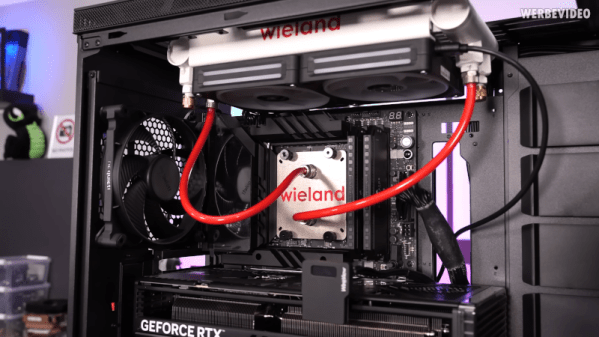
Watercooling is usually more efficient than air cooling for the same volume of equipment, and — important for many people — it is generally quieter. However, you still have water pump noises to deal with. [Der8auer] got a Wieland prototype cooler that doesn’t use a pump. Instead, it relies on the thermosiphon effect. In simple terms, the heat moves water — possibly boiling it — upwards to a radiator. Once the water is cool, it falls down back to the heat exchanger again.

It looks like any other AIO, but the block is extremely flat compared to normal coolers, which have the pump on top of the plate. As you might expect, orientation matters, and you can’t have tight bends in the hoses. The system also has to be totally airtight to function properly. The test was meant to be against a commercial AIO unit with the same number of fans. However, there was a problem, and the final test was done with a larger radiator with one of its three fans removed.

The prototype performed fine and was quiet. It didn’t do as well as the commercial cooler, but it wasn’t bad. Of course, this is a prototype. Maybe a final product will do better. Around the ten-minute mark, the IR camera came out, and it didn’t show any major unexpected hot spots.

We’ve seen water-cooled printer hotends, and pumping is a problem there. We wondered if this technology might work there. The whole thing reminded us of heat pipes without the internal wick to move cold working fluid. We’ve even seen a water-cooled calculator.

Continue reading “PC Watercooling Prototype Is Pumpless”

Cyberpunk Guitar Strap Lights Up With Repurposed PCBs

Sometimes, whether we like it or not, ordering PCBs results in extra PCBs lying around, either because of board house minimums, mistakes on either end, or both. What’s to be done with these boards? If you’re Hackaday alum [Jeremy Cook], you make a sound-reactive, light-up guitar strap and rock out in cyberpunk style.

The PCBs in question were left over from [Jeremy]’s JC Pro Macro project, and each have four addressable RGB LEDs on board. These were easy enough to chain together with jumper wires, solder, and a decent amount of hot glue. Here’s a hot tip: you can use compressed air to rapidly cool hot glue if you turn the can upside down. Just don’t spray it on your fingers.

The brains of this operation is Adafruit Circuit Playground Express, which runs off of a lipstick battery and conveniently brings a microphone to the table. These two are united by a 3D print, which is hot-glued to the guitar strap along with all the boards. In the second video after the break, there’s a bonus easy-to-make version that uses an RGB LED strip in place of the repurposed PCBs. There’s no solder or even hot glue involved.

Want to really light up the night? Print yourself a sound-reactive LED guitar.

Continue reading “Cyberpunk Guitar Strap Lights Up With Repurposed PCBs”

PCB Design Review: Tinysparrow, A Module For CAN Hacking Needs

I enjoy seeing modules that can make designing other devices easier, and when I did a call for design reviews, [enp6s0] has submitted one such board to us. It’s a module called TinySparrow (GitHub), that helps you build your own vehicle ECUs and any other CAN-enabled things. With a microcontroller, plenty of GPIOs, a linear regulator and a CAN transceiver already onboard, this board has more than enough kick for anyone in hobbyist-range automotive space – and it’s surprisingly tiny!

You could build a lot of things around this module – a CAN bus analyzer or sniffer, a custom peripheral for car dashes, or even a full-blown ECU. You can even design any hardware for a robot or a piece of industrial technology that uses CAN for its backbone – we’ve all seen a few of those! It’s a great board, but it uses six layers. We’ll see if we can do something about that here.

Modules like TinySparrow will make your PCBs cheaper while ordering, too! Thanks to the carefully routed microcontroller and the CAN transmitter, whatever board you design around this chip definitely wouldn’t need six layers like this one does – and, unlike designing your own board, you can use someone’s well-tested and tailored libraries and reference circuits!

With TinySparrow, you save a lot of time, effort and money whenever you want to design a car or industrial accessory. After looking at the board files, my proposal for helping today’s board is – like last time – to make its production cheaper, so that more people can get this board into their hands if the creator ever does try and manufacture it. I also have some tips to make future improvements on this design easier, and make it more friendly for its userbase.

Continue reading “PCB Design Review: Tinysparrow, A Module For CAN Hacking Needs”

PCB Design Review: ESP32-S3 Round LCD Board

For our next installment, I have a lovely and daring PCB submitted by one of our readers, [Vas]. This is an ESP32-S3 board that also has an onboard round TFT display, very similar to the one we used on the Vectorscope badge. The badge is self-sufficient – it has an ESP32, it has a display, a programming connector, two different QWIIC ports you could surely use as GPIOs – what’s not to love?

This is a two-layer board, and I have to admit that I seriously enjoy such designs. Managing to put a whole lot of things into two layers is quite cool in my book, and I have great fun doing so whenever I get the opportunity. There’s nothing wrong with taking up more layers than needed – in fact, if you’re concerned about emitted/received noise or you have high-speed interfaces, four-layer is the way to go. But making complex boards with two layers is a nice challenge, and, it does tend to make these boards cheaper to manufacture as a very nice bonus.

Let’s improve upon it, and support [Vas]’s design. From what I can see looking at this board, we can help [Vas] a lot with ease of assembly, perhaps even help save a hefty amount of money if they go for third-party PCBA instead of sitting down with a stencil – which you could do with this board pretty easily, since all of the components on it, save for the display, are the ones you’d expect JLCPCB to stock.

Continue reading “PCB Design Review: ESP32-S3 Round LCD Board”

Faux Silkscreen On A PCB Made With A Laser Cutter

If you’re getting PCBs professionally made, silkscreen usually comes free as part of the package. However, if you’re making your own, the job is on you. [Tony Goacher] makes his own PCBs on a CNC router, so he’s not getting any silkscreening as part of that bargain. But he wondered—could he do something analogous with a laser cutter?

The answer is yes. The silkscreen layer was first exported from DesignSpark, with the file then sent to LightBurn to prep it for laser cutting. The board outline layer was first engraved on to a piece of scrap as an alignment aid. Then, the board was placed in the laser cutter, with the silkscreen scorched directly on to the fiberglass.

The results are encouraging, if imperfect. [Tony] says he ran at “quite fast speed at quite high power.” The markings are all there, but they’re a little melty and difficult to read. He noted at lower speeds and lower power, the results were a bit more readable.

PCBs aren’t really an ideal engraving or laser marking material, but this technique could be servicable for some basic markings on DIY PCBs. We look forward to seeing how [Tony] improves the process in future. Video after the break.
Continue reading “Faux Silkscreen On A PCB Made With A Laser Cutter”

Hackaday Podcast Episode 262: Wheelchair Hacking, Big Little Science At Home, Arya Talks PCBs

Join Hackaday Editors Elliot Williams and Tom Nardi as they go over their favorite hacks and stories from the past week.  This episode starts off with an update on Hackaday Europe 2024, which is now less than a month away, and from there dives into wheelchairs with subscription plans, using classic woodworking techniques to improve your 3D printer’s slicer, and a compendium of building systems. You’ll hear about tools for finding patterns in hex dumps, a lusciously documented gadget for sniffing utility meters, a rare connector that works with both HDMI and DisplayPort, and a low-stress shortwave radio kit with an eye-watering price tag. Finally, they’ll take a close look at a pair of articles that promise to up your KiCAD game.

Check out the links below if you want to follow along, and as always, tell us what you think about this episode in the comments!

Direct download in DRM-free MP3.

Continue reading “Hackaday Podcast Episode 262: Wheelchair Hacking, Big Little Science At Home, Arya Talks PCBs”

PCB Design Review: DPI-LVDS Sony Vaio LCD Devboard

Ordering a PCB with mistakes sucks. We should help each other avoid such mistakes – especially newcomers. One of the best ways to avoid these mistakes, especially if it’s your first one, is to get a few other people to look at it. You deserve to get a PCB that is as functional and as helpful as humanly possible, so that you can be happy with your project, and feel ever so slightly more confident in yourself in whatever you shall set out to do next.

At the end of last year, I put out a call for design review submissions, and we’ve received enough projects to make me feel overwhelmed for a bit. A design review has always felt like a personal thing, and here we are doing them in public. But in that sense, we hope that everyone can learn from them, and we hope to push forward a healthy review culture.

What’s more, these articles won’t just be design review. Every project I’m highlighting is worthy of a Hackaday feature just on its own, so tune in and learn more about them!

Today’s Contestant

For this example, I will be walking through a review I’ve already given someone with a pretty cool board, for a pretty cool project I’ve already shown you. Remember the Sony Vaio remake project? A fair bit of people have reached out to me afterwards, and one of them, [Exentio] also had the same Sony Vaio rebuild idea in mind. We started chatting, and he decided to tackle one of the project’s milestones, and perhaps the most crucial one – adapting the LCD.

Continue reading “PCB Design Review: DPI-LVDS Sony Vaio LCD Devboard”