WS2812 at 670 kHz

Driving WS2812B Pixels, With DMA Based SPI

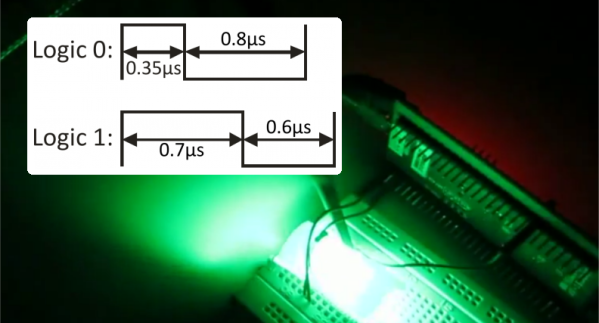
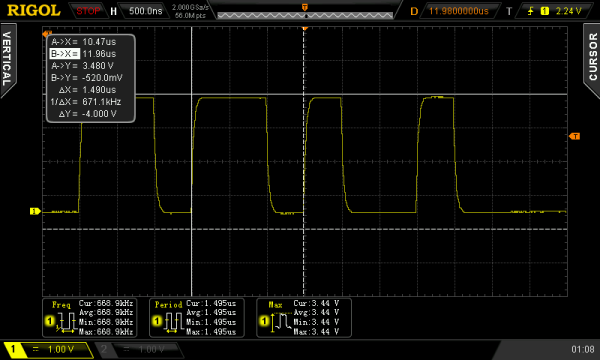
Typically bit-banging an I/O line is the common method of driving the WS2812B (WS2811) RGB LEDs. However, this ties up precious microcontroller cycles while it waits around to flip a bit. A less processor intensive method is to use one of the built-in Serial Peripheral Interface (SPI) modules. This is done using specially crafted data and baud rate settings, that when shifted out over the Serial Data Out (SDO) pin, recreate the needed WS2812B signal timing. Even when running in SPI mode, your hardware TX buffer size will limit how many pixels you can update without CPU intervention.

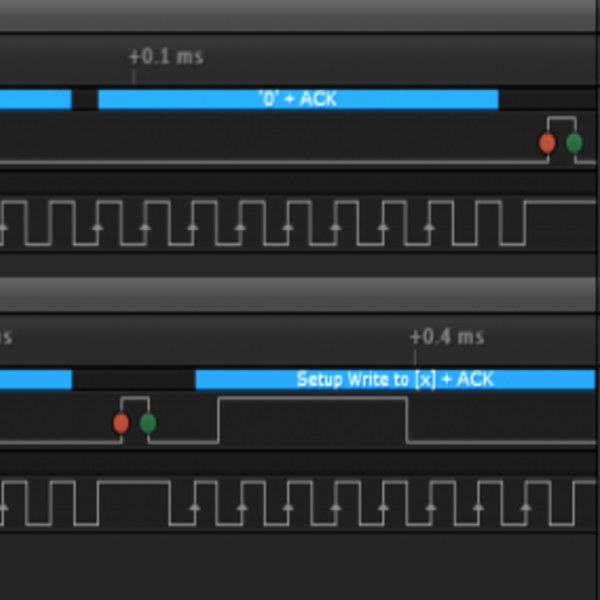
[Henrik] gets around this limitation by using peripheral DMA (Direct Memory Access) to the SPI module in the Microchip PIC32MX250F128B microcontroller. Once properly configured, the DMA controller will auto increment through the defined section of DMA RAM, sending the pixel data over to the SPI module. Since the DMA controller takes care of the transfer, the micro is free to do other things. This makes all of DMA memory your display buffer. And leaves plenty of precious microcontroller cycles available to calculate what patterns you want the RGB LEDs to display.

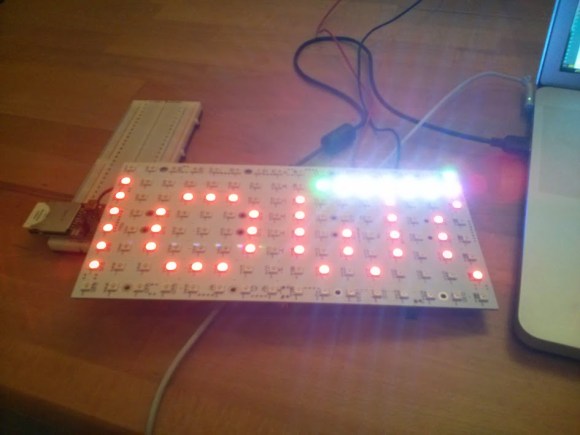
Source code is available at the above link for those who would like to peruse, or try it out. This is part of [Henrik’s] Pixel Art Project. Video of DMA based SPI pixels after the break:

Continue reading “Driving WS2812B Pixels, With DMA Based SPI”

Controlling Ten Thousand RGB LEDs

RGB LEDs are awesome – especially the new, fancy ones with the WS2812 RGB LED driver. These LEDs can be individually controlled to display red, green, and blue, but interfacing them with a microcontroller or computer presents a problem: microcontrollers generally don’t have a whole lot of RAM to store an image, and devices with enough memory to do something really cool with these LEDs don’t have a real-time operating system or the ability to do the very precise timing these LEDs require.  [Sprite_tm] thought about this problem and came up with a great solution for controlling a whole lot of these WS2812 LEDs.

[Sprite] figured there was one device on the current lot of ARM/Linux boards that provides the extremely precise timing required to drive a large array of WS2812 LEDs: the video interface. Even though the video interface on these boards is digital, it’s possible to turn the 16-bit LCD interface on an oLinuXino Nano into something that simply spits out digital values very fast with a consistent timing. Just what a huge array of RGB pixels needs.

Using a Linux board to drive RGB pixels using the video output meant [Sprite_tm] needed video output. He’s running the latest Linux kernel, so he didn’t have the drivers to enable the video hardware. Not a problem for [Sprite], as he can just add a few files to define the 16-bit LCD interface and add the proper display mode.

[Sprite_tm] already taken an oscilloscope to his board while simulating 16 strips of 600 LEDs, and was able to get a frame rate of 30 fps. That’s nearly 10,000 LEDs controlled by a single €22/$30USD board.

Now the only obstacle for building a huge LED display is actually buying the RGB LED strips. A little back-of-the-envelope math tells us a 640×480 display would be about $50,000 in LEDs alone. Anyone know where we can get these LED strips cheap?

Continue reading “Controlling Ten Thousand RGB LEDs”

Meet The Teensy 3.1

[Paul Stoffregen] just released an updated version of his Teensy 3.0, meet the oddly named Teensy 3.1. For our readers that don’t recall, the Teensy 3.0 is a 32 bit ARM Cortex-M4 based development platform supported by the Arduino IDE (using the Teensyduino add-on). The newest version has the same size, shape & pinout, is compatible with code written for the Teensy 3.0 and provides several new features as well.

The Flash has doubled, the RAM has quadrupled (from 16K to 64K) allowing much more advanced applications. The Cortex-M4 core frequency is 72MHz (48MHz on the Teensy 3.0) and the digital inputs are 5V volts compatible. Pins 3 and 4 gained CAN bus functions. The new microcontroller used even has a 12 bits Digital to Analog Converter (DAC) so you could create a simple signal generator like the one shown in the picture above. Programming is done through the USB port, which can later behave as host or slave once your application is launched. Finally, the price tag ($19.80) is in our opinion very reasonable.

Embedded below is an interview with its creator [Paul Stroffregen].

Continue reading “Meet The Teensy 3.1”

Using DMA To Drive WS2812 LED Pixels

It’s pretty well known by now that the LED pixel hardware which is starting to be commonplace, both WS2811 and WS2812, needs pretty strict timing in order to address them. There are libraries out there which mean almost no work on your part, but that’s no fun. [Elia] started looking into what it takes to drive the hardware, trying out a few 8-bit micros before moving to 32-bit with the help of an STM32VL Discovery Board. The move to a beefier processor brings a lot of speed, but why bit bang everything? He came up with a way to use the PWM and DMA features of the chip to drive the LEDs.

DMA is the Direct Memory Access unit that allows you to change the values being sent to the pixel without interrupting the processor. This is done by pre-loading the data at a memory location. This buffer is automatically read by the DMA unit — its values are used to set the PWM timer compare trigger in order to send out logic values show in the diagram above.

If you do want to delve further into this topic here’s a collection of techniques for driving the WS2811.

Continue reading “Using DMA To Drive WS2812 LED Pixels”

Monitor GitHub Activity With An RGB LED Matrix

tim-display

Ever wonder who is forking your code? [Jack] did, so he built a real time GitHub activity display for his company’s repositories. The display is based a Wyolum The Intelligent Matrix (TiM) board. The TiM is an 8 x 16 matrix of the ubiquitous WS2811/Smart Pixel/NeoPixel RGB LEDs with built-in controller. We’re seeing more and more of these serial LEDs as they drop in price. Solder jumpers allow the TiM to be used as 8 parallel rows of LEDs (for higher refresh rates), or connected into one long serial chain.

[Jack] wasn’t worried about speed, so he configured his board into a single serial string of LEDs. An Arduino drives the entire matrix with a single pin. Rather than reinvent the wheel, [Jack] used Adafruit’s NeoMatrix library to drive his display. Since the TiM uses the same LEDs as the Adafruit NeoPixel Matrix, the library will work. Chalk up another victory for open source hardware and software!

An Electric Imp retrieves Github data via WiFi and passes it on to the Arduino. This is a good use of a microcontroller such as the AVR on the Arduino. [Jack’s] display has a scrolling username. Every step in the scroll animation requires all the pixel data be clocked out to the TiM board. The Arduino can handle this while the IMP takes care of higher level duties.

Continue reading “Monitor GitHub Activity With An RGB LED Matrix”

The RedBull Creation Contest Begins!

http://www.youtube.com/watch?v=D9WPZjcEOdI

The RedBull Creation contest begins today.

Last year, we had a ton of fun competing in the RedBull creation contest. The idea is that RedBull hosts this big contest where teams compete by making awesome stuff. Finalists get to take a trip to Brooklyn for a build off extravaganza. Frankly, we think this is how ALL advertising budgets should be spent.

This year, however, we will not be participating as a team in the contest. We’ll be helping judge it!

The hardware:

In previous years, RedBull has sent out some custom hardware for people to use. Last year it was basically an Arduino on a custom PCB with some cool touch sensors. This year, they’ve sent out this multi purpose LED controller shield that looks pretty impressive.

You can see all the details along with a breakdown of the board from the creator himself, after the break.

Continue reading “The RedBull Creation Contest Begins!”

A Blinky Fedora To Ring In The New Year

[Garrett Mace] decided to dress festive for New Year’s Eve. What he came up with is a fedora ringed in LEDs that react to music. The hardware uses 5050 LEDs on strips. Three of them encircle the head-gear providing a total of 114 RGB pixels. Each is a WS2811 module — a part which we’re seeing more and more of lately.

The video clip after the break starts off with a few minutes of demonstration. [Garrett] managed to code all kinds of animations for the hardware including several different styles of color sweeps and fades. You may start to think that the three bands always display the same patterns but keep watching and you’ll see a sparkle pattern that proves each dot can be addressed individually.

About 2:20 seconds into the video [Garrett] explains how he pulled it off and shows off the driver hardware. The strips are glued to a band of webbing that slides over the hat. The wires that drive the lights were fed through the center of some paracord and connect to an Arduino housed in a 3D printed case. Power is provided by a portable USB battery with a ShiftBrite shield and an MSGEQ7 chip complete the parts list.

Continue reading “A Blinky Fedora To Ring In The New Year”