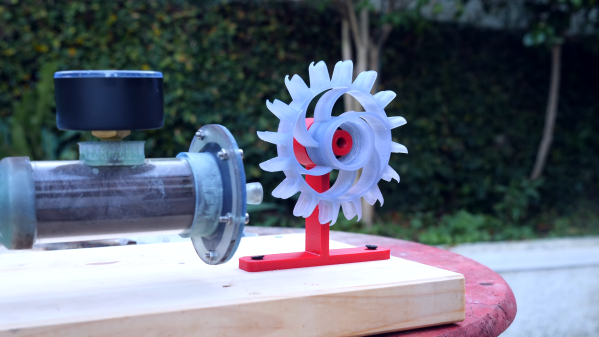
Plasma Discharges Show You Where The Radiation Is

Depending on the context of the situation, the staccato clicks or chirps of a Geiger counter can be either comforting or alarming. But each pip is only an abstraction, an aural indication of when a particle or ray of ionizing radiation passed through a detector. Knowing where that happened might be important, too, under the right circumstances.

While this plasma radiation detector is designed more as a demonstration, it does a pretty good job at localizing where ionization events are happening. Designed and built by [Jay Bowles], the detector is actually pretty simple. Since [Jay] is the type of fellow with plenty of spare high-voltage power supplies lying around, he took a 6 kV flyback supply from an old build and used it here. The detector consists of a steel disk underneath a network of fine wires. Perched atop a frame of acrylic and powered by a 9 V battery, the circuit puts high-voltage across the plate and the wires. After a substantial amount of tweaking, [Jay] got it adjusted so that passing alpha particles from a sample of americium-241 left an ionization trail between the conductors, leading to a miniature lightning bolt.

In the video below, the detector sounds very similar to a Geiger counter, but with the added benefit of a built-in light show. We like the way it looks and works, although we’d perhaps advise a little more caution to anyone disassembling a smoke detector. Especially if you’re taking apart Soviet-era smoke alarms — you might get more than you bargained for.

Continue reading “Plasma Discharges Show You Where The Radiation Is”

Paul Taylor Opened The Lines Of Telecommunication For The Hearing-Impaired

These days, nearly everyone communicates through some kind of keyboard, whether they are texting, emailing, or posting on various internet discussion forums. Talking over the phone is almost outmoded at this point. But only a few decades ago, the telephone was king of real-time communication. It was and still is a great invention, but unfortunately the technology left the hearing and speaking-impaired communities on an island of silence.

Paul and an early TDD. Image via Rochester Institute of Technology

Engineer and professor Paul Taylor was born deaf in 1939, long before cochlear implants or the existence of laws that called for testing and early identification of hearing impairment in infants. At the age of three, his mother sent him by train to St. Louis to live at a boarding school called the Central Institute for the Deaf (CID).

Here, he was outfitted with a primitive hearing aid and learned to read lips, speak, and use American sign language. At the time, this was the standard plan for deaf and hearing-impaired children — to attend such a school for a decade or so and graduate with the social and academic tools they needed to succeed in public high schools and universities.

After college, Paul became an engineer and in his free time, a champion for the deaf community. He was a pioneer of Telecommunications Devices for the Deaf, better known as TDD or TTY equipment in the US. Later in life, he helped write legislation that became part of the 1990 Americans with Disabilities Act.

Paul was diagnosed with Alzheimer’s in 2017 and died in January of 2021 at the age of 81. He always believed that the more access a deaf person had to technology, the better their life would be, and spent much of his life trying to use technology to improve the deaf experience.

Continue reading “Paul Taylor Opened The Lines Of Telecommunication For The Hearing-Impaired”

Useful Build Tips For Making LED Panel Frames

[NotLikeALeafOnTheWind] has created many LED-based display projects, and shares his method for making attractive LED panel frames and mounts. At first glance it may look as though slapping a rectangle of aluminum extrusion around a display is all it takes, there is also the mounting and management of wiring, power supply, and possibly a Raspberry Pi to deal with. The process of building an attractive frame also has a few hidden gotchas that can be avoided with a bit of careful planning.

Magnetic feet on the LED panels makes mounting much easier and more flexible.

Here is one tip that will resonate with some readers: don’t rely on specified dimensions of parts; measure the actual parts yourself. There can be small differences between what a data sheet says to expect, and the dimensions of the actual part in one’s hands. It may not be much, but it can be the difference between an ideal fit, and something that looks like a bit of a hack job.

[NotLikeALeafOnTheWind] provides some basic frame layouts, and suggests using two- or three-channel extrusions to provide a flat bezel around the display edge if desired. Mounting the LED panel itself is done with magnetic feet and providing a length of steel bar to which the display can attach. This can provide a flush mount while avoiding the whole issue of screw-mounting the display panels themselves, or sliding them into channels. For mounting all the other hardware, a piece of DIN rail and some 3D-printed parts takes care of that.

The result looks slick and sturdy, and some of the tips are sure to be useful even if the whole process isn’t applied. We like the way the basic design scales and is flexible about the thickness and size of the LED panels themselves, making it a promising way to accommodate perfectly functional oddball panels that end up in the trash.

Hands On With The Ortur Laser Cutter

I couldn’t write very much without a computer. Early in my career, I wrote with a typewriter. Unless you are pretty close to perfect — I’m not — it is very frustrating to make edits on typewritten stuff. The equivalent in the real world, for me, has been 3D printers and CNC machines. I can visualize a lot of things that I’m not careful enough to build with normal tools. Despite my 7th-grade shop teacher’s best efforts, everything I did turned out to be a toothpick or a number 7. But I can get my ideas into CAD and from there the machines do the rest. That’s why I was excited to get a laser cutter this past Christmas. You might wonder why I’d need a laser cutter if I have the other tools. Then again, if you read Hackaday, you probably don’t need me to explain why you need a new gadget. I’ve had my eye on a laser for a good long time, but recent developments made it more attractive. I thought I’d share with you some of what I’ve found getting started with the Ortur laser cutter. The cutter is easy to put together and costs somewhere in the $200-$400 range depending on what you get with it. I thought I’d take some time to share what I’ve learned about it.

Why a Laser?

If you haven’t had experience with a laser cutter or engraver before, you might think it is a very specific instrument. Sure, the Ortur is good at engraving some things (but not all things). It can cut some things, too, but not as many things as a big serious laser cutter. However, creative people find lots of ways to use cutting and engraving to produce things you might not expect.

Continue reading “Hands On With The Ortur Laser Cutter”

Lighted Raspberry Pico Stream Deck Is Easy As Pi

Whether it’s for work, school, fun, or profit, nearly everyone is a content-creating video producer these days. And while OBS has made it easier to run the show, commanding OBS itself takes some hotkey finesse. Fortunately, it just keeps getting easier to build macro keyboards that make presenting a breeze. That includes the newest player to the microcontroller game — the Raspberry Pi Pico, which [pete_codes] used to whip up a nice looking OBS stream deck.

Sometimes you just need something that works without a lot of fuss — you can always save the fuss for version two. [pete_codes]’ Pico Producer takes advantage of all those I/O pins on the Pico and doesn’t use a matrix, though that is subject to change in the future. [pete_codes] likes the simplicity of this design and we do, too. You can see it in action after the break.

In reply to the Twitter thread, someone mentions re-legendable keycaps instead of the current 3D-printed-with-stickers keycaps, but laments the lack of them online. All we can offer is that re-legendable Cherry MX-compatible keycaps are definitely out there. Maybe not in white, but they’re out there.

If [pete_codes] wants to go wild in version two and make this macro keeb control much more than just OBS, he may want to leave the labeling to something dynamic, like an e-ink screen.

Continue reading “Lighted Raspberry Pico Stream Deck Is Easy As Pi”

Pelton Turbine Development For An Air Powered Model Helicopter

[Tom Stanton] has been messing around with compressed air power for a few years now, and most of his work focused on piston engines. He likes using 2-liter soda bottles as lightweight tanks but their capacity is limited, so the nozzle can be a maximum of 1 mm in diameter if he wants to produce thrust for 30 seconds or longer using a turbine. Pelton turbines have been in use for a long time, especially for hydroelectric systems, and they use small diameter nozzles, so he decided to experiment with a pneumatic Pelton turbine. (Video, embedded below.)

Pelton wheels are water wheels with specially designed buckets to efficiently extract energy from a high-velocity jet of water. [Tom] 3D printed several geared Pelton turbines and started doing bench tests with a propeller and a load cell to gather empirical data. With the help of high-speed video of the tests, he quickly realized that the turbine efficiency is highly dependent on the load. If the load is too small or too large, the moving air will not come to a complete standstill, and energy will be wasted. [Tom] also suspected that some moving air was escaping from the bucket, so he created a version that enclosed the buckets with a ring on the outer perimeter, which increased the peak thrust output by 65%. Compared to his diaphragm air engine design, the peak thrust is higher, but the overall efficiency is less. [Tom] believes there is still room for improvement, so he plans to continue working on the Pelton turbine concept, with the hopes of building an air-powered model helicopter that can lift off. Continue reading “Pelton Turbine Development For An Air Powered Model Helicopter”

LED Spectrum Visualizer Driven By Raspberry Pi

Back in the 1980s, spectrum displays on audio equipment were absolutely must have, and the aesthetic came to define the era. This lingered on through the 1990s, and remains a cool look even to this day. [Arduino Guy] decided to put together such a display using a Raspberry Pi and a large LED display.

The LED display in question is of the 64×64 RGB type, available from Aliexpress and other electronics suppliers online. To run the display, an Adafruit RGB Matrix Hat is used with the Raspberry Pi 3B, which makes driving the panel a cinch. The visual effect is run via a Python script, which plays a wave file and produces the spectrum graphics via a Fast Fourier Transform.

While the code isn’t able to act as a general-purpose equalizer display for any content played on the Raspberry Pi, creating such a script could be an entertaining exercise for the reader. Alternatively, the Pi could be hooked up to a microphone to run the display based on ambient room noise. In any case, we’ve seen great projects like this before, such as this laser-based display. Video after the break.

Continue reading “LED Spectrum Visualizer Driven By Raspberry Pi”