How Additional Aerodynamic Drag Helped Make GTA III Work On PS2

The PlayStation 2 was a revelation when it hit the market in 2000, and yet by modern standards, it’s almost hopelessly weak. In fact, it’s so under-powered, Rockstar developers had to pull every trick in the book to make Grand Theft Auto III even work on the platform.

The story comes to us from developer [Obbe Vermeij]. He explains that the PlayStation 2 couldn’t keep the entire open-world game map in its tiny 32 MB of RAM. Instead, models had to be streamed from the DVD drive as the player moved around the world. However, even the DVD drive wasn’t fast enough. If the player moved too quickly, they would outpace the system’s ability to load new assets, and the world would fall apart. Roads would vanish, buildings simply wouldn’t appear before the player passed by them.

According to [Obbe], getting around this challenge was the job of one [Adam Fowler]. He notes that even optimizing the layout of data on the DVD wasn’t enough to help. Nifty hacks had to be employed to slow the player down. Road networks were changed to stop the player speeding towards areas that needed lots of new models. In other areas, vehicles in the game would experience a nearly-imperceptible 5% increase in air drag to dull their speed. This was chosen as a more invisible solution; cutting engine power directly was audible to players as the audio changed.

It shows you just how hard developers had to work back when resources were far more constrained than they are today!

The Apple They Should Have Made, But Didn’t

Whenever there is a large manufacturer of a popular product in the tech space, they always attract tales of near-mythical prototypes which would have changed everything on the spot had they just not been cancelled by the bean counters. The Sony-Nintendo PlayStation prototypes for example, or any of a number of machines inexplicably axed by Commodore.

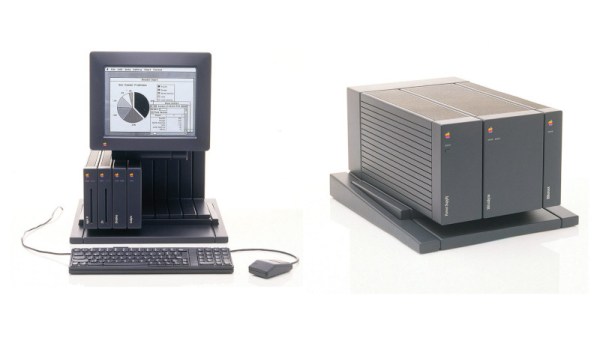
Apple is no exception. They brought the instantly forgettable twentieth anniversary Mac and the pretty but impractical G4 Cube to market, but somehow they rejected the Jonathan, a razor-sharp modular machine from the mid-1980s.

It’s easy after so long associating Apple with the Mac to forget that in the mid-80s it was simply one of their several computer lines, and not the most successful one at that. The 16-bit machine was something of a slimmed-down evolution of the Lisa, and it thus it doesn’t necessarily follow that every other Apple machine of the day also had to be a Mac. Into this would have come the Jonathan, a high-end modular machine bridging the gap between domestic and business computing, with a standard bus allowing processor modules for different operating systems, and upgrades with standard “books”, hardware modules containing peripherals, not all of which would have come from Apple themselves. It would have been Apple’s first 32-bit machine, but sadly it proved too adventurous for their management, who feared that it might tempt Apple users into the world of DOS rather than the other way round.

What strikes us about the Johnathan is how out of place it looks on a 1980s desk, it would be the mid-1990s before we would come close to having machines with these capabilities, and indeed we’ve never seen anything quite as adventurous hardware-wise. It’s certainly not the only might-have been story we’ve seen though.

6502 Hacking Hack Chat

Join us on Wednesday, April 3rd at noon Pacific for the 6502 Hacking Hack Chat with Anders Nielsen!

Back in the early days of the personal computing revolution, you could have any chip you wanted…as long as it was 8-bits. We’ve come a long way since then, and while nobody seriously hopes for a wholesale return to the time when a Commodore 64 or Apple II was the home computing power play, there’s still a lot to be said for the seat-of-the-pants feeling of the day. Our engineering forebears had their work cut out for them, and building the home PC revolution from the ground up with microprocessors that by today’s standards were laughably limited is something worth celebrating.

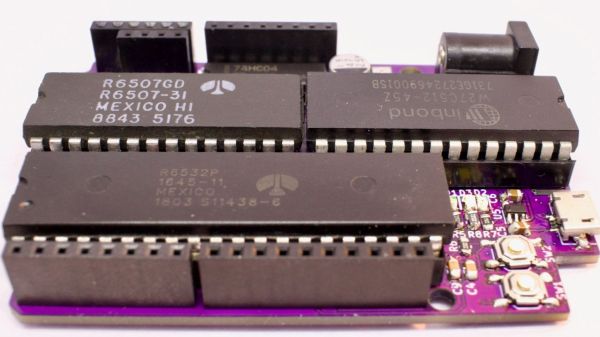
join-hack-chatEvery retrocomputing enthusiast has their own favorite chip, and for Anders, it’s obviously the 6502 — enough to give birth to his 65uino project, which put the storied microprocessor at the heart of an Arduino pin-compatible microcontroller. It’s a neat project that seems to have caught a lot of people’s imaginations and opened up a world of hardware and software hacks that modern hardware just doesn’t need.

Getting closer to the silicon is the goal of retrocomputing, and Anders is making it easy to get involved. And we’re lucky enough to have him stop by the Hack Chat to talk all about teaching the 6502 some 21st-century tricks. Stop by and join in the discussion, and maybe you’ll catch the 8-bit bug too.

Our Hack Chats are live community events in the Hackaday.io Hack Chat group messaging. This week we’ll be sitting down on Wednesday, April 3 at 12:00 PM Pacific time. If time zones have you tied up, we have a handy time zone converter.

Drop-In Switch Mode Regulators

Perhaps the simplest way to regulate a DC voltage is using a voltage divider and/or an active device like a Zener diode. Besides simplicity, they have the additional advantage of not being particularly noisy, but with a major caveat: they are terribly inefficient. To solve this problem a switching regulator can be used instead, but that generally increases complexity and noise. With careful design, though, a switching regulator can be constructed to almost completely replicate a linear regulator like this drop-in TO3 replacement. (Google Translate from German)

While the replacement regulator was built by [Mr. Floppy], the units are being put to the test in the linked video below by [root42]. The major problem these solve compared to other switching regulators is the suppression of ripple, which is a high-frequency artifact that appears on the DC voltage. Reducing ripple in this situation involved designing low-inductance circuit traces on the PCB as well as implementing a number of EMI filters on both input and output. The final result is an efficient voltage supply for retrocomputers which has a ripple lower than their oscilloscopes can measure without special tools.

[root42] is not only testing these, but the linked video also has him using the modules to repair a Commodore 1541 which originally had the linear TO3 voltage regulators. It’s definitely a non-trivial task to build a switching power supply that meets the requirements of sensitive electronics like these. Switch mode power supplies aren’t new ideas, either, and surprisingly pre-date the first commercially-available transistor although modern ones like these are much less expensive to build.

Continue reading “Drop-In Switch Mode Regulators”

Documenting Real Hidden Messages In Music

During the 1980s, a moral panic swept across the landscape with the mistaken belief that there were Satanic messages hidden in various games, books, and music that at any moment would corrupt the youth of the era and destroy society as we knew it. While completely unfounded, it turns out that there actually were some hidden messages in vinyl records of the time although they’d corrupt children in a different way, largely by getting them interested in computer science. [Dandu] has taken to collecting these historic artifacts, preserving the music and the software on various hidden recordings.

While it was possible to record only programs or other data to vinyl, much in the same way that cassette tapes can be used as a storage medium, [Dandu]’s research focuses mostly on records, tapes, and CDs which had data included alongside music. This includes not only messages or images, but often entire computer programs. In some cases these programs were meant to be used with the accompanying music, as was the case for The Other Side Of Heaven by Kissing The Pink with a program for the BBC Micro. Plenty of other contemporary machines are represented here too including the ZX Spectrum, Atari, Apple II, and the Commodore 64. The documentation extends through the CD era and even into modern music platforms like Spotify and Apple Music.

The process of extraction and recovery is detailed for each discovery, making it a comprehensive resource for retro computing enthusiasts stretching from the 80s to now. There are likely a few hidden pieces of data out there hidden in various antique storage media that [Dandu] hasn’t found yet, either. You could even make your own records with hidden programs provided you have some musical and programming talents, and a laser engraver for the record itself.

Large Language Model Can Help You Develop For The Amiga

Developing for the Amiga used to involve reading dense programming manuals and trial and error. In contrast, developing these days can be as simple as barking orders at ChatGPT to spit you out some Python code. However, that technique doesn’t work so well for Amiga languages, as ChatGPT hasn’t read much about the now-ancient platform. However, as covered by AmigaNews, there is now a ChatGPT model trained specifically on Amiga development. Enter Amiga Guru.

The work of [Cameron Armstrong], Amiga Guru was built after his early experiments with ChatGPT spat out non-functional gibberish when Amiga-compatible code was requested. The model has been trained on a corpus of official Amiga programming manuals, third-party books, and even the documentation for AmigaOS 3.2 and 4.1.

Using the model yourself requires a subscription to ChatGPT Plus, which prevents this writer from testing it directly. However, it makes sense that having been directly trained on Amiga manuals, it would be more capable at answering Amiga programming queries than conventional ChatGPT 4.

It’s easy to see the value of such a system. Learning to program for older platforms can be hard, with less resources available for new learners. Having an AI to help could be useful for some eager to develop for the 68K-based machine.

If you’d like to try Amiga Guru, you can access it via this link. Be sure to let us know how you go, and whether you think it has any value for speeding up your own Amiga development. Otherwise, if you’ve been doing anything else nifty with the platform that Commodore bought and paid for, don’t hesitate to let us know!

[Thanks to Stephen Waters for the tip!]

render of the Amiga juggler demo

The Juggler: In Rust

Back on the theme of learning to program by taking on a meaningful project — we have another raytracing demo — this time using Rust on the Raspberry Pi. [Unfastener] saw our previous article about writing a simple raytracer in spectrum BASIC and got inspired to try something similar. The plan was to recreate the famous juggler 3D demo, from the early days of 3D rendering on the Amiga.

The juggler story starts with an Amiga programmer called [Eric Graham] who created ssg, the first ray tracer application on a personal computer. A demo was shown to Commodore, who didn’t believe it was done on their platform, but a quick follow-up with the actual software used soon quelled their doubts. Once convinced, they purchased the rights to the demo for a couple of thousand dollars (in 1986 money, mind you) to use in promotional materials. [Eric] developed ssg into the popular Sculpt 3D, which became available also on Mac and Windows platforms, and kick-started a whole industry of personal 3D modelling and ray tracing.

Anyway, back to the point. [Unfastener] needed to get up the considerable Rust learning curve, and the best way to do that is to let someone else take care of some of the awkward details of dealing with GUI, and just concentrate on the application. To that end, they use the softbuffer and winit Rust crates that deal with the (important, yet frankly uninteresting) details of building frame buffers and pushing the pixels out to the window manager in a cross-platform way. Vecmath takes care of — you guessed it — the vector math. There’s no point reinventing that wheel either. Whilst [Unfastener] mentions the original Amiga demo took about an hour per frame to render, this implementation runs in real-time. To that end, the code performs a timed pre-render to determine the most acceptable resolution to get an acceptable frame rate, achieving a respectable 30 or so frames per second on a Pi 5, with the older Pis needing to drop the resolution a little. This goes to show how efficient Rust code can be and, how capable the new Pi is. How far we have come.

We saw another interesting rust-based raytracer a while back, which is kinda fun. We’ve also covered rust in other applications a few times, like inside the Linux kernel. Finally here’s our guide to getting started with rust, in case you need any more motivation to have a crack at this upcoming language.