Photo of 3D Tetris LED matrix

From Retro To Radiant: 3D Tetris On A LED Matrix

We love seeing retro games evolve into new, unexpected dimensions. Enter [Markus]’ adaptation of 3D Tetris on a custom-built 3x3x12 RGB LED matrix. Developed as a university project, this open-source setup combines coding, soldering, and 3D printing. It’s powered by an ESP32 microcontroller with gameplay controlled by a neat web interface.

This 3D build makes the classic game so much harder to play, that one could argue whether it’s still a game, or has turned into a form of art. Although it is challenging to rotate and drop blocks on such a small scale, for die-hard Tetris fans (and we know you’re out there), there is always someone up to become best at it. Just look at the FastLED-powered light show, the responsive web-based GUI, and fully modular 3D printed housing, this project is a joy to look at even when nobody is playing it. Heck, a game that turned 40 only a year ago should be so mature to entertain itself, shouldn’t it?

From homemade Pong tables to LED cube displays, hobbyists keep finding ways to give classic games a futuristic twist. Projects like this are about pushing boundaries. Hackaday’s archives are full of similar innovations, but why not craft some new ones?

Continue reading “From Retro To Radiant: 3D Tetris On A LED Matrix”

A Quarter And A Dime Will Get You A Commodore 64 Softmodem

Back in the 1980s, a viable modem cost hundreds of dollars. Even in the 1990s, you were looking at spending a a Benjamin or two to get computer squawking down the phone lines. According to [Cameron Kaiser], though, it’s possible to whip up a softmodem using a Commodore 64 for much cheaper than that. How much? Just 35 cents, we’re told!

The inspiration was simple—Rockwell apparently used to build modems using the 6502. The Commodore 64 has a 6502 inside, pretty much, so surely it could be a softmodem, right? Indeed, one [John Iannetta] had done this in a one-way form in the 1980s, using the Commodore 64’s SID audio chip to output data in sound form. In 1998, he espoused the 35-cent modem—basically, the price of buying an RCA jack to hook up a phone line to your Commodore 64.

As [Cameron] found out, the concept still works today, as does [John’s] code, but it’s more like 68 cents in 2025 dollars. With the right bits and pieces, and a little code, you can have your C64 modulating data into sound at rates of 300 baud.

It’s hacky, slow, and there’s no real way to receive—the C64 just doesn’t have the chops to demodulate these kinds of signals on its own. You also shouldn’t use it on a real phone line if you don’t want to damage your C64. Still, it’s a wonderful bit of hackery, and it’s fun to see how well it works. We’ve seen some other great Commodore 64 modem projects before, like the ever-useful RetroModem. Meanwhile, if you’ve got your own communication hacks for the computers of yesteryear, don’t hesitate to let us know!

Bambu Lab Tries To Clarify Its New “Beta” Authentication Scheme

Perhaps one of the most fascinating aspects of any developing tech scandal is the way that the target company handles criticism and feedback from the community. After announcing a new authentication scheme for cloud & LAN-based operations a few days ago, Bambu Lab today posted an update that’s supposed to address said criticism and feedback. This follows the original announcement which had the 3D printer community up in arms, and quickly saw the new tool that’s supposed to provide safe and secure communications with Bambu Lab printers ripped apart to extract the security certificate and private key.

In the new blog post, the Bambu Lab spokesperson takes a few paragraphs to get to the points which the community are most concerned about, which is interoperability between tools like OrcaSlicer and Bambu Lab printers. The above graphic is what they envision it will look like, with purportedly OrcaSlicer getting a network plugin that should provide direct access, but so far the Bambu Connect app remains required. It’s also noted that this new firmware is ‘just Beta firmware’.

As the flaming wreck that’s Bambu Lab’s PR efforts keeps hurtling down the highway of public opinion, we’d be remiss to not point out that with the security certificate and private key being easily obtainable from the Bambu Connect Electron app, there is absolutely no point to any of what Bambu Lab is doing.

3D-Printed RC Car Focuses On Performance Fundamentals

There are a huge number of manufacturers building awesome radio-controlled cars these days. However, sometimes you just have to go your own way. That’s what [snamle] did with this awesome 3D-printed RC car—and the results are impressive.

This build didn’t just aim to build something that looked vaguely car-like and whizzed around on the ground. Instead, it was intended to give [snamle] the opporunity to explore the world of vehicle dynamics—learning about weight distribution, suspension geometry, and so many other factors—and how these all feed into the handling of a vehicle. The RC side of things is all pretty straightforward—transmitter, receiver, servos, motors, and a differential were all off-the-shelf. But the chassis design, the steering, and suspension are all bespoke—designed by [snamle] to create a car with good on-road handling and grip.

It’s a small scale testbed, to be sure. Regardless, there’s no better way to learn about how a vehicle works on a real, physical level—you can’t beat building one with your own two hands and figuring out how it works.

It’s true, we see a lot of 3D printed RC cars around these parts. Many are built with an eye to robotics experimentation or simply as a learning exercise. This one stands out for its focus on handling and performance, and of course that nicely-designed suspension system. Video after the break.

Continue reading “3D-Printed RC Car Focuses On Performance Fundamentals”

Smallest USB Device… So Far

For better or worse it seems to be human nature to compete with one another, as individuals or teams, rather than experience contentedness while moving to the woods and admiring nature Thoreau-style. On the plus side, competition often results in benefits for all of us, driving down costs for everything from agriculture to medical care to technology. Although perhaps a niche area of competition, the realm of “smallest USB device” seems to have a new champion: this PCB built by [Emma] that’s barely larger than the USB connector pads themselves.

With one side hosting the pads to make contact with a standard USB type-A connector, the other side’s real estate is taken up by a tiny STM32 microcontroller, four phototransistors that can arm or disarm the microcontroller, and a tiny voltage regulator that drops the 5V provided by the USB port to the 3.3V the STM32 needs to operate. This is an impressive amount of computing power for less than three millimeters of vertical space, and can operate as a HID device with a wide variety of possible use cases.

Perhaps the most obvious thing to do with a device like this would be to build a more stealthy version of this handy tool to manage micromanagers, but there are certainly other tasks that a tiny HID can be put to use towards. And, as far as the smallest USB device competition goes, we’d also note that USB-A is not the smallest connector available and, therefore, the competition still has some potential if someone can figure out how to do something similar with an even smaller USB connector.

Thanks to [JohnU] for the tip!

Modulathe Is CNC Ready And Will Machine What You Want

Once upon a time, lathes were big heavy machines driven by massive AC motors, hewn out of cast iron and sheer will. Today, we have machine tools of all shapes and sizes, many of which are compact and tidy DIY creations. [Maxim Kachurovskiy]’s Modulathe fits the latter description nicely.

The concept behind the project was simple—this was to be a modular, digital lathe that was open-source and readily buildable on a DIY level, without sacrificing usability. To that end, Modulathe is kitted out to process metal, wooden, and plastic parts, so you can fabricate in whatever material is most appropriate for your needs.

It features a 125 mm chuck and an MT5 spindle, and relies on 15 mm linear rails, 12 mm ball screws, and NEMA23 stepper motors. Because its modular, much of the rest of the design is up to you. You can set it up with pretty much any practical bed length—just choose the right ball screw and rail to achieve it. It’s also set up to work however you like—you can manually operate it, or use it for CNC machining tasks instead.

If you want a small lathe that’s customizable and CNC-ready, this might be the project you’re looking for. We’ve featured some other similar projects in this space, too. Do your research, and explore! If you come up with new grand machine tools of your own design, don’t hesitate to let us know!

Thanks to [mip] for the tip!

Illustrated Kristina with an IBM Model M keyboard floating between her hands.

Keebin’ With Kristina: The One With The Hardware-Layered Keyboard

You know (or maybe you didn’t), I get super excited when y’all use the links at the bottom of this round-up we call Keebin’ to communicate with your old pal Kristina about your various labors of love. So just remember that.

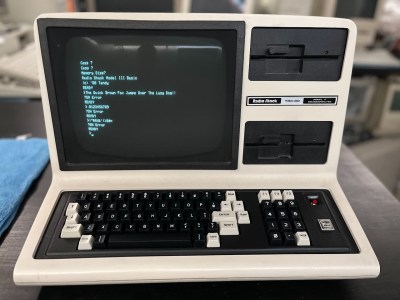
Case in point: I was typing up this very issue when I heard from [Jay Crutti] and [Marcel Erz]. Both are out there making replacement keyboards for TRS-80s — [Jay] for Models 3 and 4, and [Marcel] for the Model 1. Oooh, I said to myself. This is going at the top.

A TRS-80 Model 4 with a replacement keyboard.
A TRS-80 Model 4. Image by [Jay Crutti] via JayCrutti.com
Relevant tangent time: I remember in the 90s having a pile of computers in my parents’ basement of various vintages, a TRS-80 Model 2 among them. (Did I ever tell you about the time I got pulled over for speeding with a bunch of different computers in the backseat? I was like no, officer, first of all, those are old machines that no one would really want, and I swear I didn’t steal them.)

I think the TRS-80 is probably the one I miss the most. If I still had it, you can bet I would be using [Jay] and [Marcel]’s work to build my own replacement keyboard, which the 40-year-old machine would likely need at this point if the Model 4 is any indication with its failing keyboard contacts.

To create the replacements, [Jay] used Keyboard Layout Editor (KLE), Plate & Case Builder, and EasyEDA. Using the schematic from the maintenance manual, he matched the row/column wiring of the original matrix with Cherry MX footprints. Be sure to check out [Jay]’s site for a link to the project files, or to purchase parts or an assembled keyboard. On the hunt for TRS-80 parts in general? Look no further than [Marcel]’s site.
Continue reading “Keebin’ With Kristina: The One With The Hardware-Layered Keyboard”