This OSHW Trackball Is Ready To Be Customized

Oh sure, Amazon can deliver any number of Logitech peripherals to your door in 48 hours, but where’s the fun in that? With open source hardware (OSHW) input devices like the Ploopy Adept Trackball, you not only get to say you built the thing yourself, but there’s also an opportunity to tune the gadget to your exacting specifications — even if that just means packing it full of RGB LEDs.

The trackball is powered by the Raspberry Pi Pico running QMK, features a high-accuracy PMW3360 sensor that can be found in commercial gaming mice, and uses a snooker ball for the business end. All the hardware is wrapped up in a 3D printed enclosure, and thanks to the VIA project, configuring the device can be done right in the browser through a web app.

Like the other devices in the (somewhat unfortunately named) Ploopy family, all of the design files for the Adept Trackball are released under the CERN license, which combined with the project’s fantastic documentation means you’ve got everything you need to build it from scratch. There are official parts kits if you don’t want to source or print all the components yourself, but as of this writing, the Ploopy Shop will only let you preorder them.

Picture of a DualShock 4 controller PCB, with two joysticks on the sides

Challenging A Broken DualShock 4 Controller To A Duel

A broken PlayStation controller would normally be a bummer, and if the issue is losing calibration that’s stored in a non-documented format, you might as well bin it. For [Al] of [Al’s blog], however, it’s a challenge, turning into a four-part story – so far. The first installment was published January 1st this year, and seeing the pure enthusiasm [Al] has reverse-engineering the DualShock 4 controller, you might guess that this is a New Year’s gift from someone who knows [Al] very well. The list of problems with the joystick is numerous, to begin with – it’s easier to list all the things that work properly, and it isn’t many of them. Perhaps, the firmware problem is is the most interesting one to start with. Continue reading “Challenging A Broken DualShock 4 Controller To A Duel”

Garage Door Opener Ejection Seat

[Scott Prints] had a familiar problem. His garage door opener was boring, and rattled around annoyingly in his car’s center console. This was obviously a major issue that needed to be dealt with. His solution was to install an ejector seat. Er, well, an ejector seat button. At least, that’s what it’s labeled. (That’s sure to be a great conversation starter for passengers.)

The end result looks slick and combines several build techniques. He started by taking measurements and 3D-printing a test piece for the center console nook. Turns out, that’s a more complicated shape than it seems. Rather than try to measure the exact angles and radii, Scott turned to the tried-and-true method of fiddling with the parameters and printing a second test. Close enough.

The coolest and most challenging element of the build was engraving and cutting the aluminum plate that forms the visible part of the build. Turns out, the online recommendations for milling aluminum are laughably optimistic when you don’t have an industrial CNC machine. Slower, shallower cuts got the job done, albeit slowly. A red paint-filled marker made the letters pop. The guts of the donor garage door opener are fitted into a 3d-printed shell, and then a Big Red Button threads into the print, holding the whole build together. A bit of solder later, and the project is done. Simple, effective, and very stylish! We approve. Come back after the break for the build video.
Continue reading “Garage Door Opener Ejection Seat”

3D Printing With A Drone Swarm?

Even in technical disciplines such as engineering, there is much we can still learn from nature. After all, the endless experimentation and trials of life give rise to some of the most elegant solutions to problems. With that in mind, a large team of researchers took inspiration from the humble (if rather annoying) wasp, specifically its nest-building skills. The idea was to explore 3D printing of structures without the constraints of a framed machine, by mounting an extruder onto a drone.

As you might expect, one of the most obvious issues with this attempt is the tendency of the drone’s to drift around slightly. The solution the team came up with was to mount the effector onto a delta bot carrier hanging from the bottom of the drone, allowing it to compensate for its measured movement and cancel out the majority of the positional error.

The printing method relies upon the use of two kinds of drone. The first done operates as a scanner, measuring the print surface and any printing already completed. The second drone then approaches and lays down a single layer, before they swap places and repeat until the structure is complete.

Multiple drones can print simultaneously, by flying in formation. Prints were demonstrated using a custom cement-like material, as well as what appeared to be expanding foam, which was impressive feat to say the least.

The goal is to enable the printing of large, complex shaped structures, on any surface, using a swarm of drones, each depositing whatever material is required. It’s a bit like a swarm of wasps building a nest, into whatever little nook they come across, but on the wing.

We’ve been promised 3D printed buildings for some time now, and while we’re not sure this research is going to bring us any closer to living in an extruded house, we’re suckers for a good drone swarm here at Hackaday.

Continue reading “3D Printing With A Drone Swarm?”

Immersive Cursive: Growing Up Loopy

Growing up, ours was a family of handwritten notes for every occasion. The majority were left on the kitchen counter next to the sink, or in a particular spot on the all-purpose table in the breakfast nook. Whether one was professing their familial love and devotion on the back of a Valpak coupon, or simply communicating an intent to be home before dinnertime, the words were generally immortalized in BiC on whatever paper was available, and timestamped for the reader’s information. You may have learned cursive in school, but I was born in it — molded by it. The ascenders and descenders betray you because they belong to me.

Both of my parents always seemed to be incapable of printing in anything other than all caps, so I actually preferred to see their cursive most of the time. As a result, I could copy read it quite easily from an early age. Well, I don’t think I ever had any hope of imitating Dad’s signature. But Mom’s on the other hand — like I said in the first installment, it was important for my signature to be distinct from hers, given that we have the same name — first, middle, and last. But I could probably still bust out her signature if it came down to something going on my permanent record.

While my handwriting was sort of naturally headed towards Mom’s, I was more interested in Dad’s style and that of my older brother. He had small caps handwriting down to an art, and my attempts to copy it have always looked angry and stilted by comparison. In addition, my brother’s cursive is lovely and quick, while still being legible.

Continue reading “Immersive Cursive: Growing Up Loopy”

Small Combat Robots Pack A Punch In Antweight Division

Two robots enter, one robot leaves! Combat robotics are a fantastic showcase of design and skill, but the mechanical contenders don’t have to be big, heavy, and expensive. There is an Antweight division for combat robots in which most contenders weigh a mere 150 grams, and [Harry Makes Things] shows off four participants for Antweight World Series (AWS) 64.

Clockwise: ReLoader, Shakma, Sad Ken, and HobGoblet antweight combat robots.

Each of them have very different designs, and there are plenty of photos as well as insightful details about what was done and how well it worked. That’s exactly the kind of detail we love to read about, so huge thanks to [Harry] for sharing!

In combat robotics, contenders generally maneuver their remote-controlled machines to pin or immobilize their opponent. This can happen as a result of damaging them to the point that they stop functioning, but it can also happen by rending them helpless by working some kind of mechanical advantage. Continue reading “Small Combat Robots Pack A Punch In Antweight Division”

Tablet ina 3D printed stand, showing timetables on its screen

Revive Your Old E-Ink Tablet For Timetable Helper Duty

In our drawers, there’s gonna be quite a few old devices that we’ve forgotten about, and perhaps we ought to make them work for us instead. [Jonatron] found a Nook Simple Touch in his drawer – with its E-ink screen, wireless connectivity and a workable Android version, this e-reader from 2011 has the guts for always-on display duty. Sadly, the soft touch covering on the back disintegrated into a sticky mess, as soft touch does, the LiIon battery has gone flat, and the software support’s lackluster. Both of these are likely to happen for a lot of tablets, which is why we’re happy [Jonatron] has shared his story about this e-reader’s revival.

The tablet in question with back cover removed, battery wires connected to a USB cable for power
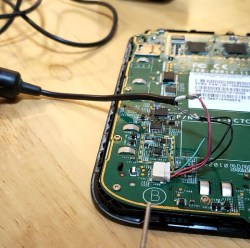
The soft touch layer on the back didn’t go away with help of alcohol, but by sheer luck, an acetone bottle was nearby, and an acetone scrub helped get rid of the unpleasant stickiness. The tablet’s charging circuitry turned out to be unsophisticated – the tablet wouldn’t boot from MicroUSB input, and [Jonathan] wired up 5 volts from a USB cable straight into the battery input. Mind you, this might not be advised, as Lithium-Ion battery range is from 3 volts to 4.2 volts and a regulator would be called for, but [Jonatron] says it’s been working just fine.

Usually, you could just put a webserver on your local network and serve a page with useful information, adding code to refresh the page periodically – but the Nook’s browser didn’t support automatic refreshes. Not to be stopped, [Jonatron] wrote an app for the Nook’s Android install instead; rooting was required but went seamlessly. The Android install is old, and Android Studio for it is no longer downloadable, so he used an older development toolkit somehow still available online. There’s still a small Python-written webserver running on a spare Pi, conditioning the data for the app to fetch. Following best hacker traditions, both the app and the server are open-sourced! With help of a 3D printed stand, this tablet now displays train departure schedules – perfect application for an old e-reader like this.

Got a Nook Simple Touch in a drawer? Now you know you can easily convert it into a hackable E-ink display! We’ve seen numerous tablet restorations before, replacing charger ICs and eMMC drives, turning them into videophones to chat with our relatives and smart home controllers, and there’s even repair databases to help you in your revival efforts. We’ve been getting quite a few projects like these in our last Hackaday Prize installment, Hack It Back, and we hope to see more such rebuilds for our Wildcard round!