This Arduino Isn’t Color Blind

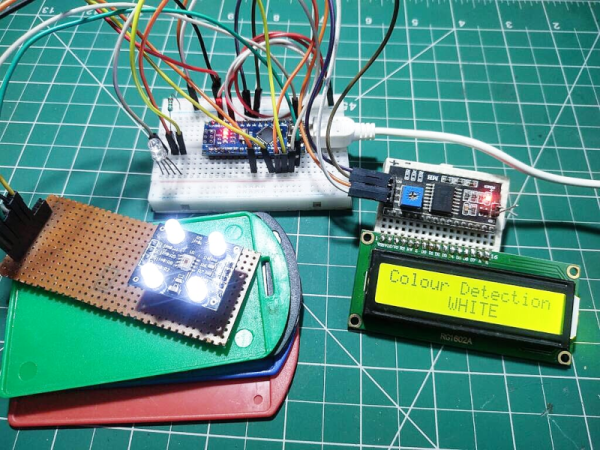
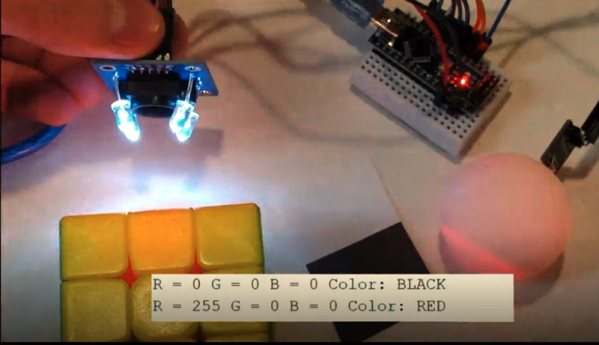
You can sense a lot of things with the right sensor, and [Nikhil Nailwal] is here to show us how to sense colors using a TCS230. The project is a simple demo. It displays the color and lights up an LED to correspond to the detected color.

If you haven’t seen the TCS230 before, it is a chip with an array of photosensors, for different light wavelengths. The controlling chip — an Arduino, in this case — can read the intensity of the selected color.

Continue reading “This Arduino Isn’t Color Blind”

An OSHW IR Remote Control Powered By The ATtiny13A

The new hotness in consumer electronics might be RF remotes based on protocols like Bluetooth Low Energy, but there’s still plenty of life left in the classic infrared remote. Especially with projects like TinyRemoteXL from [Stefan Wagner], which let you build and program an IR “clicker” of your own. Whether you want to spin up your own custom universal remote or create a beefed up version of the TV-B-Gone, this open source effort is a great place to start.

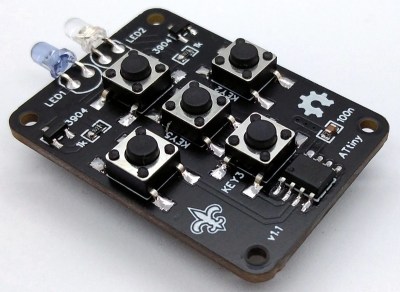
The original TinyRemote.

As you might have guessed from the name, this project is actually a larger version of the TinyRemote that [Stefan] put together previously. The documentation for that project goes a bit more into the nuts and bolts of talking IR, and is definitely worth a read if you’re into the low level stuff. For the original five button TinyRemote, the hardware consists of little more than a ATtiny13A microcontroller, a pair of IR LEDs, and the transistors to drive them.

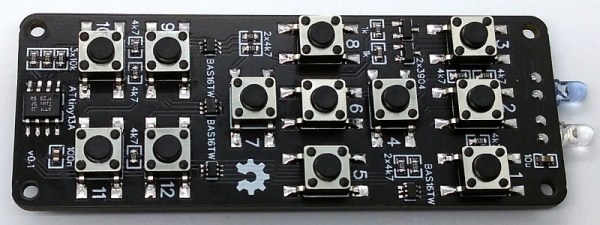
But on the XL, things are a bit trickier as there are now twelve buttons for the ATtiny13A to read. Obviously there aren’t enough pins to read so many buttons directly, but with a combination of BAS16TW diode arrays and resistors, [Stefan] is able to detect what button was pressed using the chip’s interrupt pin and ADC. Certainly a handy trick to have in the back of your mind, and the open source nature of this project gives you a great chance to see how it’s implemented.

Between this project and the impressive development board [Djordje Mandic] released recently, it seems we’re looking at something of an infrared hacking revival. Earlier this year we even saw the commercial release of an IR-equipped ESP8266 board.

Fighting Household Air Pollution

When Kenyan engineer [Aloise] found out about the health risks of household air pollution, they knew there had to be a smart solution to combatting the problem while still providing a reasonable source of energy for families cooking without the luxury of cleaner fuels. Enter OpenHAP, a DIY household air pollution monitor that provides citizen scientists and researches the means to measure air particulates in developing countries.

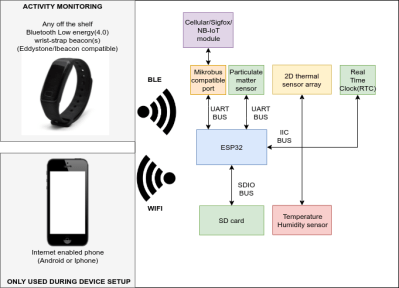
The device is based on an ESP32 communicating with a ZH03B Particulate matter sensor over UART; a DS3231SN real-time clock (RTC), temperature and humidity sensor, and MLX90640 2D thermal sensor array over I2C; and wirelessly sending the data received to a Bluetooth low energy wrist-strap beacon and an Internet enabled phone. The device also uses a TCA9534 GPIO expander to control the visual and auditory notifiers (buzzers and LEDs) and to interface to a SD card.

The project uses the libesphttpd project modified for the ESP32 for the webserver, which is used to stream data to a mobile handset or computer using the WiFi capabilities of the ESP32. The data includes real-time sensor information, system status, storage media status, visualizations of the thermal array sensor data (to ensure the camera is facing the source of heat), and tag information to test the limits of the Bluetooth tag with regards to distance.

Power input is provided through a Micro-USB connector, protected with a TVS diode and a Schottky diode in series to prevent reverse power flow.

The project was tested in two real-life scenarios: one with a household in rural Kenya and another with an urban low-income family of four. In the first test, the family used a three stone open fire stove. A FLiR thermal camera captured the stove temperatures, while a standard camera was enough to capture the high levels of smoke inside the kitchen. The readings from OpenHAP were high enough to exceed the upper detection threshold for the particulate sensor, showing that the woman cooking in the house was receiving the equivalent of 8 cigarettes a day, about 8 x the WHO’s recommended particulate levels.

Within the second household, a typical energy mix of charcoal briquettes and kerosene was typically used for cooking, with kerosene used during the day and briquettes used at night. The results from measuring pollution levels using OpenHAP showed that the mother and child in the household regularly received around 1.5 x the recommended limit of pollutants, enough to lead to slow suffocation.

There’s already immense potential for this project to help researchers test out different energy sources for rural households, not to mention the advantage of having a portable low-energy pollution monitor for citizen scientists.

Continue reading “Fighting Household Air Pollution”

Hackaday Links Column Banner

Hackaday Links: May 19, 2019

Cheap nostalgia, that’s the name of the game. If you can somehow build and ship ‘cheap nostalgia’, you’re going to be raking in the bucks. For the ‘musicians’ in the crowd, the king of cheap nostalgia has something great. Behringer is cloning the Yamaha CS-80. and it was announced at this month’s Superbooth.

The Yamaha CS-80 is the synth in Blade Runner, and since Toto’s Africa is making a comeback on top-40 radio, it’s the instrument of our time. A Wonderful Christmas Time, it seems. Aaaannnyway, yes, there might be a huge and inexpensive version of one of the greatest synthesizers ever made real soon. The cheap 808s and 909s are making their way to stores soon, and the 101 needs a firmware update but you can buy it now. Cheap nostalgia. That’s how you do it.

The PiDP-11/70 is a project we’ve been neglecting for some time, which is an absolute shame. This is a miniature simulation of what is objectively the best-looking minicomputer of all time, the PDP-11/70. This version is smaller, though, and it runs on a Pi with the help of SimH. There are injection molded switches, everything is perfect, and now there are a whole bunch of instructional videos on how to get a PiDP-11/70 up and running. Check it out, you want this kit.

Considering you can put a phone screen in anything, and anyone can make a keyboard, it’s a wonder no one is making real, well-designed palmtop computers anymore. The Vaio P series of PCs would be great with WiFi, Bluetooth, and a slight upgrade in memory and storage. This was [NFM[‘s recent project. This palmtop gets an SSD. The object of modification is a decade-old Sony Vaio CPCP11 palmtop modified with a 256 GB SSD. The Vaio only supports PATA, and the SSD is mSATA, so this is really a project of many weird adapters that also have to be built on flex connectors.

Here’s something for the brain trust in the Hackaday comments. First, take a look at this picture. It’s the inside of a rotary encoder. On the top, you have a Gray code (or what have you) that tracks the absolute position of a shaft. On the bottom, you have some sort of optical detection device with 13 photodiodes (or something) that keeps track of each track in the Gray code. This is then translated to some output, hopefully an I2C bus. What is this device, circled in red? I know what it is — it’s an optical decoder, but that phrase is utterly ungooglable, unmouserable, and undigikeyable. If you were me, what would you use to build your own custom absolute rotary encoder and you only needed the sensor? I technically only need 10 tracks/sensors/resolution of 1024, but really I only need a name.

Lol, someone should apply to Y Combinator and pitch yourself as a B Corp.

Add-Ons Go Electroluminescent

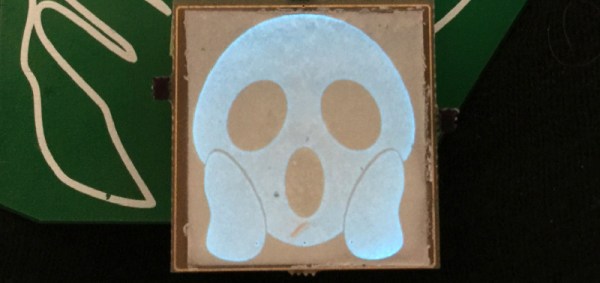
It’s that time of the year again, and once more we’re faced with the latest innovations in Badgelife, the movement to explore the artistic merits of electronics and manufacturing. This is an electroluminescent printed circuit board, and it’s some of the finest work we’ve seen. It’s also a Shitty Add-On that glows blue.

The process for applying an electroluminescent coating to printed circuit boards is, surprisingly, something we’ve covered before. Late last year, [Ben Krasnow] delved deep into a DIY EL display. The process is expensive, but all the products come from a company called Lumilor. The first step in this process is applying a thin conductive coating on a substrate with an airbrush. Since the entire idea of printed circuit boards is to have a layer of conductive material etched into any shape you want, the simple circuit board is the idea experimental platform for playing with EL displays. Traditionally, EL displays were made entirely with a silk screen process, like [Fran]’s ongoing attempt to recreate the Apollo DSKY display.

The electronics for this badge are simply a Microchip MIC4832 EL Driver, which converts the 3.something volts from the add-on header into 100 or so Volts AC at hundreds of Hz. This is a single-chip solution to driving EL displays, and the only other parts you need are an inductor, diode, and a few caps and resistors. An ATtiny85 can be used to blink the circuits, or, alternatively, you could copy [Ben]’s work and build a character EL display.

The process of applying an electroluminescent coating to a PCB does require a spray gun or airbrush, and the chemicals are a bit expensive. This, though, is pushing the boundaries of what can be done with artistic PCBs. It’s new applications of technology, simply as wearable electronics. It’s the best example of the possibilities of the medium and some of the best work that’s come out of the Badgelife scene.

Color Sensor Demystified

When [millerman4487] bought a TCS230-based color sensor, he was expecting a bit more documentation. Since he didn’t get it, he did a little research and some experimentation and wrote it up to help the rest of us.

The TCS3200 uses an 8×8 array of photodiodes. The 64 diodes come in four groups of 16. One group has a blue filter, one has green and the other has a red filter. The final set of diodes has no filter at all. You can select which group of diodes is active at any given time.

Continue reading “Color Sensor Demystified”

Fail Of The Week: EPROMs, Rats’ Nests, Tanning Lamps, And Cardboard On Fire

It all started when I bought a late-1990s synthesizer that needed a firmware upgrade. One could simply pull the ROM chip, ship it off to Yamaha for a free replacement, and swap in the new one — in 2003. Lacking a time machine, a sensible option is to buy a pre-programmed aftermarket EPROM on eBay for $10, and if you just want a single pre-flashed EPROM that’s probably the right way to go. But I wanted an adventure.

Spoiler alert: I did manage to flash a few EPROMs and the RM1X is happily running OS 1.13 and pumping out the jams. That’s not the adventure. The adventure is trying to erase UV-erasable EPROMS.

And that’s how I ended up with a small cardboard fire and a scorched tanning lamp, and why I bought a $5 LED, and why I left EPROMs out in the sun for four days. And why, in the end, I gave up and ordered a $15 EPROM eraser from China. Along the way, I learned a ton about old-school UV-erasable EPROMs, and now I have a stack of obsolete silicon that’s looking for a new project like a hammer looks for a nail — just as soon as that UV eraser arrives in the mail.

Continue reading “Fail Of The Week: EPROMs, Rats’ Nests, Tanning Lamps, And Cardboard On Fire”