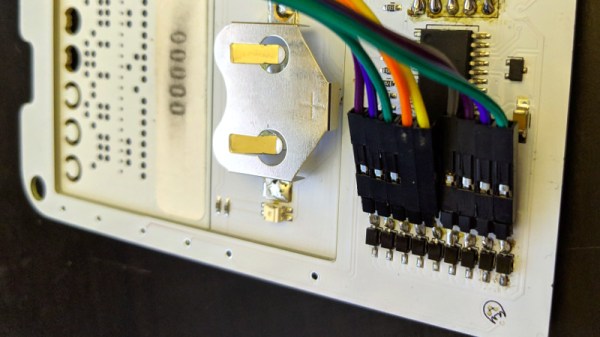
The recent Cyphercon badge featured a very clever integrated paper tape reader, and had the hidden feature of a party mode in which all its lights would flash. When [Gigawatts] discovered this after the conference had ended, it was too late to find the tape to activate it. The solution? Build a tape emulator with a microcontroller hooked into the badge’s tape sensors to send the data directly into it.
It was a Tweet from [AND!XOR] that revealed the flashing hidden mode, and in case you missed it you can find all about the amazing badge in our review. The emulator takes a TI Stellaris LaunchPad LM4F120 and a set of jumper wires soldered directly to the jumper wires on the badge’s reverse. Hex values are created from a tape through an in-browser HTML page with a checkbox interface, a sketch converts the hex to tape, and the badge runs the code. The GitHub readme includes a description of the paper tape format as well as some sample tapes including a badge reset one for when you tire of party mode.
Most of us weren’t lucky enough to make it to Cyphercon and receive a badge. But we’re still impressed by the ingenuity of the badge’s designer, and by the complexity of the CTF game of which it formed a part.
Visitors to the Wizarding World of Harry Potter at Universal Studios are able to cast “spells” by waving special interactive wands in the air. Hackers like us understand that there must be some unknown machinations happening behind the scenes to detect how the wands are moving, but for the kids wielding them, it might as well be real magic. So when his son asked to have a Harry Potter themed birthday party, [Adam Thole] decided to try recreating the system used at Universal Studios in his own home.
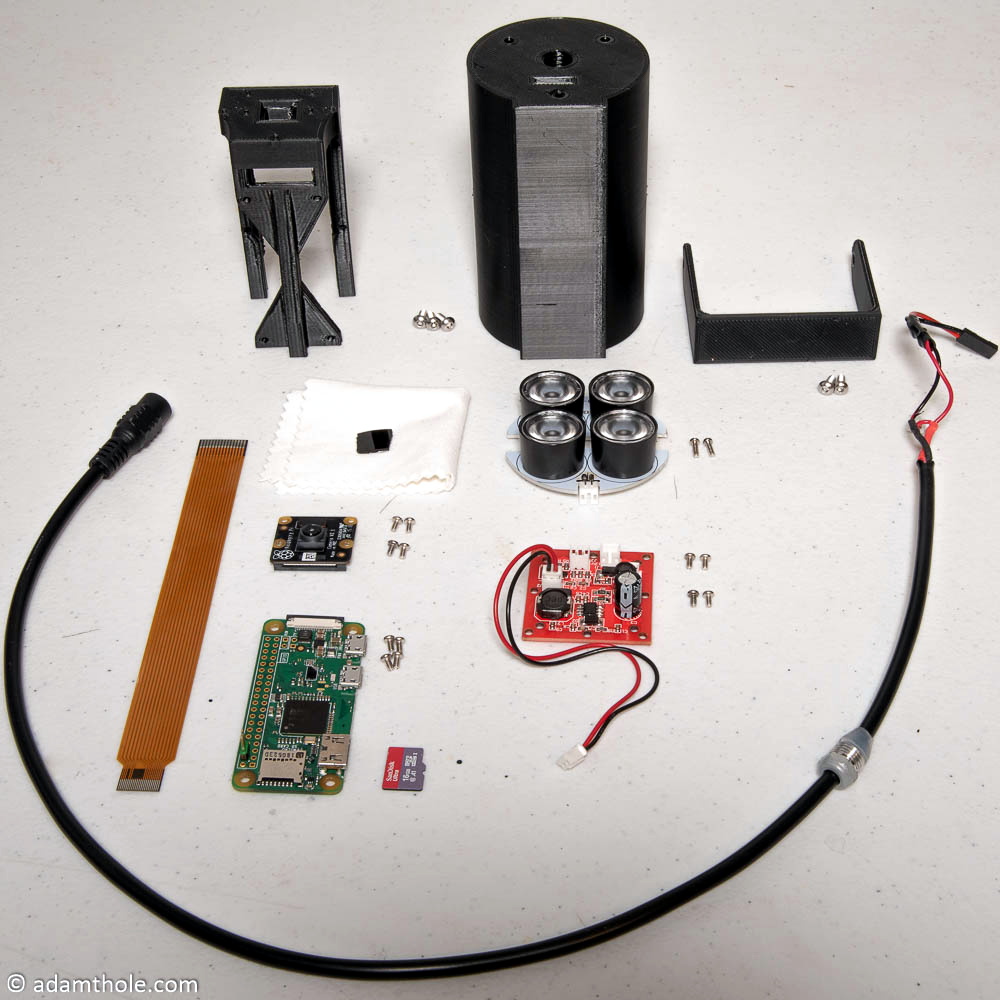
Components used in the IR streaming camera
The basic idea is that each wand has a reflector in the tip, which coupled with strong IR illumination makes them glow on camera. This allows for easy gesture recognition using computer vision techniques, all without any active components in the wand itself.
[Adam] notes that you can actually buy the official interactive wands from the Universal Studios online store, and they’d even work with his system, but at $50 USD each they were too expensive to distribute to the guests at the birthday party. His solution was to simply 3D print the wands and put a bit of white prismatic reflective tape on the ends.
With the wands out of the way, he turned his attention to the IR imaging side of the system. His final design is a very impressive 3D printed unit which includes four IR illuminators, a Raspberry Pi Zero with the NoIR camera module. [Adam] notes that his software setup specifically locks the camera at 41 FPS, as that triggers it to use a reduced field of view by essentially “zooming in” on the image. If you don’t request a FPS higher than 40, the camera will deliver a wider image which didn’t have any advantage in this particular project.
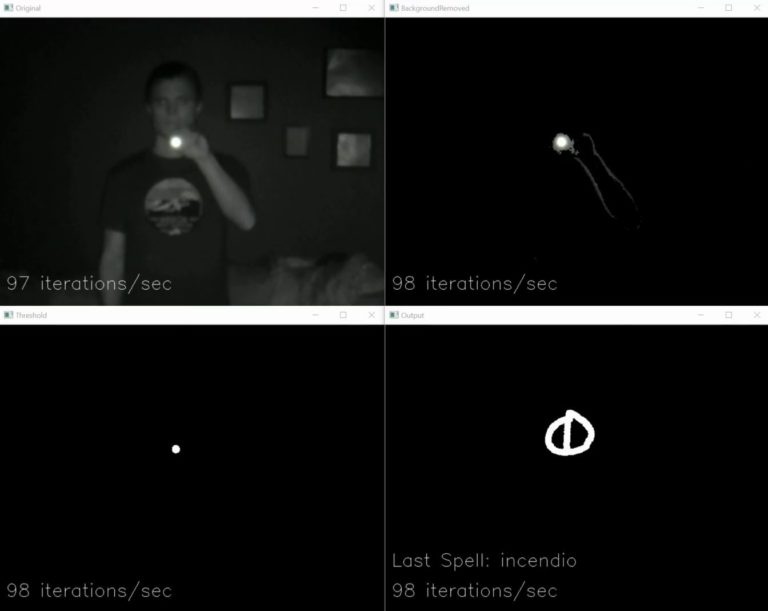
The last part of the project was taking the video stream from his IR camera and processing it to detect the bright glow of a wand’s tip. For each frame of the video the background is first removed and then any remaining pixel that doesn’t exceed a set brightness level if ignored. The end result is an isolated point of light representing the tip of the wand, which can be fed into Open CV’s optical flow function to show [Adam] what shape the user was trying to make. From there, his software just needs to match the shape with one of the stock “spells”, and execute the appropriate function (such as changing the color of the lights in the room) with Home Assistant.
Overall, it’s an exceptionally well designed system considering the goal was simply to entertain a group of children for a few hours. We almost feel bad for the other parents in the neighborhood; it’s going to take more than a piñata to impress these kids after [Adam] had them conjuring the Dark Arts at his son’s party.
As a finale to our month on the road through parts of the British Isles, we’ll be at UK Maker Faire this weekend, and we’ll also be hosting our final bring-a-hack at Maker Space Newcastle this evening, Saturday the 28th of April.
For the rest of the weekend’s UK Maker Faire, held at Newcastle’s Life Science Centre, you’ll find both Hackaday and Tindie at our booth number M118, and if you’re lucky you might even snag one of the [Brian Benchoff]-designed Tindie blinkie badge kits.
A few familiar faces from the Brits among our wider community will have their own booths, for example [Spencer] will be there with the RC2014 Z80-based retrocomputer, Rachel “Konichiwakitty” Wong will have her collection of wearables but no 3D-printed eyeballs, and Tindie seller extraordinaire [Partfusion], whose bone conduction skull radio we saw at EMF 2016 (Correction: the bone conduction radio was the work of fellow TOG stalwart [Jeffrey Roe]) and who also spoke at our Dublin Unconference.
There is still time to make your way to Geordieland to attend the event if you haven’t made plans already, and should you bring a conveniently portable hack with you then we’d love to see it. Especially if it’s a Hackaday Prize entry.
Sometimes the best part of building something is getting to rebuild it again a little farther down the line. Don’t tell anyone, but sometimes when we start a project we don’t even know where the end is going to be. It’s a starting point, not an end destination. Who wants to do something once when you could do it twice? Maybe even three times for good measure?
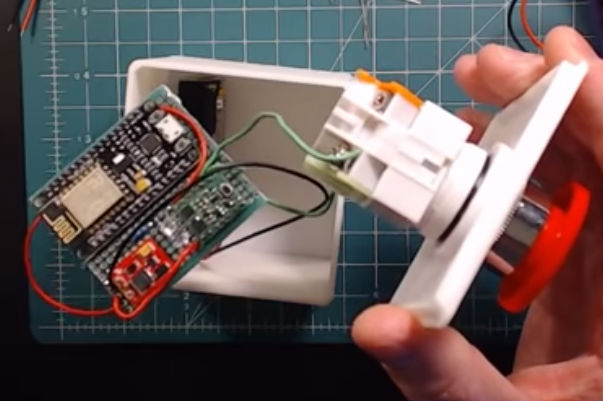
Original version of the Party Button
That’s what happened when [Ryan] decided to build a wireless “party button” for his kids. Tied into his Home Assistant automation system, a smack of the button plays music throughout the house and starts changing the colors on his Philips Hue lights. His initial version worked well enough, but in the video after the break, he walks through the evolution of this one-off gadget into a general purpose IoT interface he can use for other projects.
The general idea is pretty simple, the big physical button on the top of the device resets the internal ESP8266, which is programmed to connect to his home WiFi and send a signal to his MQTT server. In the earlier versions of the button there was quite a bit of support electronics to handle converting the momentary action of the button to a “hard” power control for the ESP8266. But as the design progressed, [Ryan] realized he could put the ESP8266 to deep sleep after it sends the signal, and just use the switch to trigger a reset on the chip.
Additional improvements in the newer version of the button include switching from alkaline AA batteries to a rechargeable lithium-ion pack, and even switching over to a bare ESP8266 rather than the NodeMCU development board he was using for the first iteration.
Short of blowing a glass bulb, building a motor, and growing the wood, this is about as scratch-built as it gets. Much of the woodworking is done on a metal lathe, and this includes the base of the mirror ball itself. As with all good thing-in-a-bottle builds, the ball is too big to go in the bulb, so [W&M] quartered it, drilled a few holes, and ran a string through the pieces so they can be carefully glued and drawn back together into a sphere. He even cut up mirror tiles and painstakingly applied them with tweezers.
This disco bulb is meant to be hung from the ceiling and wired into mains like a regular mirror ball. [M&W] stuffed the guts from a small USB wall charger into the handmade beech base to provide clean power for both the geared motor that spins the ball and the tiny LED that illuminates it. Slip into your best leisure suit (or sweat suit, we won’t judge) and hustle past the break to watch the build video.
Begin the Hackaday Superconference a day early this year. Supercon is far more than a conference, it’s a Hacker Village that forms when we all get together and that’s happening on Friday, November 10th with early badge hacking, dinner, and a party all included with your Supercon ticket!
In the last year, Supplyframe (Hackaday’s parent company) moved into a new office. It’s a beautiful space with enough square footage to host a conference itself. This year we’ll be capitalizing on that by hosting some of the larger Superconference workshops there. They’ve also opened their doors and are pulling out all the stops for the meet-and-greet pregame on Friday. Just let us know you’ll be there.
Badge pick up and hacking will begin at noon. If you’re itching to get your hands on the amazing Supercon badge, this is where you want to be. As we move into the five o’clock hour we’ll bring in the catering and the bartenders for a bash that welcomes back your extended family of hackers, designers, and engineers. This an amazing community and you’re a part of it so make your plans to get to town early.
Is a day early not good enough for you? You’re in luck! We’ve opened up a chat room on Hackaday.io. Talk to one another about what to bring, how to get there, what to do, and who exactly already has the Gerbers for the Superconference badge. It’s going to be a fantastic conference, and we can’t wait to see you there!
[Nicomedia] (a team of two) built a payload for their drone with two distinct purposes: to allow it to drop things like rose petals and to fire off fireworks. Honestly, while it is a cool idea, we are a little worried that dropping things from a height might not be a good idea (although rose petals are probably OK) and lighting off fireworks from a drone didn’t seem like a good idea at all. If you want to reproduce this, you probably need to make sure either of these things are legal in your part of the planet.
In the video below, you can see the effect. A servo tied to the drone’s controller opens the box to release the payload. In this case, the team didn’t have a spare channel so they used a separate controller, but if you had a spare channel on the flight controller, that would probably be better.