Koch Lamp Is 3D Printed With A Twist

Koch Lamp

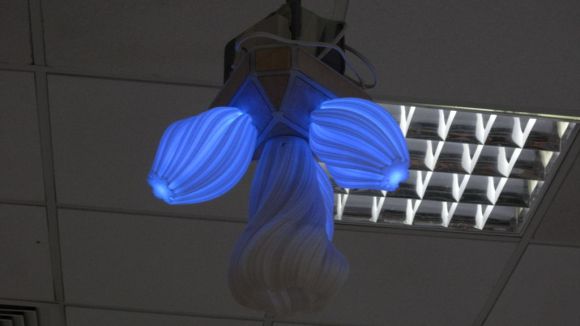
[repkid] didn’t set out to build a lamp, but that’s what he ended up with, and what a lamp he built. If the above-pictured shapes look familiar, it’s because you can’t visit Thingiverse without tripping over one of several designs, all based on a fractal better known as the Koch snowflake. Typically, however, these models are intended as vases, but [repkid] saw an opportunity to bring a couple of them together as a housing for his lighting fixture.

Tinkering with an old IKEA dioder wasn’t enough of a challenge, so [repkid] fired up his 3D printer and churned out three smaller Koch vases to serve as “bulbs” for the lamp. Inside, he affixed each LED strip to a laser-cut acrylic housing with clear tape. The three bulbs attach around a wooden base, which also holds a larger, central Koch print at its center. The base also contains a PICAXE 14M2 controller to run the dioder while collecting input from an attached wireless receiver. The final component is a custom control box—comprised of both 3D-printed and laser-cut parts—to provide a 3-dial remote. A simple spin communicates the red, green, and blue values through another PICAXE controller to the transmitter. Swing by his site for a detailed build log and an assortment of progress pictures.


Dad-Built Rocket Control Module

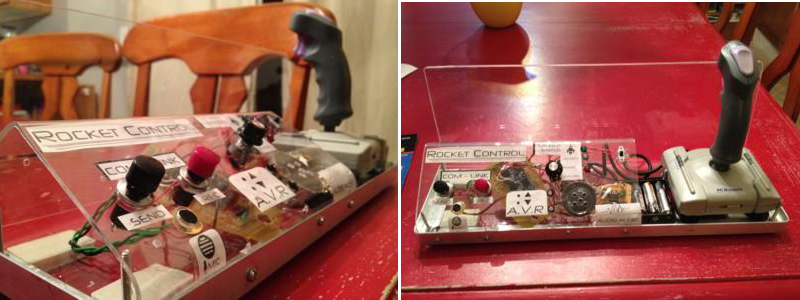
Like a lot of parents, [justbennett]’s kids like to play rocket and spaceship command. His kids’ imagination-assigned controls kept shifting from this LEGO to that banana to the dog’s tail, so [justbennett] did what he had to do: make this Dad-built rocket control module for them.

The module supports all of the vital sub-modules required for rocket and spaceship administration. There is a launch status indicator, an acceleration vector resonator (AVR), and a com-link. He used mostly parts on hand, and the Arduino count is zero. He built a NASA-grade Plexiglas enclosure to avoid juice box incidents. The two pieces are connected with aluminum angle bar so that he can make repairs or modifications.

The analogue joystick was a thrift store find. [Justbennett] wired the trigger and thumb buttons up as the AVR which activate a recycled PICAXE 08M project of his. The PICAXE senses the button pushes to flash an LED and play an ascending or descending tone. Long-pressing one button will result in an explosion noise as you might expect.

The launch status indicator is a potentiometer wired to a second PICAXE and three LEDs that light up in sequence. In the future, [justbennett] intends to add haptic feedback with a tiny vibration motor. The com-link packet messaging system is a Radio Shack recording module and two big, tempting buttons. The control module ships with a message from Star Command that explains the controls.

Magic Morse Arduino Trainer

cover_IMG408

Magic Morse is a mathematical algorithm that [Ray Burnette] wrote a few years ago to make it easy to send and receive Morse code. When he first wrote it, he designed it for a PIC, but since then he has re-written it to use as a training program for the Arduino platform.

It can run on the Uno, Nano, Pro Micro, or even home-brew Arduino boards. He’s demonstrating the program with a Nokia 5110 LCD, but has also included code for the typical 2×16 LCD displays. The Magic Morse algorithm is copyrighted, but he has released the Arduino code as open source in an effort to get people using Morse code once again — it is pretty awesome.

So how does it work? The algorithm assigns weights to the “dits” and “dahs” as received — when there is a longer pause, the algorithm creates a pointer which calls the character out of an array stored in the EEPROM. He’s included an example of this in Excel on his page.

Now you have no excuses about learning Morse code! Oh and if you don’t have a fancy telegraph key (the switch), [Ray’s] also published a handy method of making your own Morse code key out of popsicle sticks and magnets.

A Simple Servo Hack For An Iron Man Helmet

iron man helmet

[James] makes some seriously awesome Iron Man props. In one of his latest helmet builds, he came across a handy hack to lock the faceplate servo in place.

You see, as awesome as it is walking around like Iron Man all day, you’re going to want to keep your faceplate up for extended periods of time. Simply holding the servo in place electronically is a waste of power, and results in the annoying sound of a servo under strain. On the other hand, cutting power to it will keep it in place momentarily — but it will also start to close under the force of gravity.

The solution is actually quite simple, by reprogramming the Picaxe-08M microcontroller, the board now shorts the motor terminals to hold it in place. This is called magnetic motor braking, and it works by creating a closed loop that makes it much harder to induce a current under load. We once added this feature to a motorized push-scooter — it’d stop on a dime, although you wouldn’t…

Stick around after the break to see an extremely in depth video on how he setup the entire system.

Continue reading “A Simple Servo Hack For An Iron Man Helmet”

Video Game Automation Hacks

coupleofvideogamehacks

3rd party console game controllers sometimes sport a “rapid-fire” button to give gamers an unfair advantage. [Connor’s] project is along the same lines, but his hack had a different goal: automate the input of GTA5 cheat codes. [Connor] admits that this is his first Arduino hack, but aside from a small hiccup, he managed to pull it off. The build connects each button on a PS3 controller via some ribbon cable to its own digital out on an Arduino Uno . After plugging in some pretty straightforward code, [Connor] can simply press one button to automate a lengthy cheat code process.

[Matt’s] hack manages to save him even more user input in this second video game hack, which automates finger clicks in an Android game. [Matt] pieced together a couple of servos plugged into a PICAXE-18M2 microcontroller, which repeats one simple action in [Matt’s] Sims Freeplay game: continuously “freshening” (flushing?) a toilet. To mimic the same capacitive response of two fingers, [Matt] built the two contact surfaces out of some anti-static foam, then grounded them out with a wire to the ground on the board.

Check out a gallery of [Connor’s] controller and a video of [Matt’s] tablet hack after the break, then check out a rapid fire controller hack that attacks an XBox360 controller.

Continue reading “Video Game Automation Hacks”

Halloween Knock Box

knock_box_top

[Kyle] has been an avid reader of HaD for a long time. In fact, he was inspired by a Halloween knock box from 4 years ago! He saved the link and finally this year, he went ahead and made his own.

So what is it anyway? Well, as the name implies, when you knock on it, it knocks back. And if you knock on it a special number of times, it’ll play a secret tune… It is a great little item to have at any Halloween event — and kids love it!

Design and function of the box is basically the same as the original, with a few modifications — most notably, swapping out the original PICAXE for an ATtiny85 microcontroller. [Kyle] even managed to find the lego skeleton and chains available on eBay. He’s put together a very thorough blog post on it and shared all the code and schematics — so if you’re looking for a last minute Halloween project, this might be it!

Stick around after the break to see the knocking in action!

Continue reading “Halloween Knock Box”

Award Clock Put To Good Use As A Bench Meter

award-clock-turned-voltage-meter

The motivation industry turns out these type of award trinkets by the millions. Here’s a way to actually put the thing to use. Instead of displaying time, the clock dial serves as the readout of a voltage meter.

When we first saw this post we assumed that the hack used some type of coil injection to drive the hands. But it turns out that this is mechanically driven. The image above shows the stepper motor which is mounted behind the clock. Its drive shaft is coupled with the adjustment knob on the back of the clock. The precision of the motor lets the PICAXE set the clock dial based on the number of motor steps. The hour hand shows the tens value with the minutes serving as ones (base 10, not base 60). This means the top measurable voltage is 12V — when the hour hand is at 12 the measurement is 0 volts plus tenths of a volt from the minute hand. With the dial taken care of the rest of the project focuses on measuring the voltage using the ADC, which has an upper limit of just 5V. This is overcome with a simple voltage divider.

After the break you can see the accuracy of the rig as it performs measurements next to a digital voltmeter.

Continue reading “Award Clock Put To Good Use As A Bench Meter”