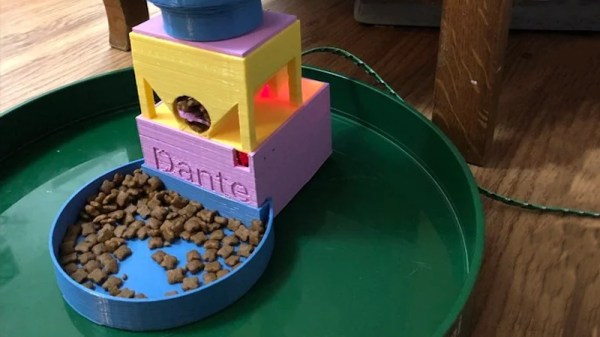
Bringing A Child’s Play Kitchen To Life

Given how many adults will go out of their way to avoid spending any extended amount of time in the kitchen, it’s pretty amazing how much children love playing in their miniature versions. Especially since they tend to be pretty simple: usually they’re little more than different sized boxes made out of MDF to represent the refrigerator, oven, and microwave. Of course, some kids are fortunate enough to have hackers and makers for parents.

[Brian Lough] wanted to get his two year old daughter her own play kitchen, but wasn’t terribly impressed with anything on the market. So he decided to start with the IKEA Duktig and add in his own personal touches to turn the stark white playset into something that would really get his daughter’s imagination going. With the liberal application of RGB LEDs and microcontrollers, her kitchen is sure to be envy of the sandbox.

Being the class act that he is, [Brian] starts his write-up acknowledging the various IKEA Duktig hacks and modifications that served as inspiration for his own build. Most of the prior art out there relates to making the microwave and oven a bit more exciting with the addition of lights and sounds, which ultimately ended up being the way he approached his daughter’s version as well.

For the oven, [Brian] decided to add some big arcade buttons over the door which would change the color of the RGB LEDs inside. He thought this association would be a good way to help his daughter learn her colors, since she’ll be able to see the oven change color when she presses the corresponding button. He also added a knob to control the intensity of the light, meant to be analogous to the temperature control in a real oven.

The modifications to the microwave are a bit more extensive, including a “timer” made out of a TM1637 LED display in a 3D printed panel complete with a buzzer to indicate when the plastic food has been thoroughly illuminated. [Brian] even made it so the LEDs in the NeoPixel ring light up in a spinning pattern to cast some shadows and simulate movement. He notes that the microwave was actually a bit overwhelming to his daughter at first, but after a couple months of getting used to the functions, she enjoys it as much as the oven.

While hacking a play kitchen might be new territory for him, [Brian] is no stranger to building awesome stuff. We’ve previously seen him put together a YouTube subscriber counter in the style of Tetris, and he even managed to create a gorgeous looking display out of shoelaces of all things.

Clock Mod Brings Super Game Boy To Competitive Arena

For one time small window between 1994 and 1998, you could play Game Boy games in color with a Super Game Boy. This was a cartridge that plugged into a Super Nintendo, and using proprietary Lock-On™ technology, you could play Game Boy games on the big screen. Inside the Super Game Boy was the guts of a real Game Boy. This was, and still is, the best way to experience everything from Kirby’s Dream Land or the Pokemon of Kanto.

Unfortunately, the Super Game Boy doesn’t exactly replicate the Game Boy experience. The crystal in the Super Game Boy means that games and sound run between 2 and 4% faster. The Super Game Boy is out for competitive speed running, and if you’re using Little Sound DJ, you’ll be out of tune with the rest of the band. The Super Game Boy doesn’t have link cable support, either.

Now, [qwertymodo] over on Tindie has the solution to the faster Super Game Boy. It’s a clock mod, but it’s not just swapping a crystal. This is a board that solders to existing pads, and still allows you to access the speed up and slow down functions available from the Commander controller from Hori. It’s a slightly impressive bit of PCB art, and certainly something that deserves notice.

This mod fixes the 2-4% speedup of the Super Game Boy, but then there’s still one feature missing: the link cable. Well, hold on to your butts, because there’s a mod for this one too. The Super Game Boy Link Port is a small little breakout board that requires fly wires to the main chip in the Super Game Boy. The installation isn’t quite as clean as the crystal hack, but if you’re fixing the clock, you might as well add the link cable port while you’re in there.

[qwertymodo] has a comparison test of the Super Game Boy running Pokemon Red, and this thing is dead on. It runs at exactly the same speed as an original Game Boy, only in color, on a TV. You can check that out below.

Continue reading “Clock Mod Brings Super Game Boy To Competitive Arena”

Add A Host Of 8-Bit Processors To Your Arduino

Normally when we bring you news of a retrocomputing design, it will centre around a single processor. At its heart will be a 6502, a Z80, or perhaps a 6809. There will be a host of support chips, some memory as RAM or ROM, and a bunch of interfaces. [Erturk Kocalar]’s RetroShield project for the Arduino Mega breaks all of those rules, because it supports all three of those classic processors, has no support chips, no memory, and no external interfaces beyond the shield connection to the Mega. What on earth is going on!

A closer look reveals that the project is a set of shields that use the Mega’s power to emulate all the support chips and peripherals you’d have seen on the original hardware. And while it would be impressive to have a single board with support for all three CPUs, in fact there is a PCB for each one. But that makes it no less interesting a project for those with an interest in 8-bit processors, because the focus becomes the software rather than a quest to find out-of-production silicon.

So far there is some limited demo software, and his website goes into some detail on the interfacing and code required. The Arduino can only clock the 8-bit CPU at 95kHz in software which may sound a bit low to those familiar with 1980s home computers, but it’s best to think of this as an experimentation platform and give up dreams of playing Elite. An exciting prospect comes in giving the 8-bit machine access to Arduino shields, if improbable hardware is your bag.

If this has captured your interest, you might also wish to take a look at the $4 Z80 single board computer which has a similar ethos.

Mods Keep The WaveBird Kicking In The Switch Era

Nintendo made some questionable decisions during the early 2000’s, but developing the WaveBird certainly wasn’t one of them. Years before wireless controllers were the standard on home game consoles, the WaveBird gave GameCube owners a glimpse into the future. It managed to deliver lag-free gaming without resorting to easily-blocked infrared, and had a battery life and range long enough that there was really no downside to cutting the cord aside from the lack of rumble support.

In fact, the WaveBird was such a good controller that some fans just can’t put the thing down even in 2019. [Bill Paxton] loves his so much that he decided to modify it so he could use it on Nintendo’s latest money printing machine, the Switch, without having to fiddle with any adapters. While he was at it, he decided to fix the only serious drawback of the controller and hack in some rumble motors; arguably making his re-imagined WaveBird superior in just about every way to the original.

It might be counter-intuitive, but the trick here is that [Bill] actually took the internals from a standard wired GameCube controller and fitted it all into the case for the WaveBird. That’s how he got the rumble support back, but where does the signature wireless capability come from?

For that, he took apart a “GBros. Wireless Adapter” from 8BitDo. This gadget is intended to let you use your existing GameCube controllers on the Switch wirelessly, so all he had to do was shove its PCB inside the controller and wire it directly to the pads on the controller’s board. Thankfully, the WaveBird was rather husky to begin with, so there’s enough space inside to add all the extra hardware without much fuss.

Between modifications like this and efforts to reverse engineer the controller’s wireless protocol, hackers aren’t about to let this revolutionary accessory go gently into that good night. You might see a GameCube slaughtered for a meme, but WaveBirds never die.

Continue reading “Mods Keep The WaveBird Kicking In The Switch Era”

This Bot Might Be The Way To Save Recycling

Recycling is on paper at least, a wonderful thing. Taking waste and converting it into new usable material is generally more efficient than digging up more raw materials. Unfortunately though, sorting this waste material is a labor-intensive process. With China implementing bans on waste imports, suddenly the world is finding it difficult to find anywhere to accept its waste for reprocessing. In an attempt to help solve this problem, MIT’s CSAIL group have developed a recycling robot.

The robot aims to reduce the reliance on human sorters and thus improve the viability of recycling operations. This is achieved through a novel approach of using special actuators that sort by material stiffness and conductivity. The actuators are known as handed shearing auxetics – a type of actuator that expands in width when stretched. By having two of these oppose each other, they can grip a variety of objects without having to worry about orientation or grip strength like conventional rigid grippers. With pressure sensors to determine how much a material squishes, and a capacitive sensor to determine conductivity, it’s possible to sort materials into paper, plastic, and metal bins.

The research paper outlines the development of the gripper in detail. Care was taken to build something that is robust enough to deal with the recycling environment, as well as capable of handling the sorting tasks. There’s a long way to go to take this proof of concept to the commercially viable stage, but it’s a promising start to a difficult resource problem.

MIT’s CSAIL is a hotbed of interesting projects, developing everything from visual microphones to camoflauge for image recognition systems. Video after the break.

Continue reading “This Bot Might Be The Way To Save Recycling”

Simon Game Is A Story Of Rushed Deadlines And Holiday Cheer

Sometimes the Christmas season can feel like a holiday all about spending money to demonstrate your love for others. Many a maker has attempted to subvert these commercialistic overtones by giving handmade presents to friends and loved ones. [APA] is no exception, and has shared their story of producing a simple Simon game during the holidays.

The circuit is nothing wild – an ATtiny85 microcontroller interfaces a handful of buttons and LEDs to handle the basic Simon gameplay. The real value is in [APA]’s retelling of the development process. It’s an accurate recounting that makes us relive some of our own follies of early projects. There’s the confusion between SMD and through hole versions of the same part, forgotten pull up resistors, as well as hours lost trying to figure out why a chip won’t write, only to learn the bootloader hasn’t been burned yet.

In the end, [APA] was able to push through a rush order and deliver the gifts on time, despite the many pitfalls along the way. The final game provided some laughs around the dinner table at Christmas, so we’d say the mission was definitely accomplished.

We’ve seen similar work before, too – like this tiny Simon game on an ATtiny13.

These Wire Strippers Are Made From PCBs

The rise in cheap PCB fabrication has made old-school prototyping methods such as wire wrapping somewhat passé, but it still has its place. And if you’re going to wire wrap, you’re going to want a quick and easy way to strip that fine Kynar-insulated wire. So why not use PCB material to make this handy wire-wrapping wire stripper?

The tool that [danielrp] built is pretty simple – just a pair of razor blades held together so as to form a narrow slot to cut insulation while leaving the conductor untouched. The body of the tool is formed of two PCBs, between which the blades are sandwiched. [danielrp] designed the outline of the PCBs in DraftSight, then exported a DXF into EAGLE to make the Gerbers. The fabricated boards needed a little post-processing, including tapping the holes on one side to accept the screws that hold the tool together. We were surprised that FR4 took the threads at all, but it seems to work for this low-torque application. The disposable snap-type blades were sandwiched between the PCBs and the gap between them adjusted for nick-free stripping. The video below shows the design and build process.

We always appreciate homemade tools, and the fact that you can get a stack of PCBs for almost nothing makes us wonder what else we could use them for. We recently saw them used in a unique word clock, and even turned into a folding circuit sculpture.

Continue reading “These Wire Strippers Are Made From PCBs”