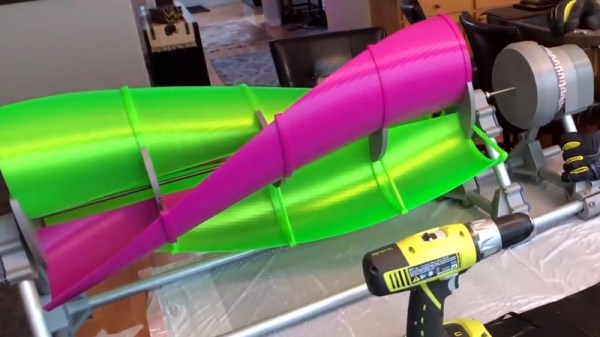
The Filament Pelletizer For Fused Granular Fabrication

The ABS and PLA that goes into your 3D printer is sold in two forms. The first, naturally, is filament. The second is plastic granules, the raw material for your filament, and costs an order of magnitude less than the filament itself. For years we’ve been seeing machines that either print directly with plastic granules or are converted into filament with fancy filament-extruding machines. Now we can do it the other way. [Aubrey Woern] and [Joshua Pearce] of Michigan Tech have been working on a polymer pelletizer chopper that takes plastic filament and turns it into pellets.

The system uses a large corded drill motor to drive a Forstner drill bit. Filament is then threaded into the top of this spinning drill bit with the help of a small DC motor and grippy wheel printed out of Ninjaflex. The system works, and the authors of the paper were able to vary the size of the chopped filament by feeding it into the Forstner bit faster or slower.

While turning an expensive product (filament) back into its raw material (pellets) may not seem like a great idea, there have been a significant number of advancements in the state of manufacturing filament on a desktop and printing directly from pellets in recent years. A machine that turns plastic back into its raw state is something that’s needed if you want to experiment with plastic recycling, and this machine is more than capable of chopping up a spool of filament in two hours or so.

Ken Shirriff Explains His Techniques For Reverse Engineering Silicon

When it comes to reverse engineering silicon, there’s no better person to ask than Ken Shirriff. He’s the expert at teasing the meaning out of layers of polysilicon and metal. He’s reverse engineered the ubiquitous 555 timer, he’s taken a look at the inside of old-school audio chips, and he’s found butterflies in his op-amp. Where there’s a crazy jumble of microscopic wires and layers of silicon, Ken’s there, ready to do the teardown.

For this year’s talk at the Hackaday Superconference, Ken walked everyone through the techniques for reverse engineering silicon. Surprisingly, this isn’t as hard as it sounds. Yes, you’ll still need to drop acid to get to the guts of an IC (of course, you could always find a 555 stuck in a metal can, but then you can’t say ‘dropping acid’), but even the most complex devices on the planet are still made of a few basic components. You’ve got n-doped silicon, p-doped silicon, and some metal. That’s it, and if you know what you’re looking for — like Ken does — you have all the tools you need to figure out how these integrated circuits are made.

Continue reading “Ken Shirriff Explains His Techniques For Reverse Engineering Silicon”

Many Uses For A Single Button

When building projects with a simple goal in mind, it’s not unheard of for us to add more and more switches, buttons, and complexity as the project goes through its initial prototyping stages. Feature creep like this tends to result in a tangled mess rather than a usable project. With enough focus, though, it’s possible to recognize when it’s happening and keep to the original plans. On the other hand, this single-button project with more than one use seems to be the opposite of feature creep. (YouTube, embedded below.)

[Danko]’s project has one goal: be as useful as possible while only using a single button and a tiny screen. Right now the small handheld device can be used as a stopwatch, a counter, and can even play a rudimentary version of flappy bird. It uses an Arduino Pro Mini, a 64×48 OLED screen running on I2C, and has a miniscule 100 mAh 3.7V battery to power everything. The video is worth watching if you’ve never worked with this small of a screen before, too.

Getting three functions out of a device with only one button is a pretty impressive feat, and if you can think of any other ways of getting more usefulness out of something like this be sure to leave it in the comments below. [Danko] is no stranger to simple projects with tiny screens, either. We recently featured his homebrew Arduino calculator that uses an even smaller screen.

Continue reading “Many Uses For A Single Button”

Linux Fu: Turn A Web App Into A Full Program

I hate to admit it. I don’t really use Linux on my desktop anymore. Well, technically I do. I boot into Linux. Then I do about 95% of my work in Chrome. About the only native applications I use anymore are development tools, the shell, emacs, and GIMP. If I really wanted to, I could probably find replacements for nearly all of those that run in the browser. I don’t use it, but there’s even an ssh client in the browser. Mail client? Gmail. Blogging? WordPress. Notes? OneNote or Evernote. Wouldn’t it be great to run those as actual applications instead of tabs in a browser? You can and I’ll show you how.

Having apps inside Chrome can be a real problem. I wind up with dozens of tabs open — I’m bad about that anyway. Restarting chrome is a nightmare as it struggles to load 100 tabs all at once. (Related tip: Go to chrome://flags and turn “Offline Auto-Reload Mode” off and “Only Auto-Reload Visible Tabs” on.) I also waste a lot of time searching since I try to organize tabs by window. So I have to find the window that has, say, Gmail in it and then find Gmail among the twenty or so tabs in that window.

What I want is a way to wrap web applications in their own window so that they’d show up in the task bar with their own icon, but external web pages that open from these apps ought to open in Chrome rather than in the same window. If applications were outside of the single browser window, I could move them to different desktops and organize them like they were any other program, including adding them to a launcher. Hopefully, this would let me have fewer windows like this:

Continue reading “Linux Fu: Turn A Web App Into A Full Program”

Editing GameCube Memory With A Raspberry Pi

[James] has been working with GameCubes, emulators, and Animal Crossing for a while now, and while emulators are sufficient, he’d like to play on real hardware. This means he needs to write to a GameCube memory card. While there are a few options to do this, they either require a Wii or hardware that hasn’t been made in a decade. The obvious solution to this problem is to reverse engineer the GameCube memory card to read and write the memory with a Raspberry Pi.

There’s an incredible amount of unofficial documentation for every console, and [James] stumbled upon a GC-Forever forum post that describes the electrical signals inside the GameCube memory card. There’s your standard compliment of power and ground pads, along with a DI, DO, CS, Clk, and an INT pin. [James] broke out the magnet wire and soldered up a pin header to these cards. Data was then captured with a Salae logic analyzer, and lo and behold, it looked like a standard SPI protocol.

With the low-level protocol worked out, [James] checked out the Yet Another GameCube Documentation to get the main functions allowed through the SPI bus. The ‘read block’, for instance, starts off with 0x52 and an address offset. A little bit of Python on a Raspberry Pi meant [James] could read and write the entire GameCube memory card. Right now the code is a little rough, but all the work is available should you want to edit your Animal Crossing save with a Raspberry Pi.

This work follows [James]’ earlier work on getting into the debug menu of Animal Crossing, allowing him to add items to his inventory. With this latest advancement, it’s only a matter of time before we plug Raspberry Pis directly into a GameCube.

Apple II Megademo Is Countin’ Cycles And Takin’ Names

The demoscene is an active place to this day, with enthusiasts around the world continuing to push the envelope as far as the capabilities of machines are concerned. [Deater], along with a skilled team, produced this Apple II Megademo which won first place at Demosplash 2018.

The demo starts with an intentional tease, with an emulated C64 BASIC startup screen which splits to reveal the title card. White-on-blue text isn’t the easiest on the Apple II, due to palette limitations, but it’s necessary for the joke to work. The following scenes make heavy use of mode-switching techniques in the middle of drawing the screen. Single screens are made up of various sections in LORES, HIRES, and even text modes. The term “cycle-counting” refers to the fact that the demo is written to operate in a cycle-exact fashion. This is necessary to achieve the mode-switching effects and to make the most of the limited resources of the Apple II.

It’s a demo that, like many others, does the right things in the wrong way to achieve its impressive results, and is a worthy competition winner. [Deater] has kindly provided an FAQ and source code for those who wish to study it further.

If you’ve written a mindblowing demo yourself, be sure to notify the tips line. Video after the break.

Continue reading “Apple II Megademo Is Countin’ Cycles And Takin’ Names”

Yet Another Restomod Of The Greatest Computer Ever

The best computer ever made is nearly thirty years old. The Macintosh SE/30 was the highest-spec original all-in-one Macs, and it had the power of a workstation. It had expansion slots, and you could hang a color monitor off the back. It ran Unix. As such, it’s become the prize of any vintage computer collector, and [Kris] recently completed a restomod on our beige king. It’s a restored Macintosh SE/30, because yes, we need to see more of these.

The restoration began with the case, which over the last thirty years had turned into an orange bromiated mess. This was fixed with RestOBrite, or Retr0Brite, or whatever we’re calling it now. This was just Oxyclean and an off-the-shelf bottle of 3% hydrogen peroxide, left out in the sun for a little bit.

Of course the capacitors had spilled their magic blue smoke over the last three decades, so a few replacements were in order. This is well-trodden territory, but [Kris] also had to replace the SCSI controller chip. Three of the pads for this chip had lifted, but this too is something that can be fixed.

With the restoration work complete, [Kris] turned his attention to doing something with this computer. The spinny hard drive was replaced with a SCSI2SD, currently the best solution to putting SCSI disks into old computers. There are a few more additions, including a Micron Xceed color video adapter, a video card that allows the SE/30 to drive two monitors (internal included) in color.

The current plans are to attach a modem to this SE/30, have it ring into a Raspberry Pi, and surf the web over a very slow connection. There is another option, though: You can get a WiFi adapter for the SE/30, and there’s a System 7 extension to make it work. Yes, we’re living in the future, in the past. It’s awesome.