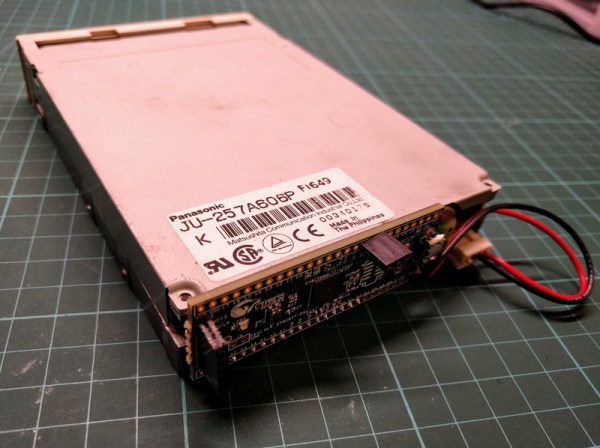
Review: SMD Tweezer Meter Or Tweezer Probes For Your Multimeter?

It’s remarkable how tiny electronics have become. Heaven knows what an old-timer whose experience started with tubes must think, to go from solder tags to SMD in a lifetime is some journey. Even  the generation that started with discrete transistors has lived through an incredible shift. But it’s true, SMD components are tiny, and that presents a challenge aside from the one you’ll face when soldering them. Identifying and measuring the value of a chip component too small to have any writing upon it becomes almost impossible with a pair of standard test probes.

Happily the test equipment manufacturers have risen to the challenge, and produced all sorts of meters designed for SMD work that have a pair of tweezers instead of test prods. When I was looking for one I did my usual thing when it comes to Hackaday reviews. I looked at the budget end of the market, and bought an inexpensive Chinese model for about £16($21). And since I was browsing tweezers I couldn’t resist adding another purchase to my order. I found a pair of tweezer test probes for my multimeter which cost me just over a pound ($1.30) and would provide a useful comparison. For working with SMD components in situ, do you even need the special meter?

Continue reading “Review: SMD Tweezer Meter Or Tweezer Probes For Your Multimeter?”

Human-Computer Interface Challenge: Change How We Interact With Computers, Win Prizes

Pay no attention to the man behind the curtain. It’s a quote from the Wizard of Oz but also an interesting way to look at our interactions with electronics. The most natural interactions free us from thinking about the ones and zeros behind them. Your next challenge is to build an innovative interface for humans to talk to machines and machines to talk to humans. This is the Human-Computer Interface Challenge!

The Next Gen of HCI

A Human-Computer Interface (or HCI) is what we use to control computers and what they use to control us get information to us. HCIs have been evolving since the beginning. The most recent breakthroughs include touchscreens and natural-language voice interaction. But HCI goes beyond the obvious. The Nest thermostat used a novel approach to learning your habits by observing times and days that people are near it, and when the temperature setting is changed. This sort of behavior feels more like the future than having to program specific times for temperature control adjustments. But of course we need to go much further.

You don’t need to start from scratch. There are all kinds of great technologies out there offering APIs that let you harness voice commands, recognize gestures, and build on existing data sets. There are chips that make touch sensing a breeze, and open source software suites that let you get up and running with computer vision. The important thing is the idea: find something that should feel more intuitive, more fun, and more natural.

The Best Interfaces Have Yet to Be Dreamed Up

No HCI is too simple; a subtle cue that makes sure you don’t miss garbage collection day can make your day. Of course no idea is too complex; who among you will work on a well-spoken personal assistant that puts Jarvis to shame? We just saw that computers sound just like people if you only tell them to make random pauses while speaking. There’s a ton of low-hanging fruit in this field waiting to be discovered.

An HCI can be in an unexpected place, or leverage interactions not yet widely used like olfactory or galvanic responses.  A good example of this is the Medium Machine which is pictured above. It stimulates the muscles in your forearm, causing your finger to press the button. The application is up to you, and we really like it that Peter mentions that Medium Machine reaches for something that wouldn’t normally come to mind when you think about these interfaces; something that hasn’t been dreamed up yet. Get creative, get silly, have some fun, and show us how technology can be a copilot and not a dimwitted sidekick.

You have until August 27th to put your entry up on Hackaday.io. The top twenty entries will each get $1,000 and go on to the finals where cash prizes of $50,000, $20,000, $15,000, $10,000, and $5,000 await.

A Microwave Erector Set

RF design isn’t always easy, especially at higher frequencies. Despite improvements in simulation tools, there’s still no substitute for prototyping and trying out different things. That wasn’t so bad when that meant nailing some nails in a piece of wood and wiring up discrete components. But at today’s microwave frequencies and with today’s IC packaging that simply doesn’t work. Solving this problem is what drives a company called X-Microwave. They have a standard grid pattern PCB for a wide range of RF circuits and accessories to tie them all together. Probably the best way to get a feel for the system is to watch the simple video below. There’s also a free simulator tool worth taking note of that you’ll see in a bit.

Before you get too excited, we’ll warn you that while this stuff is cheap if you need it, it isn’t an impulse buy. The baseboards and probes (the connectors) run from $150 to $300. You can get kits, too, but a bare-bones two-port system is going to start at about $550, which is about $100 off the component parts and includes some extras. Then you need less expensive parts to make the boxes around things if you need them. Oh. Then you also need the PCBs which are not cheap, either. Their prices vary widely as you’d expect, but — for example — we saw amplifiers as low as $80 and as high as nearly $1000. So a complete system could get pretty pricey.

Continue reading “A Microwave Erector Set”

Getting The Lead Out Of Lithium Battery Recycling

When that fateful morning comes that your car no longer roars to life with a quick twist of the key, but rather groans its displeasure at the sad state of your ride’s electrical system, your course is clear: you need a new battery. Whether you do it yourself or – perish the thought – farm out the job to someone else, the end result is the same. You get a spanking new lead-acid battery, and the old one is whisked away to be ground up and turned into a new battery in a nearly perfect closed loop system.

Contrast this to what happens to the battery in your laptop when it finally gives up the ghost. Some of us will pop the pack open, find the likely one bad cell, and either fix the pack or repurpose the good cells. But most dead lithium-based battery packs are dropped in the regular trash, or placed in blue recycling bins with the best of intentions but generally end up in the landfill anyway.

Why the difference between lead and lithium batteries? What about these two seemingly similar technologies dictates why one battery can have 98% of its material recycled, while the other is cheaper to just toss? And what are the implications down the road, when battery packs from electric vehicles start to enter the waste stream in bulk?

Continue reading “Getting The Lead Out Of Lithium Battery Recycling”

Acrylic Stencils Help With Component Placement For SMD Assembly

Surface mount is where the action is in the world of DIY PCBs, and deservedly so. SMDs are so much smaller than through-hole components, and fewer holes to drill make surface-mount PCBs easier to manufacture. Reflow soldering is even a snap now thanks to DIY ovens and solder stencils you can get when you order your boards.

So what’s the point of adding another stencil to the surface-mount process? These component placement stencils are [James Bowman]’s solution for speeding up assembly of boards in production runs too small to justify a pick and place robot. [James] finds that placing small components like discrete resistors and caps easy, but struggles with the placement of the larger components, like QFN packaged microcontrollers. Getting such packages lined up exactly is hard when the leads are underneath, and he found repositioning led to smeared solder paste. His acrylic stencils, which are laser-cut from SVGs derived directly from the Eagle files with a script he provides, sandwich the prepped board and let him just drop the big packages into their holes. The acrylic pops off after placement, leaving the components stuck to the solder paste and ready for their trip to the Easy Bake.

[James] claims it really speeds up hand placement in his biggish runs, and it’s a whole lot cheaper than a dedicated robot. But as slick as we think this idea is, a DIY pick and place is still really sweet.

It’s 1984, And You Can’t Afford A Computer. Never Mind, Have This Pop-Up Paper One Instead!

It’s an oft-derided sentiment from a Certain Type of Older Person, that the Youth of Today don’t know how lucky they are with their technology. Back when they were young they were happy with paper and string! Part of the hilarity comes from their often getting the technology itself wrong, for example chastising the youngsters for their iPods and Game Boys when in reality those long-ago-retired devices are edging into the realm of retrotechnology.

But maybe they have a point after all, because paper and string could be pretty good fun to play with. Take the example presented  in a Twitter thread by [Marcin Wichary]. A pop-up book from 1984 that presents the inner workings of a computer in an astounding level of detail, perhaps it stretches the pop-up card designer’s art to the limit, but along the way it makes a fascinating read for any retrocomputing enthusiast. Aside from the pop-up model of the computer with an insertable floppy disk that brings text onto the screen we see at  first, there is a pop-up keyboard with a working key, a peer inside the workings of a floppy disc, a circuit board complete with a paper chip that the reader can insert into a socket, and a simulation of a CRT electron bean using a piece of string. A Twitter thread on a book is not our normal fare, but this one is something special!

Did any of you have this book when you were younger? Perhaps you still have it? We’d love to hear from you in the comments. It’s probably not the type of book we normally review, but we’ve been known to venture slightly outside tech on that front.

Incredible Atari 800XL Case Restoration

If you’ve been hanging around Hackaday for a while, you know that a large portion of the stuff we publish goes above and beyond what most people would consider a reasonable level of time and effort. One could argue that’s sort of the point: the easy way out is rarely the most exciting and interesting route you can take. We, and by extension our readers, are drawn to the projects that someone has really put their heart and soul into. If the person who created the thing wasn’t passionate about it, why should we be?

That being said, on occasion, even we are left in awe about the lengths some people will go to. A perfect example of this is the absolutely insane amount of time and effort [Drygol] has put into restoring an Atari 800XL that looked like it was run over by a truck. Through trial, error, and a bunch of polyester resin, he’s recreated whole sections of the Atari’s case that were missing.

To start the process, [Drygol] used metal rods to bridge the areas where the plastic was completely gone. By heating the rods with a torch and pushing them into the Atari’s case, he was able to create a firm base to work from. Additional rods were then soldered to these and bent, recreating the shape of the original case. With the “skeleton” of the repair in palce, the next step was filling it in.

[Drygol] borrowed an intact Atari 800XL case from a friend, and used that to create a mold of the missing sections from his own case. Most of his rear panel was missing, so it took some experimentation to create such a large mold. In the end he used silicone and a custom built tray that the case could sit in vertically, but he does mention that he never quite solved the problem of degassing the silicone. The mold still worked, but bubbles caused imperfections which needed to be filled in manually during the finishing process.

Using his silicone mold and the same tray, he was then able to pour polyester resin over the wire frame. This got him most of the way to rebuilding the case, but there was still plenty of filler and sanding required before the surface finish started to look half-way decent. When he got towards the very end of the finishing process, he used a mold he created of the case surface texture to roughen up the smooth areas left over from the filling process. Add a bit of custom spray paint, and the end result looks absolutely phenomenal considering the condition it was in originally.

We were already impressed by the work he put in during the first stages of the restoration, but this case repair is really on a whole new level. Between this and the incredible instructional videos [Eric Strebel] has been putting out, we’re really gaining a whole new respect for the power of polyester.

Continue reading “Incredible Atari 800XL Case Restoration”