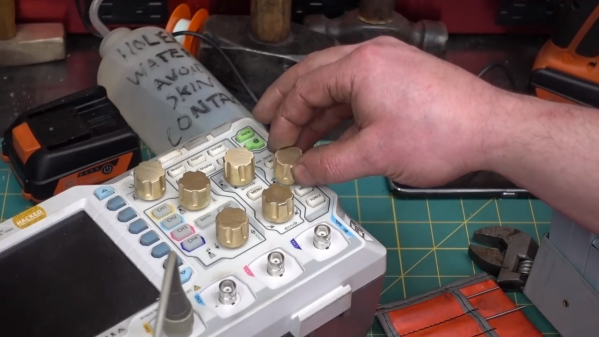
An Especially Tiny And Perfectly Formed FM Bug

It used to be something of an electronic rite of passage, the construction of an FM bug. Many of us will have taken a single RF transistor and a tiny coil of stiff wire, and with the help of a few passive components made an oscillator somewhere in the FM broadcast band. Connect up a microphone and you were a broadcaster, a prankster, and probably set upon a course towards a life in electronics. Back in the day such a bug might have been made from components robbed from a piece of scrap consumer gear such as a TV or VCR, and perhaps constructed spider-web style on a bit of tinplate. It wouldn’t have been stable and it certainly wouldn’t have been legal in many countries but the sense of achievement was huge.

As you might expect with a few decades of technological advancement, the science of FM bugs has moved with the times. Though you can still buy the single transistor bugs as kits there is a whole range of fancy chips designed for MP3 players that provide stable miniature transmitters with useful features such as stereo encoders. That’s not to say there isn’t scope for an updated simple bug too though, and here [James] delivers the goods with his tiny FM transmitter.

Gone is the transistor, and in its place is a MAX2606 voltage-controlled oscillator. The on-chip varicap and buffer provided by this device alleviate some of the stability issues suffered by the transistor circuits, and to improve performance further he’s added an AP2210 low-dropout regulator to catch any power-related drift. If it were ours we’d put in some kind of output network to use both sides of the differential output, but his single-ended solution at least offers simplicity. The whole is put on a board so tiny as to be dwarfed by a CR2032 cell, and we can see that a bug that size could provide hours of fun.

This may be a small and simple project, but it has found its way here for being an extremely well-executed one. It’s by no means the first FM bug we’ve shown you here, just a few are this one using scavenged SMD cellphone parts, or this more traditional circuit built on a piece of stripboard.

DIY Peristaltic Pump Keeps The Booze Flowing

A few months ago we showed you a bar bot built by [GreatScott] that uses peristaltic pumps to food-safely move the various spirits and mixers around behind the curtain. The bar bot uses three of them, and at $30 each for pumps with decent flow rate, they added a lot to the parts bill. These pumps are pretty much the ideal choice for a bar bot, so what do you do? [GreatScott] decided to see if it was worth it to make them instead.

Peristaltic pumps are simple devices that pump liquids without touching them. A motor turns a set of rollers that push a flexible tube against a wall. As the motor turns, the rollers move liquid through the tube by squeezing it flat from the outside in turns. Typically, the more you pay for an off-the-shelf peristaltic, the higher the flow rate.

[GreatScott] figured it was cheaper to buy the motor and the control circuitry. He chose a NEMA-17 for their reputation and ubiquity and a DRV8825 controller to go with it. The pump is driven by an Arduino Nano and a pot controls the RPM. After trying to design the mechanical assembly from scratch, he found [Ralf]’s pump model on Thingiverse and modified it to fit a NEMA-17.

The verdict? DIY all the way, assuming you can print the parts. [GreatScott] was trying to beat the purchased pumps’ flow rate of 100mL/minute and ended up with 200mL/minute from his DIY pump. Squeeze past the break for the build video and demonstration.

Is there a bar bot build on your list? No? Is it because you’re more of a single-malt scotch guy? Build a peristaltic pachyderm to pour your potion.

Continue reading “DIY Peristaltic Pump Keeps The Booze Flowing”

Dungeons And Dragons TV Tabletop!

With little more than pen, paper, dice, and imagination, a group of friends can transport themselves to another plane for shenanigans involving dungeons and/or dragons. An avid fan of D&D and a budding woodworker, Imgurian [CapnJackHarkness] decided to build gaming table with an inlaid TV for their inaugural project.

The tabletop is a 4’x4′ sheet of plywood, reinforced from underneath and cut out to accommodate a support box for the TV. Each leg ended up being four pieces of 1’x4′ wood, laminated together with a channel cut into one for the table’s power cable. An outer ledge has dice trays — if they’re even needed in today’s world — ready for all those nat 20s, cupholders because nobody likes crying over spilled drinks, and electrical outlets to keep devices charged. Foam squares cover the tabletop which can be easily removed and washed if needed — but more on that in a second. [CapnJackHarkness] painted the table as the wood rebuffed many attempts at staining, but they’re happy with how it turned out.

Continue reading “Dungeons And Dragons TV Tabletop!”

Cross-Brand Adapter Makes For Blended Battery Family

Even though he’s a faithful DeWalt cordless tool guy, [Richard Day] admits to a wandering eye in the tool aisle, looking at the Ryobi offerings with impure thoughts. Could he stay true to his brand and stick with his huge stock of yellow tools and batteries, or would he succumb to temptation and add another set of batteries and chargers so he could have access to a few specialty lime green tools?

Luckily, we live in the future, so there’s a third way — building a cross-brand battery adapter that lets him power Ryobi tools with his DeWalt batteries. [Richard]’s solution is a pure hack, as in physically hacking battery packs and forcing them to work and play well together. Mechanically, this was pretty easy — a dead Ryobi pack from the recycling bin at Home Depot was stripped down for its case, which was glued to a Dewalt 20-v to 18-v battery adapter. The tricky part came from dealing with the battery control electronics. Luckily, the donor DeWalt line has that circuitry in the adapter, while Ryobi puts it in the battery. That meant simply transplanting the PCB from the adapter to the Ryobi battery shell would be enough. The video below shows the process and the results — Ryobi tools happily clicking away on DeWalt batteries.

While [Richard] took a somewhat brute-force approach here, we imagine 3D-printed parts might make for a more elegant solution and offer other brand permutations. After all, printing an adapter should be easier than whipping up a cordless battery pack de novo.

Continue reading “Cross-Brand Adapter Makes For Blended Battery Family”

Easy, Modular Alphanumeric Displays Are Full Of Flappy Goodness

There are plenty of ways to make large alphanumeric displays that are readable at great distances. LED signboards come to mind, as do big flat-screen LCD displays. But such displays feel a little soulless, and nothing captures the atmosphere of a busy train station like an arrivals and departures board composed of hundreds of split-flap displays.

In a bid to make these noisy but intriguing displays practical for the home-gamer, [Scott Bezek] has spent the last couple of years on a simple, modular split-flap display unit, and from the look of the video below, it’s pretty close to ready. The build log details the design process, which started with OpenSCAD and took advantage of the parametric nature of the scripting language to support any number of characters, within reason. Costs are kept low with laser-cut MDF frames and running gear, and cheap steppers provide the motion. Character cards are just PVC ID badges with vinyl letters, and a simple opto-sensor prevents missed steps and incorrect characters. The modules can be chained together into multi-character displays, and the sound is satisfyingly flappy.

[Scott] has put a lot of thought into these displays, and even if it’s not the simplest split-flap display we’ve seen, it’s really worth checking out.

Continue reading “Easy, Modular Alphanumeric Displays Are Full Of Flappy Goodness”

Turn Your Lathe Into A Shaper

Ingenuity is the name of the game with manual machine tools. You often have to get creative to use the tools you have to create the part you want. That’s exactly what happened when [John] needed to cut internal splines and keyways using his lathe.

Lathes are usually used to turn metal, but internal keyways and splines are operations often performed with a broach. An older tool called a shaper would be perfect here, but shapers are relatively rare these days — or are they? There are many examples of shaper attachments for lathes. These are human-powered devices that scrape a bit of metal off each pass. The lathe itself is used to keep the workpiece in place and move the tool in a repeatable way.

Rather than create a shaper jig from scratch, [John] decided to use his compound slide as the shaper slide itself. He removed the compound slide lead screw, which allowed the compound to slide freely. He then fabricated a double hinged bar and bolted this to the compound slide. Moving the bar causes the slide to move. Just add a cutting tool, and you’re ready to cut a keyway. Add an indexing plate, and you’re ready to cut a spline. You can see the tool in action after the break.

If you want to learn more about lathes and what goes into them, you can learn how to build one from scratch.

Continue reading “Turn Your Lathe Into A Shaper”

Vera Rubin: Shedding Light On Dark Matter

Vera sat hunched in the alcove at Kitt Peak observatory, poring over punch cards. The data was the same as it had been at Lowell, at Palomar, and every other telescope she’d peered through in her feverish race to collect the orbital velocities of stars in Andromeda. Although the data was perfectly clear, the problem it posed was puzzling. If the stars at the edges of spiral galaxy were moving as fast as the ones in the center, but the pull of gravity was weaker, how did they keep from flying off? The only possible answer was that Andromeda contained some kind of unseen matter and this invisible stuff was keeping the galaxy together.

Though the idea seemed radical, it wasn’t an entirely new one. In 1933, Swiss astronomer Fritz Zwicky made an amazing discovery that was bound to bring him fame and fortune. While trying to calculate the total mass of the galaxies that make up the Coma Cluster, he found that the mass calculation based on galaxy speed was about ten times higher than the one based on total light output. With this data as proof, he proposed that much of the universe is made of something undetectable, but undeniably real. He dubbed it Dunkle Materie: Dark Matter.

But Zwicky was known to regularly bad mouth his colleagues and other astronomers in general. As a result, his wild theory was poorly received and subsequently shelved until the 1970s, when astronomer Vera Rubin made the same discovery using a high-powered spectrograph. Her findings seemed to provide solid evidence of the controversial theory Zwicky had offered forty years earlier.

Continue reading “Vera Rubin: Shedding Light On Dark Matter”