Today we heard from [Richard James Howe] about his new CPU. This new 16-bit CPU is implemented in VHDL for an FPGA.
The really cool thing about this CPU is that it eschews the typical program counter (PC) and replaces it with a linear-feedback shift register (LFSR). Apparently an LFSR can be implemented in hardware with fewer transistors than are required by an adder.
Usually the program counter in your CPU increments by one, each time indicating the location of the next instruction to fetch and execute. When you replace your program counter with an LFSR it still does the same thing, indicating the next instruction to fetch and execute, but now those instructions are scattered pseudo-randomly throughout your address space!
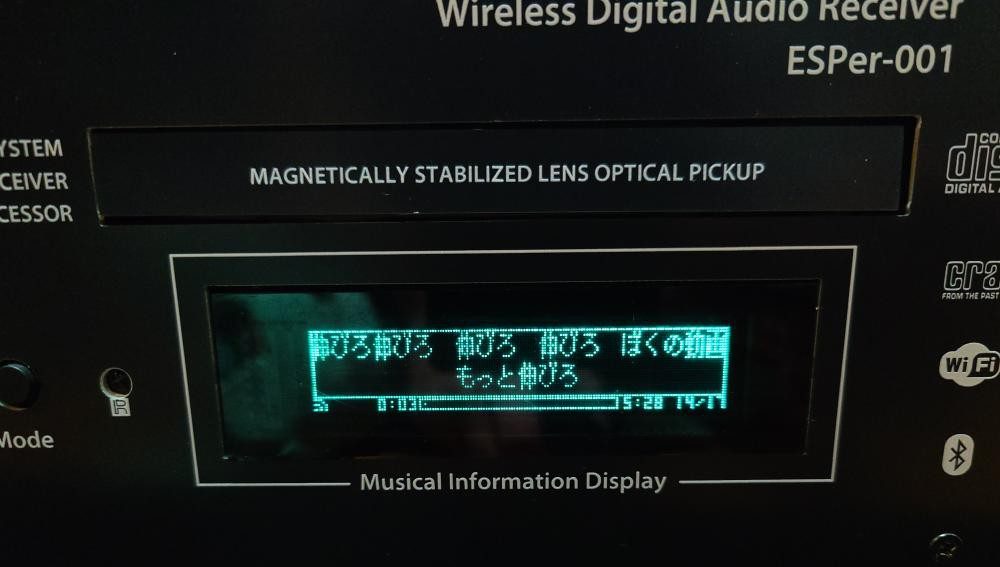
What do you get when you combine an ESP32, a 16-bit DAC, an antique VFD, and an IDE CD-ROM drive? Not much, unless you put in the work, which [Akasaka Ryuunosuke] did to create ESPer-CDP, a modern addition for your hi-fi rack.
It plays CDs (of course), but also can also scrobb the disks to Last.fm, automatically fetch track names and lyrics for CDs, and of course stream internet radio. It even acts as a Bluetooth speaker, because when you have an ESP32 and a DAC, why not? Of course we cannot help but award extra style points for the use of a VFD, a salvaged Futaba GP1232A02. There’s just something about VFDs and stereo equipment that makes them go together like milk and cookies.
Between the panel and the VFD, this could almost pass as vintage Sony.
In terms of CD access, it looks like the IDE interface is being used to issue ATAPI commands to the CD-ROM drive to get audio out via S/PDIF. (Do you remember when you had to hook your CD drive to your sound card to play music CDs?) This goes through a now-discontinued WM8805 receiver — a sign this project has been in the works for a while — that translates S/PDIF into an I2S stream the ESP32 can easily work with.
Work with it it does, with the aforementioned scrobbing, along with track ID and time-sinked lyrics via CDDB or MusicBrainz. The ESP32 should have the computing power to pull data through the IDE bus and decode it, but we have to admit that this hack gets the job done — albeit at the expense of losing the ability to read data CDs, like MP3 or MIDI. [Akasaka Ryuunosuk] has plans to include such functionality into v2, along with the ability to use a more modern SATA CD-ROM drive. We look forward to seeing it, especially if it keeps the VFD and classic styling. It just needs to be paired with a classic amplifier, and maybe a DIY turntable to top off the stack.
Thanks to [Akasaka Ryuunosuke] for the tip. If you also crave our eternal gratitude (which is worth its weight in gold, don’t forget), drop us a tip of your own. We’d love to hear from you.
In a fusion of scrapyard elegance and Aussie ingenuity, [Mark Makies] has given a piece of old steel a steamy second life with his ‘CastAway Tub’. Call it a bush mechanic’s fever dream turned functional sculpture, starring two vintage LandCruiser leaf springs, and a rust-hugged cast iron tub dug up after 20 years in hiding. And put your welding goggles on, because this one is equal parts brute force and artisan flair.
What makes this hack so bold is, first of all, the reuse of unforgiving spring steel. Leaf springs, notoriously temperamental to weld, are tamed here with oxy-LPG preheating, avoiding thermal shock like a pro. The tub sits proudly atop a custom-welded frame shaped from dismantled spring packs, with each leaf ground, clamped, torched, and welded into a steampunk sled base. The whole thing looks like it might outrun a dune buggy – and possibly bathe you while it’s at it. It’s a masterclass in metalwork with zero CAD, all intuition, and a grinder that’s seen things.
Inspired? For those with a secret love for hot water and hot steel, this build is a blueprint for turning bush junk into backyard art. Read up on the full build at Instructables.
Motorized faders are very cool, and you can find them in everything from expensive mixing desks to high-end video editing decks. If you want to build your own wireless motorized fader controls for your own projects, you might like this project from [Ian Peterson].
Faders are useful controls, but they’re usually very one-way devices—you set them to what you want, and that’s it. However, motorized faders are a little fancier. You can move them yourself, or they can be moved under the command of other hardware or software—making a control change automatically that is still visible to the human in front of the control panel.
[Ian Peterson] built his OSCillator motorized fader for his work with lighting consoles in theater contexts. Its name references the Open Sound Control (OSC) platform which is commonly used across various lighting consoles. His build relies on an ESP32 to run the show, which communicates with other lighting hardware via WiFi. The microcontroller is responsible for reading the position of the fader and built-in button, and sending the relevant commands to other lighting devices on the network. At the same time, it must also listen to commands from lighting consoles on the network and update the motorized fader’s position in turn if the relevant control it’s mapped to has been changed elsewhere.
If you’re working in theater or film and you’re wanting to control lighting cues wirelessly, a tool like this can really come in handy. We don’t see a lot of motorized faders in DIY projects, but they pop up now and then.
In a marvelous college lecture in front of a class of engineering students, V. Hunter Adams professed his love for embedded engineering, but he might as well have been singing the songs of our people – the hackers. If you occasionally feel the need to explain to people why you do what you do, at fancy cocktail parties or something, this talk is great food for thought. It’s about as good a “Why We Hack” as I’ve ever seen.
Among the zingers, “projects are filter removers” stuck out. When you go through life, there are a lot of things that you kinda understand. Or maybe you’ve not even gotten around to thinking about whether you understand them or not, and just take them for granted. Life would all simply be too complicated if you took it all sufficiently seriously. Birdsong, Bluetooth, the sun in the sky, the friction of your car’s tire on various surfaces. These are all incredibly deep subjects, when you start to peel back the layers.
And Hunter’s point is that if you are working on a project that involves USB, your success or failure depends on understanding USB. There’s no room for filters here – the illusion that it “just works” often comes crashing down until you learn enough to make it work. Some of his students are doing projects cooperatively with the ornithology department, classifying and creating birdsong. Did you know that birds do this elaborate frequency modulation thing when they sing? Once you hear it, you know, and you hear it ever more.
So we agree with Hunter. Dive into a project because you want to get the project done, sure, but pick the project because it’s a corner of the world that you’d like to shine light into, to remove the filters of “I think I basically understand that”. When you get it working, you’ll know that you really do. Hacking your way to enlightenment? We’ve heard crazier things.
This article is part of the Hackaday.com newsletter, delivered every seven days for each of the last 200+ weeks. It also includes our favorite articles from the last seven days that you can see on the web version of the newsletter.
Want this type of article to hit your inbox every Friday morning? You should sign up!
It would be hard to find any electronics still in production which use CRT displays, but for some inscrutable reason it’s easy to find cheap 4-inch CRTs on AliExpress. Not that we’re complaining, of course. Especially when they get picked up for projects like this Retro CRT Weather Display from [Conrad Farnsworth], which recreates the interface of The Weather Channel’s WeatherStar 4000+ in a suitably 90s-styled format.
The CRT itself takes up most of the space in the enclosure, with the control electronics situated in the base behind the display driver. A Raspberry Pi Zero W provides the necessary processing power, and connects to the CRT through its composite video output.
A custom PCB plugs into the GPIO header on the Raspberry Pi and provides some additional features, such as a rotary encoder for volume and brightness display, a control button, a serial UART interface, and a speaker driver. The design still has one or two caveats: it’s designed to powered by USB, but [Conrad] notes that it draws more current than USB 2.0 can provide, though USB-C should be able to keep up.
On the software side, a Python program displays a cycle of three slides: local weather, regional weather, and a radar display. For the local and regional weather display graphics, [Conrad] created a static background image containing most of the graphics, and the program only generated the dynamic components. For the radar display, the regional map’s outlines come from Natural Earth, and a Python program overlays radar data on them.
A treadmill-style bed can be a great addition to a 3D printer. It allows prints to be shifted out of the build volume as printing continues, greatly increasing the size and flexibility of what you can print. But [Ivan Miranda] and [Jón Schone] had a question. Instead of making a treadmill to suit a 3D printer, what if you just built a 3D printer on top of a full-size treadmill?
The duo sourced a piece of real gym equipment for this build. They then set about building a large-scale 3D printer on top of this platform. The linear rails were first mounted on to the treadmill’s frame, followed by a gantry for the print head itself and mounts for the necessary stepper motors. The printer also gained a custom extra-large extruder to ensure a satisfactory print speed that was suitable for the scale of the machine. From there, it was largely a case of fitting modules and running cables to complete the printer.
Soon enough, the machine was printing hot plastic on the treadmill surface, thereby greatly expanding the usable print volume. It’s a little tricky to wrap your head around at first, but when you see it in action, it’s easy to see the utility of a build like this, particularly at large scale. [Ivan] demonstrated this by printing a massive girder over two meters long.