Exquisite Craftsmanship Elevate Vic’s Creations Above The Rest

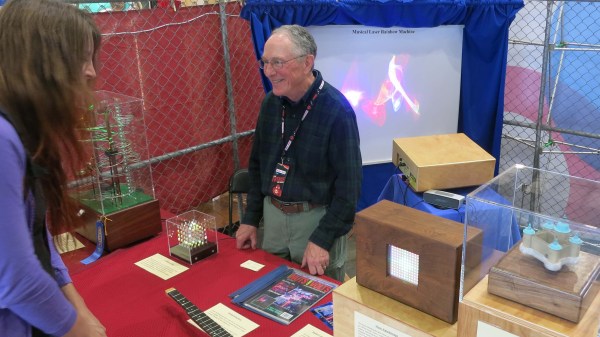
This booth was easy to miss at Maker Faire Bay Area 2019 amidst tall professional conference signage erected by adjacent exhibitors. It showcased the work of [Dr. Victor Chaney] who enjoys his day job as a dentist and thus feels no desire to commercialize his inventions — he’s building fun projects for the sake of personal enjoyment which he simply calls Vic’s Creations. Each project is built to his own standards, which are evidently quite high judging by the perfect glossy finish on every custom wood enclosure.

Some of these creations were aligned with his musical interests. The Backpacking Banjo was built around a (well cleaned) cat food can to satisfy the desire for a lightweight instrument he can take camping. His Musical Laser Rainbow Machine (fully documented in Nuts & Volts) was created so little bands formed by independent artists like himself can have a visual light show to go with their live performances. The Music Kaleidoscope is another execution along similar lines, with an LED array whose colors are dictated by music. Venturing outside the world of music, we see a magnetically levitated Castle In The Clouds which also receives power wirelessly to illuminate LEDs

The largest and most complex work on display is an epic electromechanical masterpiece. Par One is a rolling ball sculpture featuring the most convoluted golf course ever. Several more rolling ball sculptures (also called marble machines or marble runs) are on display at Dr. Chaney’s office which must make it the coolest dentist’s lobby ever. The lifelike motions he was able to get from the automatons he built into the sculpture are breathtaking, as you can see below.

Continue reading “Exquisite Craftsmanship Elevate Vic’s Creations Above The Rest”

Successful Experiments In Multicolor Circuit Boards

Printed circuit boards have never been cheaper or easier to make. We’re not that far removed from a time where, if you wanted a printed circuit board, your best and cheapest option would be to download some proprietary software from a board house, use their terrible tool, and send your board off to be manufactured. A few copies of a 5x5cm board would cost $200. Now, anyone can use free (as in beer, if not speech) software, whip up a board, and get a beautifully printed circuit board for five dollars. It has never been easier to make a printed circuit board, and with that comes a new medium of artistic expression. Now, we can make art on PCBs.

PCB as Art

For the last year or so, Hackaday has been doing a deep-dive into the state of artistic PCBs. By far our biggest triumph is the Tindie Blinky Badge, an artistic representation of a robot dog with blinking LED eyes. [Andrew Sowa] turned some idiot into PCB coinage, and that same idiot experimented with multicolor silkscreen at last year’s DEF CON.

Others have far surpassed anything we could ever come up with ourselves; [Trammel Hudson] created an amazing blinky board using the standard OSHPark colors, and [Blake Ramsdell] is crafting full panels of PCB art. The work of Boldport and [Saar Drimer] has been featured in Marie Claire. The world of art on printed circuit boards has never been more alive, there has never been more potential, and the artistic output of the community is, simply, amazing. We are witnessing the evolution of a new artistic medium.

Printed circuit boards are a limited medium. Unless you want to shell out big bucks for more colors of silkscreen, weird colors of soldermask, or even multiple colors of soldermask, you will be limited to the standard stackup found in every board house. One color, the fiberglass substrate, will be a pale yellow. The copper layer will be silver or gold, depending on the finish. The soldermask will be green, red, yellow, blue, black, white, and of course purple if you go through OSH Park. The silkscreen will be white (or black if you go with a white soldermask). What I’m getting at is that the palette of colors available for PCB art is limited… or at least it has been.

For a few months now, Hackaday has been experimenting with a new process for adding colors to printed circuit boards. This is a manufacturing process that translates well into mass production. This is a process that could, theoretically, add dozens of colors to any small PCB. It’s just an experiment right now, but we’re happy to report some limited success. It’s now easy — and cheap — to add small amounts of color to any printed circuit board.

Continue reading “Successful Experiments In Multicolor Circuit Boards”

Magic Leap Finally Announced; Remains Mysterious

Yesterday Magic Leap announced that it will ship developer edition hardware in 2018. The company is best known for raising a lot of money. That’s only partially a joke, since the teased hardware has remained very mysterious and never been revealed, yet they have managed to raise nearly $2 billion through four rounds of funding (three of them raising more than $500 million each).

The announcement launched Magic Leap One — subtitled the Creator Edition — with a mailing list sign up for “designers, developers and creatives”. The gist is that the first round of hardware will be offered for sale to people who will write applications and create uses for the Magic Leap One.

We’ve gathered some info about the hardware, but we’ll certainly begin the guessing game on the specifics below. The one mystery that has been solved is how this technology is delivered: as a pair of goggles attaching to a dedicated processing unit. How does it stack up to current offerings?

Continue reading “Magic Leap Finally Announced; Remains Mysterious”

A Grenade Launcher Named RAMBO

Always one to push the envelope, U.S. Army researchers from the U.S. Army Armament Research, Development and Engineering Center (ARDEC) have been successfully experimenting with 3D printing for one of their latest technologies. The result? RAMBO — Rapid Additively Manufactured Ballistic Ordinance — a 40mm grenade launcher. Fitting name, no?

Virtually the entire gun was produced using additive manufacturing while some components — ie: the barrel and receiver — were produced via direct metal laser sintering (DMLS). So, 3D printed rounds fired from a 3D printed launcher with the only conventionally manufactured components being springs and fasteners, all within a six month development time.

Continue reading “A Grenade Launcher Named RAMBO”

Three Of Our Favorite Hackers

It’s one thing to pull off a hack, it’s another entirely to explain it so that everyone can understand. [Micah Elizabeth Scott] took a really complicated concept (power glitching attacks) and boiled a successful reverse engineering process into one incredible video. scanlime-power-smoothing-alterationsWe know, watching 30 minutes of video these days is a huge ask, just watch it and thank us later.

She explains the process of dumping firmware from a Wacom tablet by hacking what the USB descriptors share. This involves altering the power rail smoothing circuit, building her own clock control board to work with the target hardware and a ChipWhisperer, then iterating the glitch until she hones in on the perfect attack.

This, of course isn’t her first rodeo. Also known as [scanlime], she’s been on the scene in a big way for a while now. Check out more of her work, and perhaps congratulate her on recently being scooped up for a Principal Researcher role that we’d like to attribute in part to the hacks she’s been demoing online. You should also thank her for being a Hackaday Prize Judge in 2015 and 2016.

led-handbag-debra-ansel-geekmomprojects-closeupThis year we spotted [Debra Ansell] at Maker Faire, not as an exhibitor but an attendee taking her newest creation out in the wild. [Debra’s] LED matrix handbag is a marvel of fabrication — both design and execution are so great it is hard to believe this is not a commercially available product. But no, the one-of-a-kind bag uses woven leather strips spaced perfectly to leave room for WS2812 RGB LED modules to nestle perfectly. Look slike she even posted a tutorial since we last checked! If you don’t recognize her name, you might recognize her company: GeekMomProjects. She’s the person behind EtchABot, a robotic addendum to the diminutive pocket Etch a Sketch which [Debra] sells on Tindie.

troubleshooting-veronica-custom-6502-computer
The custom PCBs of Veronica (in troubleshoot mode)

Our fascination with [Quinn Dunki]’s work goes way way back. She has a software background but her hardware chops are to be admired. Recently we’ve delighted in her efforts to beef up the fabrication abilities of her shop. Want to know how to vet your new drill press — [Quinn] has you covered. We also enjoyed seeing her bring an inexpensive bandsaw up to snuff. There are too many other great hacks from [Quinn Dunki] to start naming them all. We’ll leave you with her amazing work on Veronica, the scratch-built 6502 computer that she brought with her for her Hackaday 10th Anniversary talk. Her avatar at the top is from one of her PCB etching tutorials.

Celebrating Ada Lovelace Day

Today is the second Tuesday in October — it’s Ada Lovelace day, a worldwide celebration of women in science and technology. The hackers above are some of our all-around favorites and we have featured all of their work frequently. Their impact on technology is undeniable, we give them much respect for their skills and accomplishments. We’d love to hear your own favorite examples of women who have incredible game when it comes to hardware hacking. Please let us know in the comments below.

Hands-On The Shaper Origin: A Tool That Changes How We Build

I bet the hand saw really changed some things. One day you’re hacking away at a log with an ax. It’s sweaty, awful work, and the results are never what you’d expect. The next day the clever new apprentice down at the blacksmith’s shop is demoing his beta of his new Saw invention and looking for testers, investors, and a girlfriend. From that day onward the work is never the same again. It’s not an incremental change, it’s a change. Pure and simple.

This is one of those moments. The world of tools is seeing a new change, and I think this is the first of many tools that will change the way we build.

Like most things that are a big change, the components to build them have been around for a while. In fact, most of the time, the actual object in question has existed in some form or another for years. Like a crack in a dam, eventually someone comes up with the variation on the idea that is just right. That actually does what everything else has been promising to do. It’s not new, but it’s the difference between crude and gasoline.

My poetic rasping aside, the Shaper Origin is the future of making things. It’s tempting to boil it down and say that it’s a CNC machine, or a router. It’s just, more than that. It makes us more. Suddenly complex cuts on any flat surface are easy. Really easy. There’s no endless hours with the bandsaw and sander. There’s no need for a 25,000 dollar gantry router to take up half a garage. No need for layout tools. No need to stress about alignment. There’s not even a real need to jump between the tool and a computer. It can be both the design tool and the production tool. It’s like a magic pencil that summons whatever it draws. But even I had to see it to believe it.

Continue reading “Hands-On The Shaper Origin: A Tool That Changes How We Build”

The Raspberry Pi Infinity+ Is A Fully Functional Huge Raspberry Pi

It wasn’t an easy weekend for the rest of the world’s hackers and makers, that of the Bay Area Maker Faire. Open your social media accounts, and most of your acquaintances seemed to be there and having a great time, while the rest were doing the same at the Dayton Hamvention. Dreary televised sports just didn’t make up for it.

MCM Electronics had the Maker Faire booth next to that of the Raspberry Pi Foundation, and since they needed both a project to show off and a statement item to draw in the crowds, they came up with the idea of a 10x scale reproduction of a Raspberry Pi above the booth. And since it was Maker Faire this was no mere model; instead it was a fully functional Raspberry Pi with working LEDs and GPIO pins.

The project started with a nearly faithful (We see no Wi-Fi antenna!) reproduction of a Raspberry Pi 3 in Adobe Illustrator. The circuit board was a piece of MDF with a layer of foam board on top of it with paths milled out for wiring and the real Pi which would power the model, hidden under the fake processor. The LEDs were wired into place, then the Illustrator graphics were printed into vinyl which was wrapped onto the board, leaving a very two-dimensional Pi.

The integrated circuits and connectors except for the GPIO pins were made using clever joinery with more foam board, then wrapped in more printed vinyl and attached to the PCB. A Pi camera was concealed above the Broadcom logo on the processor model, to take timelapse pictures of the event. This left one more component to complete, the GPIO pins which had to be functional and connected to the pins on the real Pi concealed in the model. These were made from aluminium rods, which were connected to a bundle of wires with some soldering trickery, before being wired to the Pi via the screw terminals on a Pi EZ-Connect HAT from Alchemy Power.

Is the challenge now on for a range of compatible super-HATs to mate with this new GPIO connector standard?

We previously covered the 2012 Maker Faire exhibit that inspired this huge Pi. The Arduino Grande was as you might well guess, a huge (6x scale) fully functional Arduino. In fact, the world seems rather short of working huge-scale models of single board computers, though we have featured one or two working small-scale computer models.

Thanks [Michael K Castor] and [Christian Moist] for sharing their project with us.