Programming Ada: Implementing The Lock-Free Ring Buffer

In the previous article we looked at designing a lock-free ring buffer (LFRB) in Ada, contrasting and comparing it with the C++-based version which it is based on, and highlighting the Ada way of doing things. In this article we’ll cover implementing the LFRB, including the data request task that the LFRB will be using to fill the buffer with. Accompanying the LFRB is a test driver, which will allow us to not only demonstrate the usage of the LFRB, but also to verify the correctness of the code.

This test driver is uncomplicated: in the main task it sets up the LFRB with a 20 byte buffer, after which it begins to read 8 byte sections. This will trigger the LFRB to begin requesting data from the data request task, with this data request task setting an end-of-file (EoF) state after writing 100 bytes. The main task will keep reading 8-byte chunks until the LFRB is empty. It will also compare the read byte values with the expected value, being the value range of 0 to 99.

Continue reading “Programming Ada: Implementing The Lock-Free Ring Buffer”

Programming Tiny Blinkenlight Projects With Light

[mitxela] has a tiny problem, literally: some of his projects are so small as to defy easy programming. While most of us would probably solve the problem of having no physical space on a board to mount a connector with WiFi or Bluetooth, he took a different path and gave this clever light-based programming interface a go.

Part of the impetus for this approach comes from some of the LED-centric projects [mitxela] has tackled lately, particularly wearables such as his LED matrix earrings or these blinky industrial piercings. Since LEDs can serve as light sensors, albeit imperfect ones, he explored exactly how to make the scheme work.

For initial experiments he wisely chose his larger but still diminutive LED matrix badge, which sports a CH32V003 microcontroller, an 8×8 array of SMD LEDs, and not much else. The video below is a brief summary of the effort, while the link above provides a much more detailed account of the proceedings, which involved a couple of false starts and a lot of prototyping that eventually led to dividing the matrix in two and ganging all the LEDs in each half into separate sensors. This allows [mitxela] to connect each side of the array to the two inputs of an op-amp built into the CH32V003, making a differential sensor that’s less prone to interference from room light. A smartphone app alternately flashes two rectangles on and off with the matrix lying directly on the screen to send data to the badge — at a low bitrate, to be sure, but it’s more than enough to program the badge in a reasonable amount of time.

We find this to be an extremely clever way to leverage what’s already available and make a project even better than it was. Here’s hoping it spurs new and even smaller LED projects in the future.

Continue reading “Programming Tiny Blinkenlight Projects With Light”

Secret Messages On Plastic, Just Add Tesla Coil

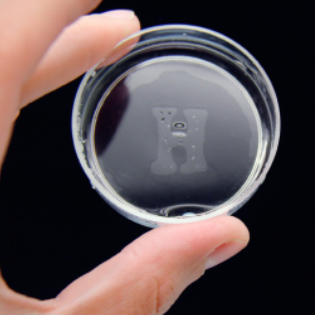
Here’s a short research paper from 2013 that explains how to create “hydroglyphics”, or writing with selecting surface wetting. In it, an apparently normal-looking petri dish is treated so as to reveal a message when wetted with water vapor. The contrast between hydrophobic and hydrophilic surfaces, which is not visible to the naked eye, becomes visible when misted with water. All it took was a mask, and a little treatment with a modified Tesla coil.

Plastics tend to be hydrophobic, meaning their surface repels water. These plastics also tend to be non-receptive to things like inks and adhesives. However, there is an industrial process called corona treatment (invented by Verner Eisby in 1951) that changes the surface energy of materials like plastics, rendering them more receptive to inks, coatings, and adhesives. Eisby’s company Vetaphone still exists today, and has a page describing the process.

What’s this got to do with the petri dishes and their secret messages? The process is essentially the same. By using a Tesla coil modified with a metal wire mesh, the surface of the petri dish is exposed to the coil’s discharge, altering its surface energy and rendering it hydrophilic. By selectively blocking the discharge with a nonconductive mask made from a foam sticker, the masked area remains hydrophobic. Mist the surface with water, and the design becomes visible.

The effects of corona treatment decay over time, but we think this is exactly the sort of thing that is worth keeping in mind just in case it ever comes in useful. Compact Tesla coils are fairly easy to get a hold of nowadays, but it’s also possible to make your own.

Spin Your Own Passive Cooling Fibres

When the temperature climbs, it’s an eternal problem: how to stay cool. An exciting field of materials science lies in radiative cooling materials, things which reflect so much incoming heat that they can cool down from their own radiation rather than heating up in the sun. It’s something [NightHawkInLight] has been working on over a series, and he’s dropped a very long video we’ve placed below. It’s ostensibly about spinning radiative cooling fibers, but in fact provides a huge quantity of background as well as a bonus explanation of cotton candy machines.

These materials achieve their reflectivity by creating a surface full of microscopic bubbles. It’s the same process that makes snow so white and reflective, and in this case it’s achieved by dissolving a polymer in a mixture of two solvents. The lower boiling point solvent evaporates first leaving the polymer full of microscopic bubbles of the higher boiling point solvent, and once these evaporate they leave behind the tiny voids. In the video he’s using PLA, and we see him experimenting with different solvents and lubricants to achieve the desired result. The cotton candy machine comes in trying to create fibers by melting solid samples, something which doesn’t work as well as it could so instead he draws them by hand with a small rake.

When he tests his mat of fibers in bright sunlight the effect is almost magical if we didn’t already know the mechanism, they cool down by a few degrees compared to ambient temperature and the surrounding control materials. This is a fascinating material, and we hope we’ll see more experimenters working with it. You won’t be surprised to hear we’ve featured his work before.

Continue reading “Spin Your Own Passive Cooling Fibres”

A map of the US showing the potential changes to passenger rail service due to the Corridor ID Program

A New Era For US Passenger Rail?

Here in the United States, we’re lagging behind the rest of the world when it comes to shiny new passenger rail, despite being leaders in previous centuries. The Federal Railroad Administration (FRA) has just released a story map of how the US could close the gap (a little).

A new blue and white high speed train crosses a brick bridge. There is what looks like a park beneath and a cityscape in the background.The Corridor Identification and Development (CID) Program is a way for FRA to provide both funding and technical assistance as corridor sponsors (mostly state Departments of Transportation) evaluate either new intercity service or expansion of existing services. While it isn’t a guarantee of anything, it is a step in the right direction to rebuilding passenger rail capacity in the US.

Some cities would be getting rail service back for the first time in decades, and perhaps even more exciting is that several of the routes being studied are for high speed rail “primarily or solely on new trackage.” As any railfan can tell you, vintage rails aren’t the best for trains going fast (sorry, Acela). With recent polling showing strong public support for the build out of high speed rail, it’s an exciting time for those who prefer to travel by rail.

We don’t think you’ll be able to ride a gyro monorail, nuclear-powered, or jet train on these proposed routes, but we do hope that Amtrak and FRA are looking to the state-of-the-art when it comes to those high speed alignments. While you’re eagerly awaiting new passenger service, might we recommend this field guide to what all those different freight cars going by are for here in North America?

A man's hand with a black ring touches a white box. It is square on the bottom and has a sloped top. Various AC, 12V, and USB ports adorn its surface. It's approximately the size of a human head.

DIY Off Grid Battery Pack From EV Battery

Car camping gets you out in the great outdoors, but sometimes it’s nice to bring a few comforts from home. [Ed’s Garage] has taken a module from a salvaged EV and turned it into a handy portable power station.

With 2.3 kWh of storage from the single Spark EV module, the battery pack can power [Ed]’s hotplate, lights, fridge, and other electric accessories while camping away from shore power. The inverter he selected can provide up to 1500W of AC power and his 12V converter can do 150W. Several USB ports and a wireless charging pad adorn the outside next to the waterproof AC ports. He even printed a small magnetic flashlight to reuse the light from the inverter which uses an 18650 cell that can be charged from the big battery in a charger built into the exterior of the pack.

The battery management system (BMS) has a Bluetooth module allowing for remote monitoring of state of charge and setting the maximum and minimum charge points for the pack. The whole thing comes in at 73 pounds (33 kg), and while he had originally thought to give it wheels to roll, he changed his mind once he thought more about what sort of wheels he’d need to maneuver the thing in the backcountry.

If you’re thinking of building your own power pack, why not checkout a few other builds for inspiration like this one from tool batteries or one designed to charge directly from a solar panel. Be sure you checkout our guide on how to select a BMS if you’re going to use a lithium-based chemistry.

Continue reading “DIY Off Grid Battery Pack From EV Battery”

LightBurn Turns Back The Clock, Bails On Linux Users

Angry Birds, flash mobs, Russell Brand, fidget spinners. All of these were virtually unavoidable in the previous decade, and yet, like so many popular trends, have now largely faded into obscurity. But in a recent announcement, the developers of LightBurn have brought back a relic of the past that we thought was all but buried along with Harambe — popular software not supporting Linux.

But this isn’t a case of the developers not wanting to bring their software to Linux. LightBurn, the defacto tool for controlling hobbyist laser cutters and engravers, was already multi-platform. Looking forward, however, the developers claim that too much of their time is spent supporting and packaging the software for Linux relative to the size of the user base. In an announcement email sent out to users, they reached even deeper into the mid-2000s bag of excuses, and cited the number of Linux distributions as a further challenge:

The segmentation of Linux distributions complicates these burdens further — we’ve had to provide three separate packages for the versions of Linux we officially support, and still encounter frequent compatibility issues on those distributions (or closely related distributions), to say nothing of the many distributions we have been asked to support.

We’re not sure how much of their time could possibly be taken up by responding to requests for supporting additional distributions (especially when the answer is no), but apparently, it was enough that they finally had to put their foot down — the upcoming 1.7.00 release of LightBurn will be the last to run on Linux.

Continue reading “LightBurn Turns Back The Clock, Bails On Linux Users”