Upgrading A Cheap LX-2BUPS UPS Board To Fix Fatal Flaws

Cheap uninterruptable power supply (UPS) boards that take Li-ion cells of some description seem to have cropped up everywhere the past years. Finding use in applications such as keeping single-board computers ticking along in the case of a power failure, they would seem to be a panacea. Unfortunately most of these boards come with a series of fatal flaws, such as those that [MisterHW] found in an LX-2BUPS board obtained from AliExpress. Worst of all was the deep discharge of the Li-ion cells to below 2 V, which took some ingenuity and hard work to fix this and other problems.

The patched up XR2981 boost IC with MCP809 reset IC installed. (Credit: [MisterHW])
This particular board is rated for 5V at 3A, featuring the all too common TP4056 as charging IC and the XYSemi XR2981 boost converter. Since there is no off-switch or other protections on the board, the XR2981 will happily keep operating until around 2.6V, at a rather astoundingly high idle power consumption. Because of this the fixes mostly concentrated on optimizing the XR2981, by using better resistor values (R7, R8, R9), as well as adding a 3.15V MCP809 reset IC, to reduce idle power usage of the boost converter and disable it below a safe cell voltage.

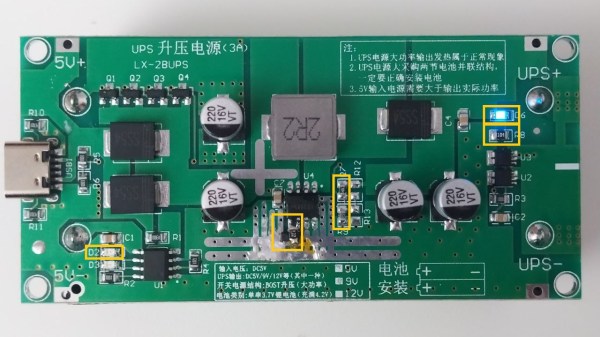
The final coup de grâce was the eviction of the red LED (D6) and replacing it with the blue LED from D2, to stop the former from draining the cell as well. With these changes in place, no-load power usage dropped from nearly 900 µA to just over 200 µA, while preventing deep discharge. Although this board now has a second life, it does raise the question of what the point of these cheap UPS boards is if you have to spend money and time on reworking them before they’re somewhat acceptable. What is your go-to solution for these boards?

A DIY E-Ink Tank Watch

[Augusto Marinucci] liked the classic Cartier Tank series of dress watches aesthetic, but wanted something a bit more techy, with a decent runtime on a single battery. E-Ink displays are often used in such applications, but finding one to fit a custom case design, is a tall order. When ordering one off the shelf is not easy, the solution is to make one from scratch.

Building a programming jig is a great idea for small-scale production

The article doesn’t have much information on the E-Ink side of things, which is a bit of a shame. But from what we can glean, the segment shapes — in this case, based on the famous Apollo DSKY — are formed in the top copper of a four-layer PCB, using filled and capped vias to connect invisibly from below.

A donor E-Ink display is cut to size with scissors (we don’t know much more than this!) and glued in place around the edge to make the common electrode connection. The display PCB attaches to the control PCB, at the rear using low-profile board-to-board connectors. This board hosts a PIC16 micro, as well as an RV-3028-C7 RTC which keeps time whilst consuming a paltry 45 nA.

Five volts are provided via a MAX1722 low-power boost converter which is fed power from the CR1616 cell via a couple of logic-controllable load switches. With a low-power design such as this, it’s critical to get this correct. Any mistakes here can easily result in a very low runtime. It is easy to over-stress small button cells and kill them prematurely.

The case looks like it’s printed in a translucent resin, with the PCB stack sealed inside with a UV-cured resin pour. It’s not immediately obvious if the rear panel can be removed to access the battery and programming port. There are what appear to be screw holes, so maybe that’s possible, or maybe they’re the rear side of the PCB mounting posts. Who can tell?

If DIY hardware is but too much effort for you, then there’s the option of hacking new firmware onto an existing watch, or perhaps meeting in the middle and making something out of all those junk E-ink tags you can get from time to time?

Thanks to [JohnU] for the tip!

Upgrading At Least One Component Of A TI Calculator

Even though Texas Instruments were the first company to produce an integrated circuit and a microprocessor, their success as a company in the 60s and 70s was not guaranteed. At the time there wasn’t much demand for previously non-existent products like these, so to drive some business they built the first hand-held calculator, a venture that they are still famous for today. Since then, though, they’ve become a bit of a punchline for producing calculators with decades-old technology but with modern price tags, so while this business model was quite successful if you want a calculator with a few modern features you’ll have to take a DIY approach like this calculator retrofitted with a LiPo battery.

The modern battery pack, with a lithium polymer battery at its core, includes all of the circuitry needed to integrate it seamlessly into the TI-59 calculator, which is all available on the project’s GitHub page. This calculator originally used a 9V battery, so the new battery pack includes a boost converter to match the 3.7V from the new battery to the needs of the old calculator. It doesn’t stop there, though. The pack is rechargeable from an included USB-C port, has a built-in charge controller, and is housed in its own custom-built case that fits neatly into the calculator where the old battery would sit.

While this wouldn’t be a drop-in replacement for more modern calculators like the TI-83/84 and TI-89, a new case and a different boost converter would solve the problem of the AAA batteries dying during exams. It might make the calculators non-compliant with various standardized testing requirements, though (which TI was also instrumental in developing) so you may want to verify with your testing standard of choice before modifying a calculator you need for an exam. But if all the rules are off, why not add Wi-Fi to it too?

Saving PIC Microcontrollers With DIY Programmer

When working on a project, plenty of us will reach for an Atmel microcontroller because of the widespread prevalence of the Arduino platform. A few hackers would opt for a bit more modern part like an ESP32. But these Arduino-compatible platforms are far from the only microcontrollers available. The flash-based PIC family of microcontrollers is another popular choice. Since they aren’t quite as beginner or user-friendly, setting up a programmer for them is not as straightforward. [Tahmid] needed to program some old PIC microcontrollers and found the Pi Pico to be an ideal programmer.

The reason for reaching for the Pico in the first place was that [Tahmid] had rediscovered these decade-old microcontrollers in a parts bin but couldn’t find the original programmer. Thanks to advances in technology in the last ten years, including the advent of micropython, the Pico turned out to be the ideal programmer. Micropython also enables a fairly simple drag-and-drop way of sending the .hex file to the PIC, so the only thing the software has to do is detect the PIC, erase it, and flash the .hex file. The only physical limitation is that the voltages needed for the PIC are much higher than the Pico can offer, but this problem is easily solved with a boost converter (controlled by the Pico) and a level shifter.

[Tahmid] notes that there’s plenty of room for speed and performance optimization, since this project optimized development time instead. He also notes that since the software side is relatively simple, it could be used for other microcontrollers as well. To this end, he made the code available on his GitHub page. Even if you’re more familiar with the Arduino platform, though, there’s more than one way to program a microcontroller like this project which uses the Scratch language to program an ESP32.

Open Source DC UPS Keeps The Low-Voltage Gear Going

We all like to keep our network gear running during a power outage — trouble is, your standard consumer-grade uninterruptible power supply (UPS) tends to be overkill for routers and such. Their outlet strips built quickly get crowded with wall-warts, and why bother converting from DC to AC only to convert back again?

This common conundrum is the inspiration for [Walker]’s DC UPS design, which has some interesting features. First off, the design is open source, which of course invites tinkering and repurposing. The UPS is built for a 12 volt supply and load, but that obviously can be changed to suit your needs. The battery bank is a 4S3P design using 18650 cells, and that could be customized as well. There’s an ideal diode controller that prevents DC from back-feeding into the supply when the lights go out, and a really interesting synchronous buck-boost converter in place of the power management chip you’d normally see in a UPS. The converter chip takes a PWM signal from an RP2040; there’s also an ESP32 onboard for web server and UI duties as well as an STM32 to run the BMS. The video below discusses the design and shows a little of the build.

We’ve seen a spate of DC UPS designs lately, some more elaborate than others. This one has quite a few interesting chips that most of us don’t normally deal with, and it’s nice to see how they’re used in a practical design.

Continue reading “Open Source DC UPS Keeps The Low-Voltage Gear Going”

Building A Solar-Powered, Supercapacitor-Based Speaker

Inspired by many months of hours-long load shedding in South Africa, [JGJMatt] decided to make a portable speaker that can play tunes for hours on a single charge and even charge off the integrated solar panel to top the charge off. None of this should sound too surprising, but what differentiates this speaker is the use of two beefy 400 F, 2.7 V supercapacitors in series rather than a lithium-ion battery on the custom PCB with the Ti TPA2013D1 Class-D mono amplifier.

Insides of the speaker prior to stuffing and closing.

The reason for supercapacitors is two-fold. The first is that their lifespan is much longer than that of Li-ion batteries, the second that they can charge much faster. The disadvantages of supercapacitors come in the form of their lower energy density and linear discharge voltage. For the latter issue the TPA2301D1 amplifier has a built-in boost converter for an input range from 1.8 – 5.5 V, and despite the lower energy density a solid 6 hours of playback are claimed.

Beyond the exquisitely finished 3D printed PETG shell and TPU-based passive bass radiator, the functionality consists out of a single full-range speaker and an analog audio input (TRS jack and USB-C). To add Bluetooth support [JGJMatt] created a module consisting out of a Bluetooth module that connects to the USB-C port for both power and analog audio input.

Charging the speaker can be done via the USB-C port, as well as via the solar panel. This means that you can plug its USB-C port into e.g. a laptop’s USB-C port and (hopefully) charge it and play back music at the same time.

For those feeling like replicating this feat, the Gerbers, bill of materials, enclosure STLs, and everything else needed can be be found in the tutorial.

Continue reading “Building A Solar-Powered, Supercapacitor-Based Speaker”

2023 Halloween Hackfest: Quoth The Raven, “Caww!”

Sometimes, projects start in somewhat unlikely places. This one began when [Istvan Raduly] scored a fake raven at a neighbor’s garage sale and decided to turn it into a thunder-and-lightning decoration that would frighten even the bravest trick-or-treater.

Get close enough to this raven and you’ll set off the PIR sensor, which triggers lighting and sound effects, including some spooky glowing and blinking red eyes, general cawing, and of course, thunder. The light comes from a whopping 10-watt, 12-volt power LED. This bird’s brain is an Arduino Nano, which is protected from the 12V supply with a boost converter. As you might expect, the sounds are on an SD card and played through a DF Player Mini.

Spookiness aside, our favorite part might be the absolutely lovely job that [Istvan] did decorating the raven’s base. Hiding electronics and hot glue is one thing, but this is above and beyond. Be sure to check it out after the break, both in the safety of the house, and outside in the scary darkness.

Continue reading “2023 Halloween Hackfest: Quoth The Raven, “Caww!””