What do you do, when you want an ohm? What is an ohm, for that matter? Take a wander over to the textbook definitions, and you’re soon deep in a world of coulombs and parallel infinite planes one meter apart in a vacuum that you probably only half remember from your high school physics class. It’s hard work, this metrology lark.
Of course, you can just order a resistor. A few cents each when you’re buying small quantities or much less when you’re buying a reel of five thousand, and there you have it. An ohm. Only it’s not really an ohm, more like nearly an ohm. Within 1% of an ohm is pretty good, but Vishay or Bourns or whoever don’t have the margins to get philosophical about those infinite planes when you’re only giving them a few cents.
When you REALLY want an ohm, you buy a standard resistor, and you pay a more significant sum. You’re never going to wire one of these up to bias a transistor or drive an LED, instead it’s about as close as it’s possible to get on your bench to the value it says on the box and you can use it for calibration purposes. PPM figures well in excess of the resolution of even superior DMMs sound pretty good to us!
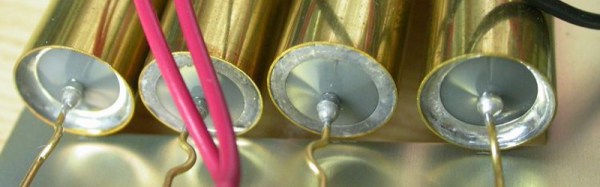
[Zlymex] was curious about standard resistors, so performed a teardown of a few to see what they contain. And after a pithy explanation of the terms involved he’s managed to look inside quite a few of them.
Inside he finds hermetically sealed wire-wound resistors, some oil-filled wire-wound resistors, and the occasional hefty piece of manganin. He also tears down some of the hermetically sealed resistors themselves, finding both wire-wound and foil resistance elements within.
It is a curious obsession that permeates hacker culture, that of standard measurements, and it’s one we’ve covered quite a few times here. Time enthusiasts with atomic clocks like this rather beautiful discrete logic build, or voltage enthusiasts with their temperature compensated references or programmable standards. Surprisingly though, this appears to be the first time we’ve looked at standard resistors.
Thanks [David Gustafik] for the tip.