3D-Printed Clock Tells Time With Gears

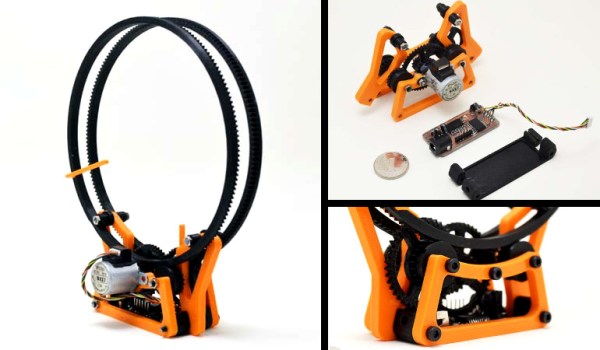
[ekaggrat] designed a 3d-printed clock that’s fairly simple to make and looks awesome. The clock features a series of 3d-printed gears, all driven by a single stepper motor that [ekaggrat] found in surplus.

The clock’s controller is based around an ATtiny2313 programmed with the Arduino IDE. The ATtiny controls a Darlington driver IC which is used to run the stepper motor. The ATtiny drives the stepper motor forward every minute, which moves both the hour and minute hands through the 3d-printed gears. The hour and minute are indicated by two orange posts inside the large gears.

[ekaggrat] etched his own PCB for the microcontroller and stepper driver, making the build nice and compact. If you want to build your own, [ekaggrat] posted all of his design files on GitHub. All you need is a PCB (or breadboard), a few components,  and a bit of time on a 3D printer to make your own clock.

3D Printing Atomic Force Microscopy

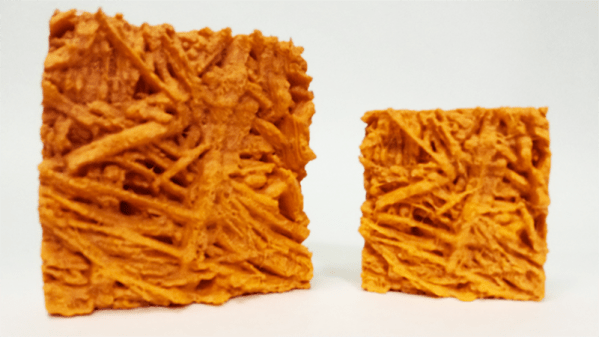
[Andres] is working with an Atomic Force Microscope, a device that drags a small needle across a surface to produce an image with incredible resolution. The AFM can produce native .STL files, and when you have that ability, what’s the obvious next step? That’s right. printing atomic force microscope images.

The AFM image above is of a hydrogel, a network of polymers that’s mostly water, but has a huge number of crosslinked polymers. After grabbing the image of a hydrogel from an Agilent 5100 AFM, [Andres] exported the STL, imported it into Blender, and upscaled it and turned it into a printable object.

If you’d like to try out this build but don’t have access to an atomic force microscope, never fear: you can build one for about $1000 from a few pieces of metal, an old CD burner, and a dozen or so consumable AFM probes. Actually, the probes are going to be what sets you back the most, so just do what they did in olden times – smash diamonds together and look through the broken pieces for a tip that’s sufficiently sharp.

Using The Second Microcontroller On An Arduino

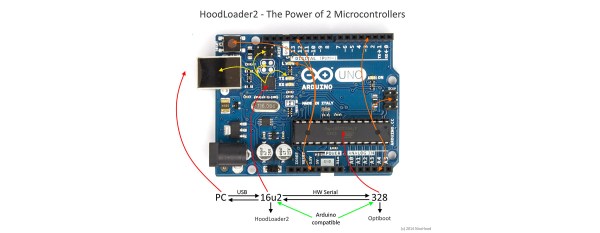
While newer Arduinos and Arduino compatibles (including the Hackaday.io Trinket Pro. Superliminal Advertising!) either have a chip capable of USB or rely on a V-USB implementation, the old fogies of the Arduino world, the Uno and Mega, actually have two chips. An ATMega16u2 takes care of the USB connection, while the standard ‘328 or ‘2560 takes care of all ~duino tasks. Wouldn’t it be great is you could also use the ’16u2 on the Uno or Mega for some additional functionality to your Arduino sketch? That’s now a reality. [Nico] has been working on the HoodLoader2 for a while now, and the current version give you the option of reprogramming the ’16u2 with custom sketches, and use seven I/O pins on this previously overlooked chip.

Unlike the previous HoodLoader, this version is a real bootloader for the ’16u2 that replaces the DFU bootloader with a CDC bootloader and USB serial function. This allows for new USB functions like HID keyboard, mouse, media keys, and a gamepad, the addition of extra sensors or LEDs, and anything else you can do with a normal ‘duino.

Setup is simple enough, only requiring a connection between the ‘328 ISP header and the pins on the ’16u2 header. There are already a few samples of what this new firmware for the ’16u2 can do over on [Nico]’s blog, but we’ll expect the number of example projects using this new bootloader to explode over the coming months. If you’re ever in an Arduino Demoscene contest with an Arduino and you’re looking for more pins and code space, now you know where to look.

3D Printing Without Support

3D printing is getting better every year, a tale told by dozens of Makerbot Cupcakes nailed to the wall in hackerspaces the world over. What was once thought impossible – insane bridging, high levels of repeatability, and extremely well-tuned machines – are now the norm. We’re still printing with supports, and until powder printers make it to garages, we’ll be stuck with that. There’s more than one way to skin a cat, though. It is possible to print complex 3D objects without supports. How? With pre-printed supports, of course.

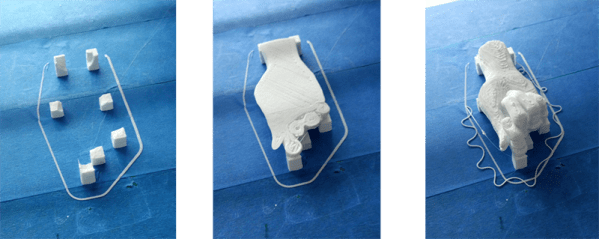
[Markus] wanted to print the latest comet we’ve landed on, 67P/Churyumov–Gerasimenko. This is a difficult model for any 3D printer: there are two oversized lobes connected by a thin strand of comet. There isn’t a flat space, either, and cutting the model in half and gluing the two printed sides together is certainly not cool enough.

To print this plastic comet without supports, [Markus] first created a mold – a cube with the model of the comet subtracted with a boolean operation. If there’s one problem [Markus] ran into its that no host software will allow you to print an object over the previous print. That would be a nice addition to Slic3r or Repetier Host, and shouldn’t be that hard to implement.

Hackaday Links Column Banner

Hackaday Links: November 30, 2014

Tired of wiring up the power rails and serial adapter every time you build something on a breadboard? [Jason] has you covered. He put his Breadboard Buddy Pro up on Indiegogo, and it does everything you’d expect it to: power rails, USB to UART bridge, and a 3.3 V regulator. Oh, he’s not using an FTDI chip. Neat.

With Christmas around the corner, a lot of those cheap 3-channel RC helicopters are going to find their way into stockings. They’re cool toys, but if you want to really have fun with them, you’ll need to add a penny.

Here’s a crowdfunding campaign for a very interesting IoT module. It’s a UART to WiFi adapter that has enough free Flash and RAM to run your own code, GPIOs, SPI, and PWM functions. Wait a second. This is just an ESP8266 module. Stay classy, Indiegogo.

Mankind has sent space probes to the surface – and received pictures from – Venus, Mars, the Moon, Titan, asteroids Itokawa and Eros, and comet Comet 67P/Churyumov–Gerasimenko. In a beautiful bit of geological irony, every single one of these celestial bodies looks like a rock quarry in Wales. That quarry is now for sale.

Here’s something exceptionally interesting. It’s a browser plugin that takes a BOM, and puts all the components into a cart. Here’s the cool bit: it does it with multiple retailers. The current retailers supported are Mouser, Digikey, Farnell/Element14, Newark, and RS Components.

Want a death ray? Too bad, because it’s already been sold.

[Glasslinger] Builds Tiny Tubes

In the early days of transistors, RCA and GE were battling against silicon with ever smaller vacuum tubes. These tubes – Nuvistors, Compactrons, and some extremely small JAN triodes were some of the tiniest tubes to ever be created. [glasslinger], YouTube’s expert on DIY valves, is pretty close to beating the tiniest tubes that were ever manufactured. He’s created a miniature diode and triode that are about 1/4″ in diameter and 1″ long.

The most difficult part of making a vacuum tube is getting a perfect glass seal around the pins. For this, [glasslinger] is using very fine tungsten wire and glass beads. A bead is placed around each wire, mounted in a stand, and melted together with a torch.

A diode is simple as far as tubes go, requiring only a filament between two pins. [glasslinger] is just stringing a fine piece of wire between two pins and welding them on with a miniature spot welder. After that, it’s just an issue of melting a 1/4″ glass tube to the base of the tube, putting it under vacuum overnight, and sealing it shut.

Build Your Own Raytracing Minion

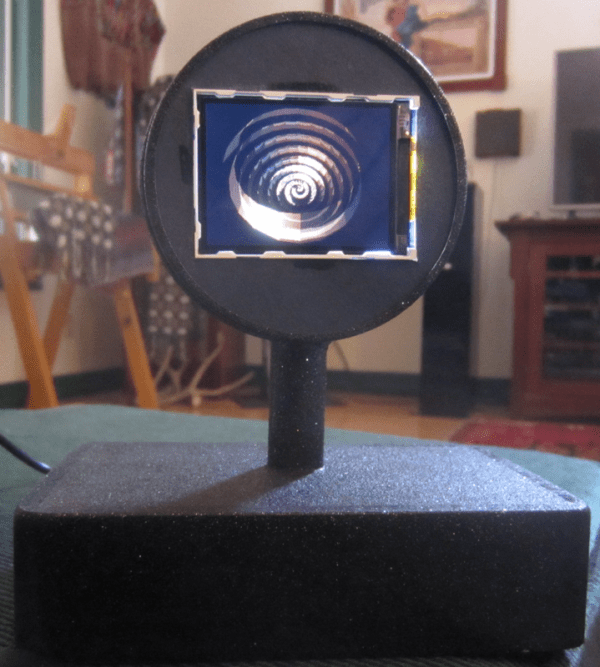
A canceled project left [Craig] with six Raspberry Pi based devices he calls “Minions”. A minion is a Raspberry Pi model A in a small enclosure with an Adafruit 2.2″ 320×240 SPI LCD. The LCD lives in a lollipop style circular housing above the base. [Craig] has found a use for one of his minions as a desktop raytracer.

The Raspberry Pi is quite capable of running Persistance Of Vision Raytracer, or POV-Ray. POV-Ray started life as an early PC based raytracer. Created as a port of an Amiga program called DKBTrace, which was itself a port of a Unix raytracer, POV-Ray first was released in 1987. For the uninitiated, raytracers like POV-Ray  literally trace rays from a light source to an image plane. As one would imagine, the Raspberry Pi’s little ARM processor would take quite a bit of time to raytrace a high resolution image. However, when targeting a 320×240 LCD, it’s not half bad.

[Craig’s] minion is running his own software which he calls ArtRays. Based upon a setup file, ArtRays can render images from several sources, including the internet via a WiFi dongle, or a local SD card. Rather than walk through the setup and software install, [Craig] has provided a link to download a full SD card image to build your own Minion. It might be worth experimenting on your own first though, rather than killing his server with a 1GB download.

We’re glad [Craig] has found use for one of his minions, now we have to see what he’s done with the other five!