Retrotechtacular: Forces Acting On An Airfoil

floating film title We’ve probably all experimented with a very clear demonstration of the basic principles of lift: if you’re riding in a car and you put your flattened hand out the window at different angles, your hand will rise and fall like an airplane’s wing, or airfoil. This week’s Retrotechtacular explains exactly how flight is possible through the principles of lift and drag. It’s an Army training documentary from 1941 titled “Aerodynamics: Forces Acting on an Air Foil“.

What is an airfoil? Contextually speaking, it’s the shape of an airplane’s wing. In the face of pressure differences acting upon their surfaces, airfoils produce a useful aerodynamic reaction, such as the lift that makes flight possible. As the film explains, the ideas of lift and drag are measured against the yardstick of relative wind. The force of this wind on the airfoil changes according to the acute angle formed between the airfoil and the direction of the air flow acting upon it. As you may already know, lift is measured at right angles to the relative wind, and drag occurs parallel to it. Lift is opposed by the weight of the foil, and drag by tension.
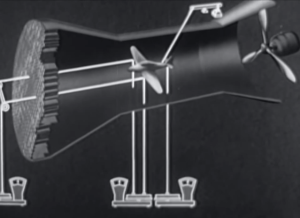
wind tunnel testing

Airfoils come in several types of thicknesses and curvatures, and the film shows how a chord is derived from each shape. These chords are used to measure and describe the angle of attack in relation to the relative wind.

The forces that act upon an airfoil are measured in wind tunnels which provide straight and predictable airflow. A model airplane is supported by wires that lead to scales. These scales measure drag as well as front and rear lift.

In experimenting with angles of attack, lift and drag increase toward what is known as the stalling angle. After this point, lift decreases abruptly, and drag takes over. Lift and drag are proportional to the area of the wing, the relative wind velocity squared, and the air density. When a plane is in the air, drag is a retarding force that equals the thrust of the craft, or the propelling force.

monometer tubesAirfoil models are also unit tested in wind tunnels. They are built with small tubes running along many points of the foil that sit just under the surface. The tubes leave the model at a single point and are connected to a bank of manometer tubes. These tubes compare the pressures acting on the airfoil model to the reference point of atmospheric pressure. The different liquid levels in the manometer tubes give clear proof of the pressure values along the airfoil. These levels are photographed and mapped to a pressure curve. Now, a diagram can be made to show the positive and negative pressures relative to the angle of attack.

In closing, we are shown the effects of a dive on lift as an aircraft approaches and reaches terminal velocity, and that lift is attained again by pulling slowly out of the dive. Remember that the next time you fly your hand-plane out the window.

Continue reading “Retrotechtacular: Forces Acting On An Airfoil”

A Do-It-Yourself Air Conditioner With Evaporative Cooling 5 Gallon Bucket

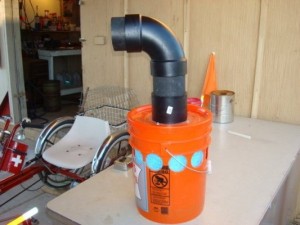
image42-300x225The people over at Gray Wolf Survival have this amazing little air conditioning project that is a perfect addition to any household that doesn’t have flowing air wafting through. It was created by [Figjam] for a trip to Burning Man, where all kinds of crazy ideas are bred in the hot dry heat of The Playa sun.
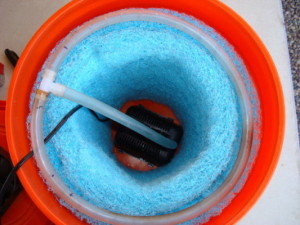
The design uses no ice, which is the cooling agent typical found in other DIY air conditioners. Those generally cut holes in the top of a cooler, put a fan on top to blow the air down across the ice. This is similar, but acts more like an evaporative cooler (not really a traditional air conditioner but it does the job).

397648283-300x225It uses a LOT less energy than an air conditioner unit so there won’t be a need to increase the power capabilities of a simple system to work it, and it can reduce the temperature by up to 30 degrees as well as alleviate the dryness associated with living through a Burn. It runs off 12V DC so it can either use the solar panel or connect to a battery. It has a 12V power plug for this, and draws as little power as absolutely possible. Plus, it has the ability to easily connect to a larger water source so it won’t have to be continually refilled. These considerations make it very portable and perhaps backpackable as well.
[Figjam] took a 5 gallon bucket, wrapped the inside with two layers of swamp cooler matting, made a loop of hose above it connected to a submersible pump and ran a fan out the top with piping. Connecting it to a shelter is done with a vent hose.

Go Vintage! Learn To Repair And Restore Mechanical Pocket And Wrist Watches.

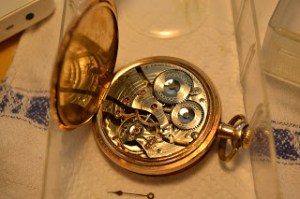
pw tear down 1

Until recently, watches have been entirely mechanical where each wheel, gear, and mechanism representing a milestone in our understanding of precision manufacturing and timekeeping.

One of the very first watches, created by a locksmith.

Today it is nearly impossible to find watchmakers to service or repair vintage mechanical pocket and wristwatches, so we have to do it ourselves. Learn to repair vintage mechanical watches. You can do this and we’ll show you how.

They tick, mechanical watches have a pulse. First created in the 16th century by locksmiths, these early watches could only resolve time down to the hour and for this reason displayed time with only one hour hand.

By the 18th century fusee technology enabled watches to achieve accuracies to within seconds.

Continue reading “Go Vintage! Learn To Repair And Restore Mechanical Pocket And Wrist Watches.”

Magic In The Midwest: Maker Faire Kansas City

What did you do over the weekend? I spent both days at Maker Faire Kansas City and it was awesome. This is the fourth year the Faire has been held in Union Station, a stunning Kansas City landmark that celebrates its centennial this fall.

The Things

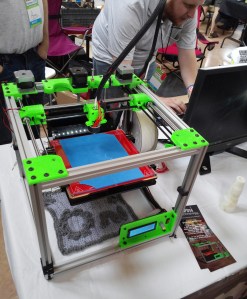
As you might imagine, there were 3D printers galore. One of my favorites was the One Up family from Q3D. These acrylic beauties start at $199 and offer a heated bed plate option.

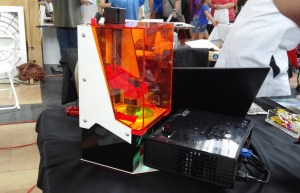
Maker Juice Labs, purveyors of 3D printing inks for SLA brought a LittleSLA printer which they demonstrated by making some very nice key chains.

Little SLA does it stereolithographically.

SeeMeCNC had their Rostock Max V2 printer cooking up some huge prints, and Oni Technology, a local KC company, had their H Bot cranking.

Locally-made Oni H Bot.

At the Modio booth, my companion and I constructed heroes and monsters from a rainbow-colored pile of 3D-printed body parts and weapons. With Modio’s iPad app, you can create characters from the existing parts library, modify those parts, and print them on any 3D printer. All of the parts are designed to snap together. Modio recently teamed up with MakerBot and hopes to port their app from the iPad to the iPhone and Android in the near future.

I managed to resist the inexplicable Hostess booth and their free piles of Twinkies, Cup Cakes, and Coffee Cakes. They had a display that promised banana Twinkies and some Greek yogurt oddities, but only had the regular stuff on hand. On Sunday, I saw many people lugging around entire boxes of free Donettes and other goodies.

Continue reading “Magic In The Midwest: Maker Faire Kansas City”

Super Simple Gimbal For Multi-Rotor Aircraft Laughs In The Face Of Complexity

Super Simple Multi Rotor Gimbal

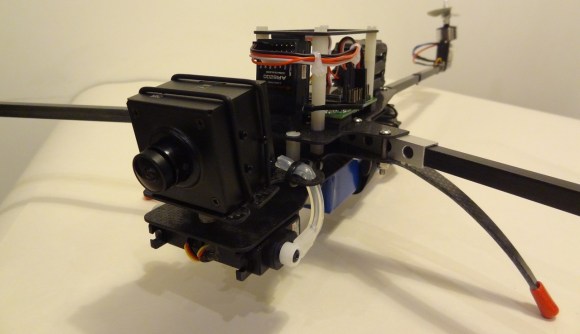
After the first flight of your newly built multi-copter, you will immediately want to add a camera. This sequence of events follows the laws of physics and is as predictable as gravity. Just strapping a camera on by way of a fixed bracket may technically solve that problem, but it creates another. A multi-copter tilts and rolls as a result of changing flight direction. If the multi-copter tilts and rolls, so does your camera. This is where a gimbal comes in handy, it adjusts the camera in an equal and opposite direction than that of the aircraft. If the aircraft tilts forward, the gimbal tilts the camera backward the same amount. The result is a steady camera for capturing some sweet videography.

Super Simple Multi Rotor GimbalTeam SSG over at rcgroups.com has come up with what they are calling the Super Simple Gimbal. Their vision was a gimbal that would be inexpensive, easy to build and add minimal weight to the aircraft. On a normal gimbal, there are two motors or servos, each one specifically controls a single axis of movement. On the SSG, there are 2 servos but they do not move independently from one another. The camera is mounted to a plate that is supported on one end by a piece of silicone tube which becomes a fulcrum for the system. The other side of this plate is supported by 2 linkages (also made of silicone tube) that are themselves connected to the servos. If both servos move up, the camera is tilted down. If the right servo moves up and the left down, the camera is tilted to the left.

Continue reading “Super Simple Gimbal For Multi-Rotor Aircraft Laughs In The Face Of Complexity”

A Virtual Cane For The Visually Impaired

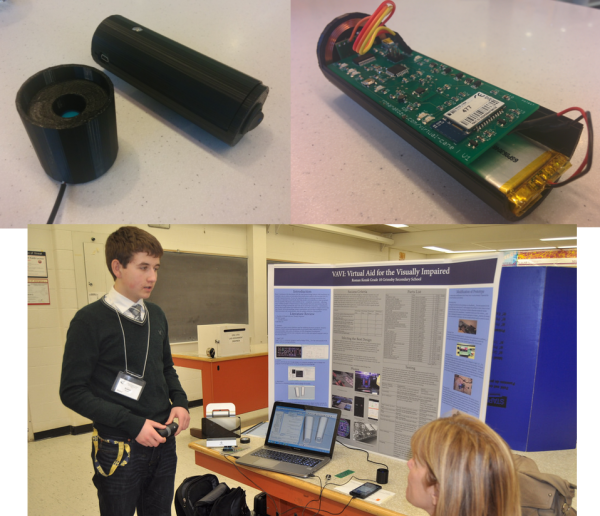
[Roman] has created an electronic cane for the visually impaired. Blind and visually impaired people have used canes and walking sticks for centuries. However, it wasn’t until the 1920’s and 1930’s that the white cane came to be synonymous with the blind. [Roman] is attempting to improve on the white cane design by bringing modern electronics to the table. With a mixture of hardware and clever software running on an Android smartphone, [Roman] has created a device that could help a blind person navigate.

The white cane has been replaced with a virtual cane, consisting of a 3D printed black cylinder. The cane is controlled by an ATmega328 running the Arduino bootloader and [Roman’s] code. Peeking out from the end of the handle is a Maxbotix ultrasonic distance sensor. Distance information is reported to the user via a piezo buzzer and a vibration motor. An induction coil allows for charging without fumbling for tiny connectors. A Bluetooth module connects the virtual cane to the other half of the system, an Android phone.

[Roman’s] Android app runs solely on voice prompts and speech syntheses. Navigation commands such as “Take me to <address>” use the phone’s GPS and Google Maps API to retrieve route information. [Roman’s] app then speaks the directions for the user to follow. Help can be summoned by simply stating “Send <contact name> my current location.” In the event that the user drops their virtual cane, “Find my device” will send a Bluetooth command to the cane. Once the command is received, the cane will reveal its position by beeping and vibrating.

We’ve said it before, and we’ll say it again. Using technology to help disabled people is one of the best hacks we can think of. Hackaday alum [Caleb Kraft] has been doing just that with his work at The Controller Project. [Roman] is still actively improving his cane. He’s already won a gold medal at the Niagara Regional Science and Engineering Fair. He’s entered his project in several more science events, including the Canada Wide Science Fair and the Google Science Fair. Good luck [Roman]!

Portable SMT Lab For Hacker On The Go

smt-lab2

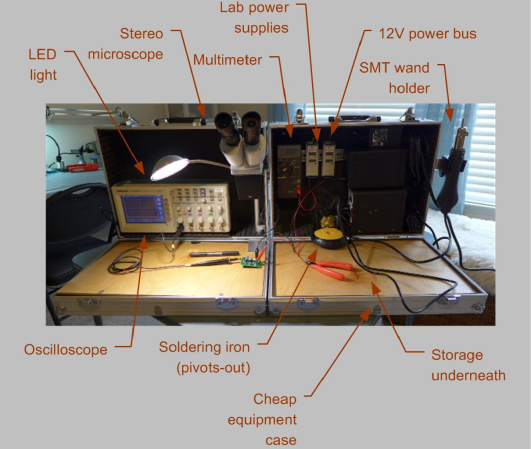
We admit it, we’re suckers for workbenches and toolboxes. [Jon] must feel the same way, because he built this portable surface mount electronics lab. It’s a beast of a project, which might be why it’s project #666 on Hackaday.io. [Jon] spends a lot of time working off site, and keeps finding himself without proper surface mount soldering tools. Ever tried to stack an 0603 resistor with a 40 watt pistol grip iron? Take our word for it, the results are not pretty.

[Jon] started with two cheap aluminum cases from Harbor Freight. He loaded them up with the typical lab supplies: soldering iron, oscilloscope, multimeter, dual lab supplies, and a good assortment of hand tools. He then added a few choice SMT tools: A hot air tool, a good LED light, and a stereo magnifier. Many of the tools are mounted on DIN rail along the rear of the cases.  All the low voltage equipment runs on  a common 12V bus.

We really like what [Jon] did with the tops of the cases. Each lid contains a plywood sheet. When the cases are opened, the plywood becomes a work surface. As an added bonus, the wood really strengthens the originally flimsy tool cases. The only thing we would add is a good portable anti-static mat.

The final build is really slick. Once the cases are open, four bolts act as feet. The microscope swings out, and the hot air gun hangs on the right side. Plug in power and you’ve gone from zero to SMT hero in under 1 minute.