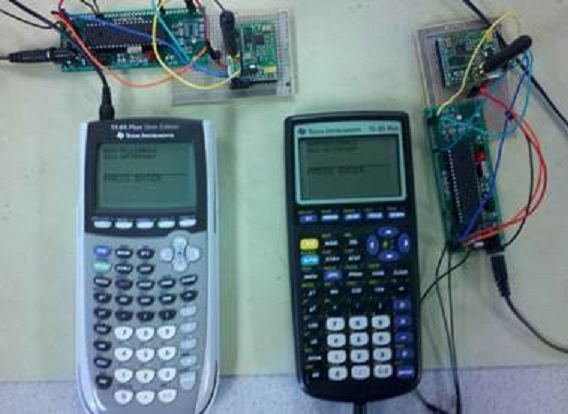
Magic Morse Arduino Trainer

cover_IMG408

Magic Morse is a mathematical algorithm that [Ray Burnette] wrote a few years ago to make it easy to send and receive Morse code. When he first wrote it, he designed it for a PIC, but since then he has re-written it to use as a training program for the Arduino platform.

It can run on the Uno, Nano, Pro Micro, or even home-brew Arduino boards. He’s demonstrating the program with a Nokia 5110 LCD, but has also included code for the typical 2×16 LCD displays. The Magic Morse algorithm is copyrighted, but he has released the Arduino code as open source in an effort to get people using Morse code once again — it is pretty awesome.

So how does it work? The algorithm assigns weights to the “dits” and “dahs” as received — when there is a longer pause, the algorithm creates a pointer which calls the character out of an array stored in the EEPROM. He’s included an example of this in Excel on his page.

Now you have no excuses about learning Morse code! Oh and if you don’t have a fancy telegraph key (the switch), [Ray’s] also published a handy method of making your own Morse code key out of popsicle sticks and magnets.

$1 Coin Cell Charger

Sure, coin cells usually last a long time — but do you really want to buy new ones and throw the old ones out? The LiR2032 coin cell is a rechargeable lithium battery, for which you can build a charger at around $1.

The 5 minute hack starts with a TP4056 lithium charging circuit, which is a great DIY board designed to charge high-capacity cells at about 1A. Luckily, it is pretty easy to modify the board to charge lower capacity batteries. It’s just a matter of replacing resistor R4, and a little bit of soldering! Continue reading “$1 Coin Cell Charger”

The Pioneering Lifestyle In Low Earth Orbit

The first element of the International Space Station (ISS) launched over fifteen years ago, on November 20, 1998. For more than thirteen years at least two human beings have been continually living off the surface of our planet. Assembly of the Space Station is now complete. It is being utilized by its crews and scientists from around the world to execute its primary mission – scientific investigations that can only be accomplished in the microgravity environment of Low Earth Orbit (LEO). As with any structure, items age, wear out, or break and need to be repaired. What could be rather “simple” repairs on Earth can become much more complex in zero gravity. In some cases, “necessity becomes the mother of invention.”

Continue reading “The Pioneering Lifestyle In Low Earth Orbit”

Nixie-ify Me Necklace

big-nixie

[Armilar] wanted to cheer up his friend who was going through a rough spot at the time — she really likes Dieselpunk, so he decided to improvise a Dieselpunk themed photo shoot for her. We’re assuming they had other costumes and props, but [Armilar] had this idea to make a nixie tube pendant for a while, he’d just have to expedite the build process to have it ready!

What he managed to whip up the day of the shoot looks amazing considering the time involved, if not just a little bit ill-advised. There may or may not be 200VAC running around his friend’s neck.

He’s using an electroluminescent driver rated for 5VDC to 100VAC, over-powered to 12VDC, resulting in about 200VAC, which is just enough to make the nixie glow a nice warm orange. In an effort to minimize the size of the pendant, he had to keep the battery and driver hanging off the back of the necklace.

Continue reading “Nixie-ify Me Necklace”

PIDDYBOT – A Self Balancing Teaching Tool

We’re sure that most Hackaday readers are already familiar with the inverted pendulum system, which basically consists of a pendulum having its center of mass above its pivot point. Most applications (like the one we are going to describe) limit the pendulum to 1 degree of freedom by affixing the pole (or circuit board here) to an axis of rotation. The overall system is therefore inherently unstable and must be actively balanced in order to remain upright.

[Sean] created the piddybot, a tiny balancing robot aimed to teach the basics of PID control by trying to get the robot to stand still. More interestingly, the Proportional / Integral / Derivative values can directly be adjusted using the three on-board potentiometers. This will allow users to get the feel of each parameter’s impact on the robot behavior. The piddybot is based around the Arduino nano, a custom PCB, 2x 26:1 geared motors, one 1A dual motor driver board, a six degrees of freedom Inertial Measurement Unit, 2 batteries and finally a 3D printed body. You can check out a video of the robot in action after the break.

This project stems from a non-PID self balancer which [Sean] hacked together in September.

Continue reading “PIDDYBOT – A Self Balancing Teaching Tool”

Here’s Pi In Your Eye – HUD Goggles

[John Ohno] has found what is perhaps the best possible use for steampunk goggles: framing a monocular display for a Raspberry Pi-based wearable computer. [John]’s eventual goal for the computer is a zzstructure-based personal organizer and general notifier. We covered [John]’s zzstructure emulator to our great delight in July 2011. Go ahead and check that out, because it’s awesome. We’ll wait here.

[John] has been interested in wearable computing for some time, but is unimpressed with Google Glass. He had read up on turning head-mounted displays into monocular devices and recognized a great opportunity when his friend gave him most of an Adafruit display. With some steampunk goggles he’d bought at an anime convention, he started on the path to becoming a Gargoyle. He encountered a few problems along the way, namely SD card fail, display output issues, and general keep-the-parts-together stuff, but came out smelling like a rose. [John] has ideas for future input additions such as simple infrared eye tracking, the addition of a chording keyboard, and implementing a motorized glove for haptic learning. 

Want to make your own wearable display but have an aversion to steampunk? Check out this homebrew solution with (mostly) 3-D printed frames. And it has servos!

[Thanks John]

Built-in Coffee Table Lightbox

diydollarstorelightbox

[Flyingpuppy] sent us this tip about her cleverly-concealed pull-out lightbox drawer. Her resolution for the new year was to make more art, so she filled this coffee table with art supplies and decided she’d draw while relaxing in front of the television. She also wanted a lightbox nearby, which originally involved hacking the entire tabletop with some acrylic, but she eventually opted for a simpler build: and it’s portable, too! The drawer’s lights are battery-powered, so you can pull the entire thing out of the table and drag it onto your lap, if that makes drawing more comfortable.

[Flyingpuppy] sourced seven inexpensive LED units from her local dollar store, which she mounted to the back of the drawer with some screws. The rest of the drawer was lined with white foam board, the bottom section angled to bounce light up onto the acrylic drawing surface. Because she needs to open the case to manually flip on the lights, she secured the acrylic top magnetically, gluing a magnet to the underside of the foam board and affixing a small piece of steel to the acrylic. A simple tug on the steel bit frees the surface, providing access underneath. Stick around for a video below.

Continue reading “Built-in Coffee Table Lightbox”