Still Got Film To Scan? This Lego And Raspberry Pi Scanner Is For You

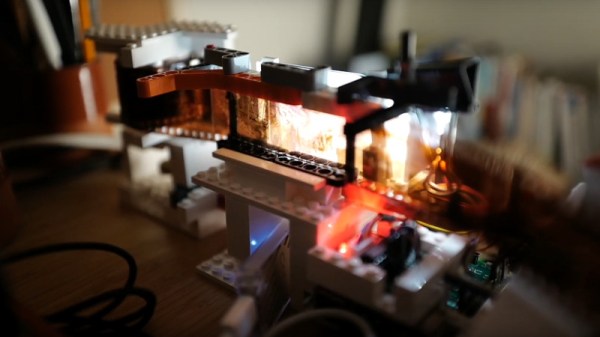
There was a time during the early years of mass digital photography, when a film scanner was a common sight. A small box usually connected to a USB port, it had a slot for slides or negatives. In 2020 they’re  a rare breed, but never fear! [Bezineb5] has a solution in the shape of an automated scanner using a Radpberry Pi and a mechanism made of Lego.

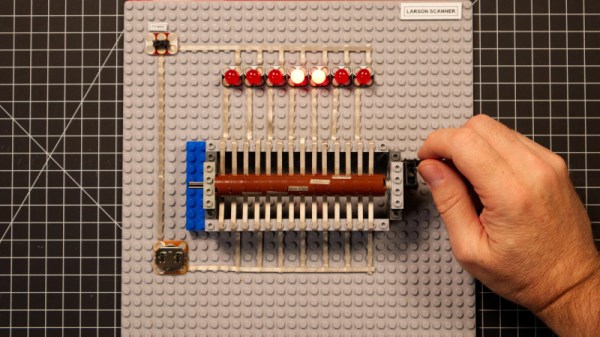
The Lego mechanism is a sprocket feeder that moves the film past the field of view from an SLR camera. The software on the Pi runs in a Docker container, and features a machine learning approach to spotting frame boundaries. This is beyond the capabilities of the Pi, so is offloaded to a Google Coral accelerator.

The whole process is automated with the Pi controlling not only the Lego but also the camera, to the extent of retrieving the photos from it to the Pi. There’s a smart web interface to control everything, making the process — if you’ll excuse the pun — a snap. There’s a video of it in action, that you can see below the break.

We’ve featured many film scanner projects over the years, one that remains memorable is this 3D printed lens mount.

Continue reading “Still Got Film To Scan? This Lego And Raspberry Pi Scanner Is For You”

S400 Scanner Modified For Finding Hidden Watermarks

Computer hardware is by and large compromised out of the box. Whether it’s sloppy factory code, or government-installed backdoors, it’s difficult to trust anything. A great example is that of color laser printers, the vast majority of which place hidden watermarks on printed pages. It’s a somewhat forgotten issue these days, but back in 2005, [bunnie] set out to modify a scanner to help better image and investigate these watermarks.

The watermarks in question have been investigated by the EFF, and often, but not always, consist of tiny yellow dots printed on the page. They can store data such as the name of the computer that printed the document, as well as the serial number and model of the printer used. With this functionality baked into the firmware, all prints made on such a printer are compromised.

The easiest way to see these watermarks is with blue light, which is reflected by the white paper, but causes yellow dots to show up as dark spots. To make scanning affected documents quick and easy, [bunnie] whipped up a linear LED light array, installing it in a spare slot in his scanner’s light assembly, next to the stock white CCFL. Usage is a little more complex, with the scanner’s automatic calibration getting confused if the blue LEDs are left on at the start of a scan. Instead, the LEDs must be turned off initially, and then powered up once the calibration is complete.

Results are good, with the tiny dots made much clearer in the test scans [bunnie] performed. Unfortunately, the watermarking technology has moved on, and it’s likely that modern printers use a variety of techniques that are even harder to detect. By and large, ransom notes are best made the old fashioned way – by cutting up some old magazines.

Manual Larson Scanner Invites You To Crank It

Hasselhoff make Larson Scanners famous. That’s the name for the scanning red lights on the front of KITT, the hero car from the popular 1980s TV series Knight Rider. Despite serving a solely aesthetic role, they remain a fun and popular LED project to this day. Putting a new twist on the old concept, [Pete Prodoehl] whipped up a Larson Scanner that you crank to operate.

Built out of LEGO, the project relies on a hand crank to work. The crank turns a drum, onto which is placed several strips of conductive Maker Tape – a steel/nylon material which we’ve looked at before. Strips of tape running side-by-side are bridge by segments of tape on the drum as it turns. The LEDs are switched on in the requisite pattern of a traditional Larson scanner.

The project has inspired further possibilities, such as using similar techniques to produce an electronic music box or player piano that will change tempo as the user changes the speed with the crank. [Pete] notes that turning the crank is an inherently enjoyable experience, and given the wonder inherent in hand-cranked musical projects like Marble Machine X, we can’t wait to see where this one goes next. Video after the break.

Continue reading “Manual Larson Scanner Invites You To Crank It”

Tiny Barcode Scanner Beeps Your Shopping List Together

Taking a paper list to the grocery store seems like a good idea, at least until you get there and try to use it. Did you remember to bring a pen? Great. How about a clipboard so you don’t punch through the paper when crossing something off? Apps are easier to use for this, especially the ones with checkboxes, but you’ll still have to enter everything manually. Wouldn’t it be easier (and way more fun) to just scan the barcodes of stuff you need into a list before you chuck the packaging?

That’s exactly the idea behind [DavidE281]’s barcode scanner, which is designed to work with the Bring! app. All he has to do is scan a barcode, and the product ends up in a tidy list on his phone. It’s a simple build that’s based around the M5StickC, which is an ESP32 dev kit that has a small display and a 6-axis IMU along with some other goodies. [David] combined it with a 2D barcode scanner that has a serial port and designed a printed case that joins them together.

Here’s how it works: the M5Stick sends the barcode over MQTT to an external Raspberry Pi that’s running Home Assistant. The Pi does a lookup in a spreadsheet and sends the data to the Bring! app over a community-built API. At the same time, it sends the product name back to the M5Stick’s display to confirm that it was added to the list. Check out bite-sized demo video after the break.

Scanning barcodes is super fun. So why not use an IoT barcode scanner to keep track of everything you own?

Continue reading “Tiny Barcode Scanner Beeps Your Shopping List Together”

8mm Film Scanner Grows Into A Masterpiece

Digitizing film is a tedious process that becomes a lot more fun if you spend more of your time building a digitizer and less time actually working working with old film. [Heikki Hietala] has been at it for years and his Kotokino Mark IV film scanner is a masterpiece of simple machine building.

Since we first saw the film scanner four years ago it’s undergone a number of excellent improvements. Most notably, the point-and-shoot camera has been swapped out for a DSLR. With the use of a macro reversing ring a normal lens is flipped around to blow up the 8-millimeter-wide film to take advantage of all the megapixels available on the camera sensor.

The key to the setup is the film advancer mechanism which takes care of both advancing the film and triggering the camera. As you can see, a servo motor rotating an axle provides the locomotion. The mechanism keys into the perforations in the film to pull it along on the down stroke and closes a switch to trigger the camera on the upstroke. Directly under the lens, the alignment jig uses lens cleaning fabric to avoid scratching the film, while perfectly positioning it over the light source.

Previous versions have placed the camera on the horizontal plane but it seems some vibrations in the system caused alignment problems between captured frames. This latest version places the camera pointed straight down to solve that issue, and brings the entire thing together into one beautiful finished project. Having gathered numerous fans of the build along the way, [Heikki] has made the design files available so that you may build your own version.

3D Print Your 3D Scanner

[QLRO] wanted a 3D scanner, but didn’t like any of the existing designs. Some were too complex. Some were simple but required you to do things by hand. That led to him designing his own that he calls AAScan. You can see the thing operating in the video below.

In general, you can move the camera around the object or you can move the object around while the camera stays fixed. This design chooses the latter. You’ll need a stepper motor with a driver board and an Arduino to make the turntable rotate. You also need a computer running Python and Meshroom. The phone also has to run Python and [QLRO] used QPython on an Android device.

Continue reading “3D Print Your 3D Scanner”

Building A 3D Scanner With A 3D Printer

Using a 3D printer to make high quality parts is a great way to improve the look and appeal of any project. If you want to replicate something exactly, though, you’ll need either a very good set of calipers and a lot of time or a 3D scanner. Using the 3D scanner and the 3D printer go along very well together, especially if you use your 3D printer to build your 3D scanner too.

This project comes to us from [Vojislav] who spent the past two years perfecting this 3D scanner. Using a vast array of 3D printed parts, this build looks professional on every level. It also boasts a Raspberry Pi Zero and a fleet of camera modules, not to mention its own LED lighting. [Vojislav] has provided the printer files and the software needed to run it on the project page. It all runs through command line and python code, but that shouldn’t be a big hurdle.

While there is no video of it in action, it seems like all the parts are there for a solid 3D scanner, provided you have access to a 3D printer that can churn out the parts you’ll need. If you need something larger, there are some other options available as well that really take your photogrammetry skills to the next level.