Becky Stern, David Cranor, And A CT Scanner Vs The Oura Ring

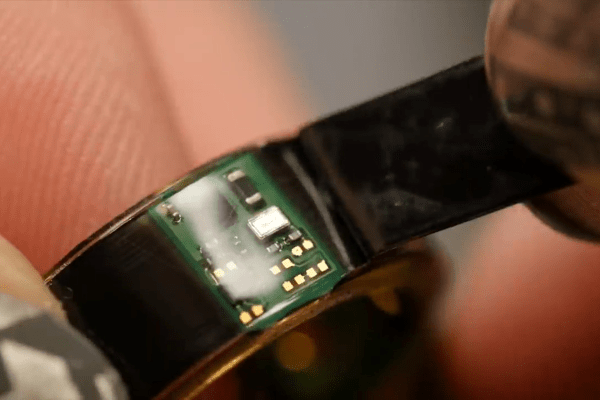
If you wonder how it’s possible to fit a fitness tracker into a ring, well, you’re not alone. [Becky Stern] sent one off to get CT scanned, went at it with a rotary tool, and then she made a video about it with [David Cranor]. (Video embedded below.)

While it’s super cool that you can do a teardown without tearing anything down these days — thanks to the CT scan — most of the analysis is done on a cut-up version of the thing through a normal stereo microscope. Still, the ability to then flip over to a 3D CT scan of the thing is nice.

We absolutely concur with [Becky] and [David] that it’s astounding how much was fit into very little space. Somewhere along the way, [David] muses that the electrical, mechanical, and software design teams must have all worked tightly together on this project to pull it off, and it shows. All along, there’s a nice running dialog on how you know what you’re looking at when tearing at a new device, and it’s nice to look over their shoulders.

Then there’s the bit where [Becky] shows you what a lithium-ion battery pack looks like when you cut it in half. She says it was already mostly discharged, and she didn’t burst into flames. But take it easy out there! (Also, make sure you take your hot xylene out on the patio.)

X-ray machines are of course just the coolest thing when doing a teardown. We’ve seen them used from fixing multimeters to simply looking at servo motors.

Continue reading “Becky Stern, David Cranor, And A CT Scanner Vs The Oura Ring”

Servo Larson scanner

No LEDs Required For This Servo-Controlled Larson Scanner

All things considered, it’s pretty easy to get one LED is a strip to light up sequentially, and have it bounce back and forth. Turning that simple animation into a real Larson scanner, with smooth transitions and controlled fade-out, is another thing entirely. And forgetting the LEDs altogether and making a servo-operated Larson scanner is — well, let’s just call it an interesting lesson in hardware abstraction.

The Larson scanner, named after famed TV producer Glen A. Larson for his penchant for incorporating it into shows like Battlestar Galactica and Knight Rider, is actually hard to execute in hardware thanks to the fading tail that follows the lead pixel as it dances back and forth across the display. [Eric Gunnerson] decided to make this and other animation effects easier to achieve with Fade, a custom framework for LED animations that runs on an ESP32.

LED animations are fine, but what about servos? Could Fade be modified to support them? This turned out to be a fairly easy mod thanks to Fade’s architecture and [Eric]’s existing support for non-addressable LEDs via PWM signals. And it was even possible to support more than the 16 PWM channels on an ESP32by adding a UDP connection that puts multiple ESP32s under the control of a central microcontroller.

The video below shows [Eric]’s demo of servo support, with an eight-channel electromechanical Larson scanner. Each “pixel” is a painted ping pong ball swinging back and forth on a hobby servo, and the whole thing sounds just about as awful as you’d expect it to. If you squint just right, the effect looks pretty convincing, but that’s hardly the point. The real story here is [Eric]’s thoughtful architecture, which made the mods easier than starting from scratch.

Continue reading “No LEDs Required For This Servo-Controlled Larson Scanner”

Put A Landscape Scanner On Your Bike And Ride

Google have a fleet of cars travelling the roads of the world taking images for their online StreetView service. You could do much the same thing pedalling on two wheels, with the help of this landscape scanner from [Celian_31].

The basic concept is simple. A powerbank on the bike runs a Raspberry Pi, kitted out with its typical Pi Camera within a 3D-printed housing. A reed switch on the bike’s frame detects pulses from a magnet attached to the valve stem of one tire, and this is used to trigger the taking of photos at regular intervals with the aid of a Python script. Further scripts are then used to knit all the photos taken on a ride together into one contiguous image.

It’s unlikely you’ll recreate Google’s entire StreetView in this fashion. You’d probably want a spherical camera anyway. However, if you wish to undertake regular static surveillance of your local area in an inconspicuous fashion, this would be a great way to do it while also staying in shape. If you do that, please don’t tell us as it would be a major violation of operational security. We’d love to hear about any other projects, though! Video after the break.

Continue reading “Put A Landscape Scanner On Your Bike And Ride”

Automatic Microfiche Scanner Digitizes Docs

While the concept might seem quaint to us today, microfiche was once a very compelling way to store and distribute documents. By optically shrinking them down to just a few percent of their original size, hundreds of pages could be stored on a piece of high-resolution film. A box of said films could store the equivalent of several gigabytes of text and images, and reading them back only required a relatively simple projection machine.

As [Joerg Hoppe] explains in the write-up for his automatic microfiche scanner, companies such as Digital Equipment Corporation (DEC) made extensive use of this technology to distribute manuals, schematics, and even source code to their service departments in the 70s and 80s. Luckily, that means hard copies of all this valuable information still exist in excellent condition decades after DEC published it. The downside, of course, is that microfiche viewers aren’t exactly something you can pick up at the local Big Box electronics store these days. To make this information accessible to current and future generations, it needs to be digitized.

The camera panning over a full DEC microfiche sheet.

[Joerg] notes there are commercial services that would do this for you, but the prices are just too high to be practical for the hobbyist. The same for turn-key microfiche scanners. Which is why he’s developed this hardware and software system specifically to digitize DEC documents. The user enters in the information written on the top of the microfiche into the software, and then places it onto the machine itself which is based on a cheap 3D printer.

The device moves a Canon DSLR camera and appropriate magnifying optics in two dimensions over the film, using the Z axis to fine-tune the focus, and then commands the camera to take an image of each page. These are then passed through various filters to clean up the image, and compiled into PDFs that can be easily viewed on modern hardware. The digital documents can be further run though optical character recognition (OCR) so the text can be easily searched and manipulated. In the video after the break you can see that the whole process is rather involved, but once the settled into the workflow, [Joerg] says his scanner can digitize 100 pages in around 10 minutes.

A machine like this is invaluable if you’ve got a trove of microfiche documents to get through, but if you’ve just got a sheet or two you’d like to take a peek at, [CuriousMarc] put together a simple rig using a digital microscope and a salvaged light box that should work in a pinch.

Continue reading “Automatic Microfiche Scanner Digitizes Docs”

Scanning Medium Format Film On A 35mm Scanner

Scanning film is great for archival purposes as well as sharing said photos digitally. However, if you’re scanning 120 film, aka medium format, it can be expensive to get the requisite hardware. 35mm scanners are comparatively more common, so [Christian Chapman] decided to modify one to suit medium film instead.

The hack is for the Plustek 8100, and requires modifying the scanner in two ways. Firstly, the driver has to be scanned to sweep a longer range to take into account the bigger film. Secondly, a part of the film carriage has to be replaced so it doesn’t show up in the scanners field of view.

The former is achieved by using the sane-genesys scanner software backend, which can be easily modified to adjust the scan length values appropriately. The latter is achieved via 3D printing replacement components that fit without blocking the requisite area.

It’s a tidy hack and one that allows [Christian] to both scan medium format film as well as overscan 35mm film to capture details from the sprocket hole area. We’ve seen fully custom film scanner builds before, too. If you’ve built your own scanner, be sure to drop us a line!

Hackaday Podcast 126: Cable 3D-Scanner, Tesla Charger Robot, Ultrasonic Anemometer, And A Zoetrope

Hackaday editors Elliot Williams and Mike Szczys dive into a week of exceptional hacks. Tip-top of the list has to be the precision measuring instrument that uses a cable spooling mechanism. There’s news that the Starlink base station firmware has been dumped and includes interesting things like geofencing for the developer modes. We saw a garage robot that will plug in your electric vehicle if you’re the forgetful sort. And we close up by talking about heavier-than-air helium airships and China’s Mars rover.

Take a look at the links below if you want to follow along, and as always, tell us what you think about this episode in the comments!

Direct download (55 MB or so.)

Places to follow Hackaday podcasts:

Continue reading “Hackaday Podcast 126: Cable 3D-Scanner, Tesla Charger Robot, Ultrasonic Anemometer, And A Zoetrope”

Sub-mm Mechanical 3D Scanner With Encoders And String

[Scott Rumschlag] wanted a way to precisely map interior spaces for remodeling projects, but did not want to deal with the massive datasets created by optical 3D scanning, and found the precision of the cost-effective optical tools lacking. Instead, he built a 3D cable measuring device that can be used to map by using a manual probe attached to a cable.

The cable is wound on a retractable spool, and passes over a pulley and through a carbon fiber tube mounted on a two-axis gimbal. There are a few commercial machines that use this mechanical approach, but [Scott] decided to build one himself after seeing the prices. The angle of rotation of each axis of the gimbal and the length of extended cable is measured with encoders, and in theory the relative coordinates of the probe can be calculated with simple geometry. However, for the level of precision [Scott] wanted, the devil is in the details. To determine the position of a point within 0.5 mm at a distance of 3 m, an angular resolution of less than 0.001° is required on the encoders. Mechanical encoders could add unnecessary drag, and magnetic encoders are not perfectly linear, so optical encoders were used. Many other factors can also introduce errors, like stretch and droop in the cable, stickiness of the bearings, perpendicularity of the gimbals axis and even the spring force created by the encoder wires. Each of these errors had to accounted for in the calculations. At first, [Scott] was using an Arduino Mega for the geometry calculations, but moved it to his laptop after he discovered the floating point precision of the Mega was not good.

[Scott] spend around 500 hours building and tuning the device, but the end result is really impressive. There are surprisingly few optical machines that can achieve this level of precision and accuracy, and they can be affected by factors like the reflectivity of an object.

If you do want to get into real 3D scanning, definitely take the time to read [Donal Papp]’s excellent guide to the practical aspects of the various technologies. Most of us already have a 3D scanner in our pocket in the form of a smartphone, which can be used for photogrammetry.

Continue reading “Sub-mm Mechanical 3D Scanner With Encoders And String”