The 3D Printers, Scanners, And Art Robots Of Maker Faire Rome

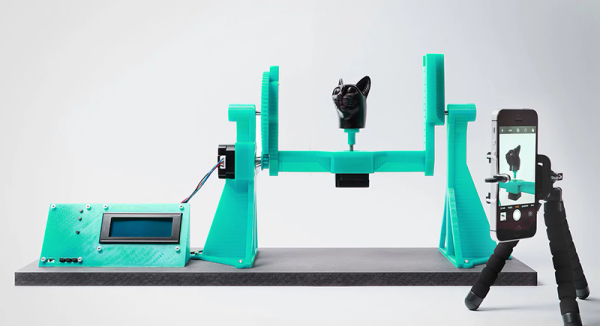
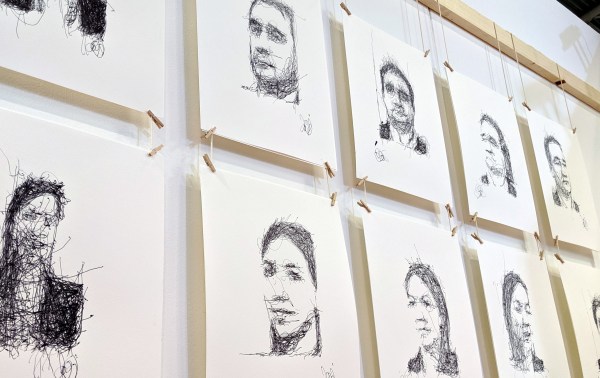
How is it possible that a robot can sketch both better and worse than I can at the same time, and yet turn out an incredible work of art? Has 3D-scanning really come so far that a simple camera and motorized jig can have insane resolution? These are the kinds of questions that were running through my mind, and being answered by the creators of these brilliant machines, at Maker Faire Rome.

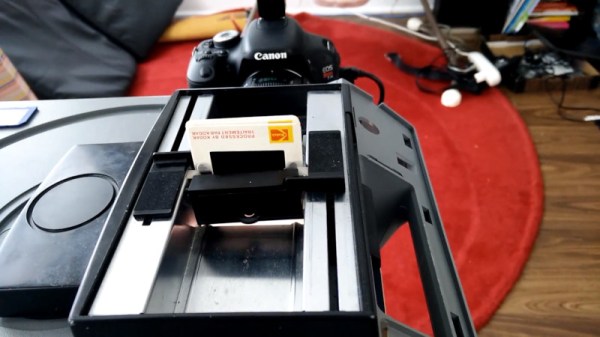
There was a high concentration of robots creating art and 3D printing on display and the Faire, so I saved the best examples just for this article. But you’ll also find hacks from a few groups of clever students, and hardware that made me realize industrial controllers can be anything but boring. Let’s take a look!

Continue reading “The 3D Printers, Scanners, And Art Robots Of Maker Faire Rome”

3D Scanner For Tiny Objects Uses Blu-Ray Parts

There’s plenty of different methods to build a 3D scanner, with photogrammetry being a particularly accessible way to do it. This involves taking a series of photos from different angles to build up the geometry of the model. If you want to do this with something small, instead of a camera, just substitute a microscope! [NoseLace’s] LadyBug does just that.

It’s a 3D scanner built in a very hacker fashion. The X-Y stage that moves the sample is from a KES-400a Blu-Ray drive, salvged from the original “fat” Playstation 3. The Z axis is then created using the linear stepper motor from the optical pickup of the same drive. A rotary stepper motor is added on to the Z-axis to allow the sample to be rotated. It’s all combined with a basic USB microscope to take the images, and a Raspberry Pi which handles running all the stepper motors with some add-on driver boards.

[NoseLace] uses the device to create 3D models of insects, but it would work just as well with other small objects. The benefit of this approach is that it creates both the 3D model and the requisite texture, too. There’s plenty of open-source tools available if you’d like to try it for yourself. Video after the break.

Continue reading “3D Scanner For Tiny Objects Uses Blu-Ray Parts”

2D-Scanner Records Surfboard Profiles For Posterity

[Ryan Schenk] had a problem: he built the perfect surfboard. Normally that wouldn’t present a problem, but in this case, it did because [Ryan] had no idea how he carved the gentle curves on the bottom of the board. So he built this homebrew 2D-scanner to make the job of replicating his hand-carved board a bit easier.

Dubbed the Scanbot 69420 – interpretation of the number is left as an exercise for the reader, my dude – the scanner is pretty simple. It’s just an old mouse carrying a digital dial indicator from Harbor Freight. The mouse was gutted, with even the original ball replaced by an RC plane wheel. The optical encoder and buttons were hooked to an Arduino, as was the serial output of the dial indicator. The Arduino consolidates the data from both sensors and sends a stream of X- and Z-axis coordinates up the USB cable as the rig slides across the board on a straightedge. On the PC side, a Node.js program turns the raw data into a vector drawing that represents the profile of the board at that point. Curves are captured at various points along the length of the board, resulting in a series of curves that can be used to replicate the board.

Yes, this could have been done with a straightedge, a ruler, and a pencil and paper – or perhaps with a hacked set of calipers – but that wouldn’t be nearly as much fun. And we can certainly see applications for this far beyond the surfboard shop.

3D-Printed Film Scanner Brings Family Memories Back To Life

There is a treasure trove of history locked away in closets and attics, where old shoeboxes hold reels of movie film shot by amateur cinematographers. They captured children’s first steps, family vacations, and parties where [Uncle Bill] was getting up to his usual antics. Little of what was captured on thousands of miles of 8-mm and Super 8 film is consequential, but giving a family the means to see long lost loved ones again can be a powerful thing indeed.

That was the goal of [Anton Gutscher]’s automated 8-mm film scanner. Yes, commercial services exist that will digitize movies, slides, and snapshots, but where’s the challenge in that? And a challenge is what it ended up being. Aside from designing and printing something like 27 custom parts, [Anton] also had a custom PCB fabricated for the control electronics. Film handling is done with a stepper motor that moves one frame into the scanner at a time for scanning and cropping. An LCD display allows the archivist to move the cropping window around manually, and individual images are strung together with ffmpeg running on the embedded Raspberry Pi. There’s a brief clip of film from a 1976 trip to Singapore in the video below; we find the quality of the digitized film remarkably good.

Hats off to [Anton] for stepping up as the family historian with this build. We’ve seen ad hoc 8-mm digitizers before, but few this polished looking. We’ve also featured other archival attempts before, like this high-speed slide scanner.

Continue reading “3D-Printed Film Scanner Brings Family Memories Back To Life”

A Very Modern Flying Spot Scanner

Analogue TV signals are a beautiful exercise in order and synchronisation, in that as the white dot on your old CRT TV back in the day traced its way across the glass it would have been doing so in faithful obedience to the corresponding electron beam in the camera at the studio. But a camera with a lens and light-sensitive scanning camera tube wouldn’t have been the only way of generating a picture. The flying-spot scanner drew a raster over its subject — usually celluloid film — with a white dot of light and recorded the result with a single photocell to produce a video signal. The ever resourceful [Niklas Roy] has built one using a video projector.

In this scanner the “dot” is a square of white pixels that is moved around the scene, while the sensor is a photoresistor that is read by an Arduino which passes the data to a PC. The whole is mounted in a booth that the subject positions themselves in front of, and covers their head with a cloth. It’s a slow process because the photoresistor is hardly the best sensor, in fact a portrait takes 83 seconds.

The result is hardly superlative quality, but of course this is an artwork in itself rather than a particularly good camera. It is however an impressive piece of work, and we know we’d give it a go if we had the chance.

[Niklas] is a frequent feature on these pages, having produces some pretty impressive work over the years. Some of our favourites are his container-sized music construction machine, and his tiny cardboard plotter.

This 3D Scanner Is Your Ticket To Photogrammetry

It seems 3D printers have been around for ages and still we don’t have a good solution for turning physical 3D objects into digital ones. Yes, 3D scanners exist, but the OpenScan is the best 3D scanner we’ve seen. It’s a 3D printed device meant to take pictures of an object that can then be used by photogrammetry software to construct a point cloud. From there, it’s just a matter of messing with meshes to create a 3D printed copy of anything you want.

The latest version of the scanner is an improvement over the previous version that kind of, sort of looked like the Machine from Contact. This was a gigantic hubless ring, with a smartphone attached to the rim. Put an object in the center, and the phone would rotate around the object in every axis, snapping pictures the entire time. Needless to say, a simpler design prevailed. That doesn’t mean the old version didn’t look awesome. The electronics are simply an Arduino clone, two stepper drivers, a character display for control and some headers for connections and power supplies. This is pretty normal stuff for the RepRap crew.

Running this machine is as simple as putting an object in the device and taking a few pictures. There is some support for remotely controlling some cameras, but everything is universal if you have a remote shutter release. This can be plugged into the electronics, and once everything is done you have a few dozen pictures of an object with optimal lighting conditions that can be thrown into your photogrammetry software of choice. (Ed note: at least one that doesn’t rely on the object remaining stationary with respect to the background to estimate camera position.)

A High-Speed Slide Scanner Build

Photographic slides were popular in the middle part of the 20th century, but are long forgotten now. If you’ve found a handful in a dusty attic, you might consider sending them away to be digitized professionally, or using a flatbed scanner at home. [Bryan Howard] found himself with over 200,000 slides, however, so that just wouldn’t do. Instead, he endeavored to build an automated scanner of his own. 

Like many similar projects, [Bryan] started with an existing slide projector as a base. This means that all the difficult work of slide transport is already taken care of. The projector has then been upgraded with an LED light source and other tweaks befitting its new role. An Arduino Pro Micro runs the show, firing off the camera to image each slide before loading the next one into place. The DSLR responsible for imaging is then hooked up to a PC so the incoming images can be checked while the machine is in operation.

Preliminary tests are promising, with the scanner successfully capturing several slides in a row. [Bryan] estimates that, with a capture time of between 1 and 2 seconds per slide, it should take somewhere between 2-5 days to image the entire collection.

We wish [Bryan] the best of luck with the project, and look forward to seeing the final results. We’ve seen similar work before, too. Video after the break.

Continue reading “A High-Speed Slide Scanner Build”