A Glorious Mechanical Seven Segment Display

If you’ve ever wondered why you’ve never seen a mechanical seven-segment display, now you know. They’re fairly complicated and most likely absurdly expensive, especially when a few light bulbs or LEDs would do the same job equally well. This didn’t stop [kiu] from completing his mechanical seven-segment clock he calls SevenBlocks, and for that we are thankful.

Each of the 28 segments in [kiu]’s clock is made of three layers of acrylic and a short section of a rack gear. Unlike every seven-segment display you’ve ever seen, tiny hobby servos provide the indication for each segment. For the electronics, An ATMega8 is used for the brains of the outfit with a 74HC595 shift register to expand the number of I/O lines. A DS1307 RTC module provides accurate timekeeping, and the dozens of servo outputs visible in the ‘guts shot’ makes you realize why you’ve never seen a mechanical seven segment display before – they’re really friggin’ complex.

If you want to build your own mechanical seven-segment clock, [kiu] put all the files up on Github. Everything is there, from the .DXF files ready to feed to a laser cutter to the schematic and board files for each of the three PCBs. A video showing this clock in action is sort of necessary, so you can check that out after the break.

Continue reading “A Glorious Mechanical Seven Segment Display”

Playing Zork On The Arduino

If you’re looking for something to do on a boring Sunday afternoon, how about dusting off your Arduino and playing a text adventure? [Louis] wrote in to tell us about his project called AZIP, an app that will let you play classic 1980s text adventures on your Arduino.

The famous Infocom text adventure games such as Zork and Hitchhiker’s Guide to the Galaxy (reputed to be better than the book, by the way) all ran on a virtual machine called a ZMachine. We’ve seen a few unsuccessful attempts to run a ZMachine on an Arduino, but these builds usually end up going with a Linux-based single board computer. As far as we’re aware, [Louis]’ build is the first time classic text adventures have been available on the Arduino.

[Louis] based his build on the popular Jzip ZMachine. The required hardware is fairly minimal – just an Arduino with an SD card. Right now the limitations of Flash and RAM on the Arduino means [Louis] needed to remove the game save and restore functions, but with a little clever coding and continued development those functions can be restored. Very cool indeed.

Printing Anything With A Thermal Receipt Printer

Over the last year, [James] has been a part of a few commercial projects that used a thermal receipt printer as part of the build. Something must have cracked in his mind, because [James] spent a lot of time developing a way to print customized content on receipt printers, connecting these printers to the Internet, and sharing content with other Internet-connected receipt printers. Even [James] doesn’t know why he spent so much time on this project; [James] figured he was bound to find something interesting. We’ve got to commend him for that.

[James] had been aware of the Adafruit Thermal Printer Library, but this library is a little kludgy. Text is the Adafruit Library’s forte, and while graphics and non-ASCII characters are possible they’re certainly not easy to print with the existing libraries. With his current system based on HTML, CSS, and Javascript, [James] has a really easy way to print anything he can put on a webpage on receipt paper.

Getting his receipt printer onto the Internet had its own challenges. After wrangling with the Arduino Ethernet library through the month of February, [James] realized larger prints (about 15cm of paper) would fail inexplicably. To get around this, [James] wrote an HTTP client for the Arduino that would fetch data, put it on the SD card, and then start printing.

Right now, [James]’ project is a polished as anyone could hope. We’re a bit concerned – although we completely understand –  that he could get sucked into the black hole of pointless development of receipt printer software so easily. All was not for naught, though; now anyone can make very professional-looking prints on receipt paper very easily.

Extending The Range Of Wireless Weather Stations With Walkie Talkies

[Roel] wanted to put a wireless weather station in his greenhouse. Even though the weather station was supposed to transmit over fairly long distances, the geometry of his back yard and a few stone walls killed the radio signal even after putting a good antenna on the receiving side of his wireless weather station setup. Wanting to get his weather station working, [Roel] did the sensible thing and built a packet radio setup out of a pair of walkie talkies, greatly increasing the range of his weather station.

This build comes after [Roel] spent a great deal of time reverse engineering the wireless protocol of his Thierry Mugler weather station. With a little bit of code, [Roel] is able to get the current temperature and humidity reading into his Linux box. This system relies on the transmitter inside the weather station, so the system falls apart over any sufficiently large distance.

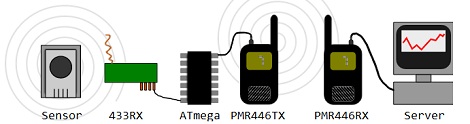
To increase the range of his weather station, [Roel] took his existing hardware and added a pair of inexpensive FRS walkie talkies. The build uses the hardware from his previous build to get the radio data from the weather station. This data is sent over to an ATmega88 where it’s converted to packet radio and sent over the walkie-talkie. On the receiving side, the output of a second walkie-talkie is piped into the Linux soundmodem app (link, but it’s down as of this writing) where it’s decoded. Sending the received data to gnuplot makes a very nice graph of the temperature and humidity.

[Roel] put the code for both the tx and rx sides of the build up on his build page. Very nice work that uses very inexpensive hardware.

Aquarium Automation Keeps The Fish Fed And The Lights On

fish-tank-automator

Anyone who owns a fish tank knows that a good amount of care is required to keep fish happy, healthy, and most of all – alive. [Vicente Jiménez] usually has no problem keeping up on the day to day maintenance such as feeding and switching the tank light, but he wanted to automate these processes for times when he can’t be home to take care of the fish (Translation).

His aquarium automation project is meant to cover three separate parts of the operation: light control, feeding, and pump regulation during feeding times. [Vincente] picked up an STM8L Discovery board to control his system, which enabled him to easily control the automation of all three.

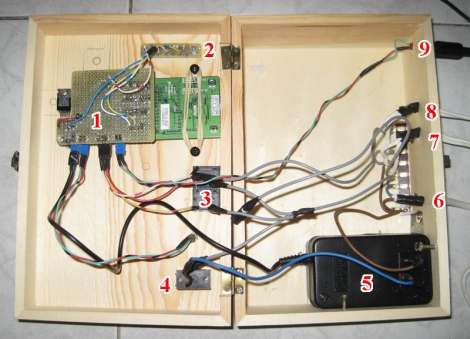
He constructed the feeding mechanism using an old cassette player motor, which turns his food drum (an old film canister), twice a day at specified feeding times. Before the drum is turned to dispense food, the STM8L turns off the aquarium’s pump via a relay to ensure it doesn’t get clogged in the process. During the day he keeps the tank illuminated, but once night falls, the microcontroller shuts the lights off so the fish can get their rest.

There’s no video of the system in action, but [Vincente] has detailed its construction pretty thoroughly in his blog, so be sure to check it out if you are in need of something similar.

IR Helicopter Controller Hacked Into A Linux Game Pad

syma-linux-joystick

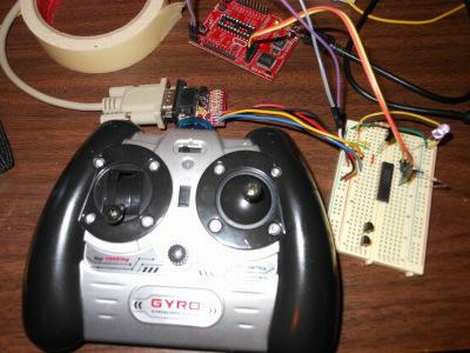
[Mike Kohn’s] Syma S107 helicopter wasn’t flying as well as it used to due to a broken gear, he figured he might as well find some use for the toy’s controller, since it was currently sitting around collecting dust. Having done a bunch of work with Syma IR protocols earlier this year, he decided it would be pretty easy to get the remote working as a game pad for his Linux desktop.

He patched an IR receiver into an MSP430 board, which decodes the incoming IR signals, sending them to his computer over a serial connection. [Mike] dug around in the Linux source for some good joystick driver code to borrow and found something that was close enough to work. After a bit of tweaking he loaded up his driver module and fired up Mame to give [Ms. Pacman] a try.

He says that the controller worked without much trouble, though as he discovered in previous projects, there are some quirks in the controller that make it somewhat less than convenient to use full time. Check out his site if you’re interested in taking a look at the code that he used to get things running.

An ITunes Rating Box For Everyone

If you’ve ever scoffed at the idea of opening up iTunes every four minutes to rate a song, [Steve] is the guy to talk to. He built a small hardware box with five illuminated buttons to rate the current song playing on iTunes.

This build comes after [Steve]’s earlier Arduino-based rating box that was functional, but didn’t have the level of polish he desired. To get to the current iteration, [Steve] designed a custom board around a PIC18F microcontroller programmed as a USB HID device. After a great deal of frustration soldering teeny SMD components, [Steve] had a functioning USB five-star iTunes rating box. With a custom acrylic case the build was finally completed.

We’re very impressed with the finished version of [Steve]’s TuneConsole, as he calls it. We can certainly imagine other people wanting a similar device. Whether that comes from releasing the schematics and boards or selling PCBs on Seeed Studio is something we’re eager to find out.