Custom Nixie Tube PSU Is A Lesson In Good PCB Design

Nixie HVPSU

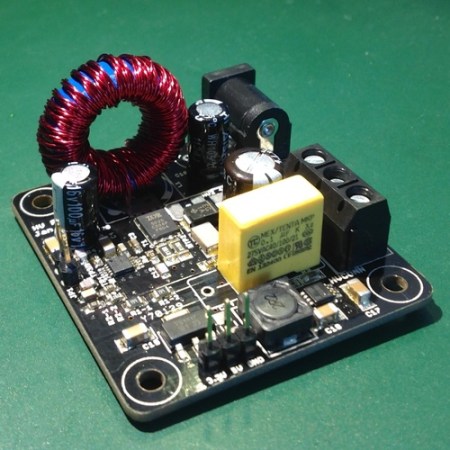
[Jan Rychter] was sick and tired of not being able to find the right power supply for his Nixie tube projects, so he decided to design his own. [Jan] started out designing around the MAX1771 (PDF) DC-DC controller, but quickly discovered he was having stability problems. Even after seven board revisions, he was still experiencing uncontrolled behavior. He ended up abandoning the MAX1171 and switching to the Texas Instruments TPS40210. After three more board designs, he finally has something that works for him. [Jan] admits that his design is likely not perfect (could have fooled us!), but he wanted to release it to the world as Open-Source Hardware to give back to the community.

The end result of [Jan’s] hard work is a 5cm x 5cm board that generates four separate output voltages from a single 12V source. These include both a 3.3V and 5V output for digital logic as well as a 220V out put for Nixie tubes and a 440V maximum output for dekatrons. The circuit also features several safety features including over-current protection, thermal shutdown, and slow-start. Be sure to check out [Jan’s] webpage to view out the schematics and technical information for this awesome circuit.

Need some Nixie tubes to go with that circuit? We know some resources for you to check out. Or you could always just build your own. How can you use this board in your next project?

Designing A WakeUp Light

[Akhil] and his wife recently finished their WakeUp Light project. As the name suggests, this kind of morning alarm uses light to wake you up in the morning. The main constraints when starting this relationship-strengthening adventure were cost, ability to work with any table lamp, and having a simple but effective control interface, all while keeping all the design open. The created platform (put in the wooden box shown above) is built around a Stellaris Launchpad (ARM Cortex M4 based) and uses an AC dimmer circuit found in this instructable. For our readers interested in those, [Akhil] mentions two very interesting articles about their theory of operation here and here.

An Android application has been made to set up all the alarm parameters, which uses the phone’s Bluetooth to communicate with the (well-known) HC-05 Bluetooth transceiver connected to the Launchpad. For safety, the current design also includes an LM4876 based audio amplifier connected to the microcontroller’s PWM output. The next revision will integrate a Digital to Analog Converter and an SD-Card slot for better quality and music diversity. A presentation video is embedded after the break and you can find the official repository at GitHub.

Continue reading “Designing A WakeUp Light”

S.A.M. The Safety Attention Monitor

Capture

Last term’s project at Chico State University hopes to reduce driver distraction by alerting you when it notices you aren’t paying attention (to the road!).

The team designed SAM using OpenCV to track your face in order to recognize when you aren’t watching the road. It alerts you through a variety of audible beeps and LED lights, and is programmed to only alert you after set time values — i.e. it’s not going to go off when you’re checking your blind spot, unless you’ve been checking it for over a certain length of time. It also has a silence button you can press for situations like looking around while you are parked.

The proof of concept device was built using a Raspberry Pi, the PiCam, and a breadboard to accommodate some manual controls, the buzzer, and LEDs. It also continuously records video of you on a 30 second loop, and in the event of an accident, it saves all the video — perhaps proving it was your fault. Can you imagine if all cars had this installed? On the plus side you wouldn’t have to argue with insurance companies — but if it really was your fault, well then you’re straight out of luck.

Safety Warning: Arduino GSM Shield May Cause Fires

Be careful with those Arduino GSM cards. As [James] reports, they may turn into fire starters. One person has reported a small explosion and fire already on the Arduino forums.
Now before we go any further – You may be asking yourself who the heck [James] is, and what gives him the ability to second guess the Arduino team. Well, here is [James’] blog disclaimer:  “James is a Senior Technical Expert for Technology and Applications at KEMET Electronics, a capacitor manufacturer. The content of this post are his and in no way reflects opinions of his employer.”

Senior Technical Expert?  That’s a good enough reason for us to believe him.

[James] states the problem is a tantalum capacitor used to decouple the GSM radio power supply from the main Arduino supply.
Tantalum capacitors are great for their low ESR properties. However, they have a well known downside of getting very hot, or even exploding when stressed. It’s not the Tantalum Anode that is burning. The Manganese Dioxide used as a cathode in some Tantalum capacitors is the culprit. Continue reading “Safety Warning: Arduino GSM Shield May Cause Fires”

ATX Benchtop Conversion Retains Safety Features, Delivers Plenty Of Current.

atx-benchtop-psu

[Bogin] was looking to add a benchtop power supply to his array of tools, but he didn’t really find any of the online tutorials helpful. Most of what he discovered were simple re-wiring jobs utilizing LM317 regulators and shorted PS-ON pins used to keep the PSUs happily chugging along as if nothing had been changed. No, what [Bogin] wanted was a serious power supply with short circuit protection and loads of current.

He started the conversion by disassembling a 300 watt ATX power supply that uses a halfbridge design. After identifying the controller chip, a TL494 in this case, he proceeded to tweak the PWM feedback circuit which controls the supply’s output. A few snips here, a few passes with a soldering iron there, and [Bogin] was ready to test out his creation.

He says that it works very well, even under heavy load. His tutorial is specific to these sorts of PSUs, so we would be more than happy to feature similar work done with those that implement other design topologies. In the meantime, be sure to check out a video of the hacked power supply in action below.

Continue reading “ATX Benchtop Conversion Retains Safety Features, Delivers Plenty Of Current.”

Collecting Radon Data In The Name Of Science And Safety

radon-data-collector

When [Chris Nafis] built an addition onto his historical home he found that a Radon problem, previously mitigated with plenty of concrete, seemed to rear its ugly head yet again. He eventually resigned himself to installing a Radon fan and detector – the latter of which offered no way to store measurement data. He wanted to get a better feel for the short and long-term Radon measurements in his house, in hopes of finding some correlation between temperature, moisture levels, and the total amount of Radon emitted from the ground.

To do this, he disassembled a pair of Radon detectors located in different parts of his house, each of which he wired up to an Arduino. Using his oscilloscope to determine which PCB leads controlled the different LED segments on the displays, he quickly had the Arduinos scraping measurement data from the sensors. [Chris] figured the best way to keep track of his data was to do it online, so he interfaced the microcontrollers with Pachube, where he can easily analyze his historical readings.

An additional goal he set for himself is to trigger the Radon fan only when levels start rising in order to save a little on his electric bill. With his data logging operation in full swing, we think it should be a easy task to accomplish.

Head-to-head Mountain Climbing From The Safety Of Your Game Room

Why risk frostbite and altitude sickness when you can marvel at the view from atop your own mountain climbing game?

[Jeff] built this delightful piece which you can see in action after the break. he combined several very simple ideas and he did it really well. The climbers are both mechanical. They grip the mountain’s face (which is covered with of carpet) with a tack pointed downward on the end of each limb. Their motion is provided by two tiny servos that make up the body of the climber. The two potentiometers in each controller directly affect the movement of the top and bottom limbs. The game plays music during the contest, and precisely detects a winner by sensing when an arm comes in contact with the metal snow cap at the summit.

Obviously weight was an issue during the design process. After some hemming and hawing [Jeff] decided to tether the climbers in order to avoid rolling a battery into each. But he overcame the issue with weighted cable management on the inside of the mountain.

Continue reading “Head-to-head Mountain Climbing From The Safety Of Your Game Room”