Wacky Science: Using Mayonnaise To Study Rayleigh-Taylor Instability

Sometimes a paper in a scientific journal pops up that makes you do a triple-take, case in point being a recent paper by [Aren Boyaci] and [Arindam Banerjee] in Physical Review E titled “Transition to plastic regime for Rayleigh-Taylor instability in soft solids”. The title doesn’t quite do their methodology justice — as the paper describes zipping a container filled with mayonnaise along a figure-eight track to look at the surface transitions. With the paper paywalled and no preprint available, we have to mostly rely the Lehigh University press releases pertaining to the original 2019 paper and this follow-up 2024 one.

Rayleigh-Taylor instability (RTI) is an instability of an interface between two fluids of different densities when the less dense fluid acts up on the more dense fluid. An example of this is water suspended above oil, as well as the expanding mushroom cloud during a explosion or eruption. It also plays a major role in plasma physics, especially as it pertains to nuclear fusion. In the case of inertial confinement fusion (ICF) the rapidly laser-heated pellet of deuterium-tritium fuel will expand, with the boundary interface with the expanding D-T fuel subject to RTI, negatively affecting the ignition efficiency and fusion rate. A simulation of this can be found in a January 2024 research paper by [Y. Y. Lei] et al.
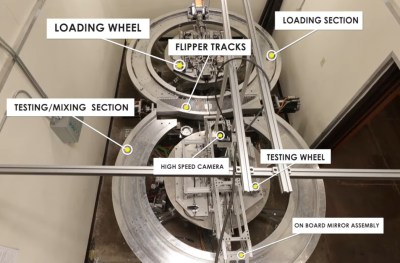
As a fairly chaotic process, RTI is hard to simulate, making a physical model a more ideal research subject. Mayonnaise is definitely among the whackiest ideas here, with other researchers like [Samar Alqatari] et al. as published in Science Advances opting to use a Hele-Shaw cell with dyed glycerol-water mixtures for a less messy and mechanically convoluted experimental contraption.

What’s notable here is that the Lehigh University studies were funded by the Lawrence Livermore National Laboratory (LLNL), which explains the focus on ICF, as the National Ignition Facility (NIF) is based there.

This also makes the breathless hype about ‘mayo enabling fusion power’ somewhat silly, as ICF is even less likely to lead to net power production, far behind even Z-pinch fusion. That said, a better understanding of RTI is always welcome, even if one has to question the practical benefit of studying it in a container of mayonnaise.

DIY Gaming Laptop Built Entirely With Desktop Parts

Gaming laptops often tend towards implementing more desktop-like hardware in the pursuit of pure grunt. But what if you were to simply buy desktop hardware yourself, and build your own gaming laptop? That would be very cool, as [Socket Science] demonstrates for us all.

The project began with lofty goals. The plan wasn’t to build something rough and vaguely laptop-like. [Socket Science] wanted to build something of genuine quality, that for all intents and purposes, looked and worked like a proper commercial-grade laptop. Getting to that point took a full 14 months, but the final results are impressive.

Under the hood lies an AMD Ryzen 5 5600X and a XFX Radeon RX6600, hooked into an ITX motherboard with some low-profile RAM sticks. Those components were paired with a thin keyboard, a touchpad, and a portable gaming monitor. Getting all that into a thin laptop case, even a custom one, was no mean feat. Ports had to be cut down to size, weird ribbon cables had to be employed, and heatsinks and coolers had to be rearranged. To say nothing of all the work to 3D print a case that was strong and actually worked!

The full journey is quite the ride. If you want to go right back to the start, you can find part one here.

We’ve seen some builds along these lines before, but seldom few that get anywhere near this level of fit and finish. Oftentimes, it’s that kind of physical polish that is most difficult to achieve. All we can say is “Bravo!” Oh, and… video after the break.

Continue reading “DIY Gaming Laptop Built Entirely With Desktop Parts”

RC submarine surfaced in a pool

RC Submarine Build Starts With Plenty Of Research

[Ben]’s a 15-year-old who loves engineering and loves taking on new challenges. He’s made some cool stuff over the years, but the high water mark (no pun intended) has to be this impressively documented remote controlled submarine.

His new build starts off with more research than the actual building. [Ben] spent a ton of time investigating the design of the submarine from its shape, to the propeller system, to the best way to waterproof everything, keeping his sub in tip-top shape. He decides to go with the Russian-style Akula submarine, which is probably the generic look that most of us would think of when we hear the word submarine. He had some interesting thoughts on the propeller system (like the syringe ballast we’ve seen before), and which type of motor to use. In the end, he decided with four pumps that would act essentially as thrusters. fill a chamber with water, allowing the submarine to submerge, or fill with air, making the submarine buoyant, allowing it to resurface.

However, what we found most interesting about his build is how he explains the rationale for all his design decisions and clearly documents his thought process on his project page. We really can’t do [Ben]’s project justice in a short post, so head over to his project page to see it for yourself.

While you’re at it, check out some of these other cool submarine builds that we’ve featured here on Hackaday

Audio On Pi: Here Are Your Options

There are a ton of fun Raspberry Pi and Linux projects that require audio output – music players, talking robots, game consoles and arcades, intelligent assistants, mesh network walkie-talkies, and much more! There’s no shortage of Pi-based iPods out there, and my humble opinion is that we still could use more of them.

To help you in figuring out your projects, let’s talk about all the ways you can use to get audio out of a Pi or a similar SBC. Not all of them are immediately obvious and you ought to know the ropes before you implement one of them and get unpleasantly surprised by a problem you didn’t foresee. I can count at least five ways, and they don’t even include a GPIO-connected buzzer!

Let’s rank the different audio output methods, zoning in on things like their power consumption, and sort them by ease of implementation, and we’ll talk a bit about audio input options while we’re at it.

Continue reading “Audio On Pi: Here Are Your Options”

This Week In Security: GhostWrite, Localhost, And More

You may have heard some scary news about RISC-V CPUs. There’s good news, and bad news, and the whole thing is a bit of a cautionary tale. GhostWrite is a devastating vulnerability in a pair of T-Head XuanTie RISC-V CPUs. There are also unexploitable crashes in another T-Head CPU and the QEMU soft core implementation. These findings come courtesy of a group of researchers at the CISPA Helmholtz Center for Information Security in Germany. They took at look at RISC-V cores, and asked the question, do any of these instructions do anything unexpected? The answer, obviously, was “yes”.

Undocumented instructions have been around just about as long as we’ve had Van Neumann architecture processors. The RISC-V ISA put a lampshade on that reality, and calls them “vendor specific custom ISA extensions”. The problem is that vendors are in a hurry, have limited resources, and deadlines wait for no one. So sometimes things make it out the door with problems. To find those problems, CISPA researchers put together a test framework is called RISCVuzz, and it’s all about running each instruction on multiple chips, and watching for oddball behavior. They found a couple of “halt-and-catch-fire” problems, but the real winner (loser) is GhostWrite.

Now, this isn’t a speculative attack like Meltdown or Spectre. It’s more accurate to say that it’s a memory mapping problem. Memory mapping helps the OS keep programs independent of each other by giving them a simplified memory layout, doing the mapping from each program to physical memory in the background. There are instructions that operate using these virtual addresses, and one such is vs128.v. That instruction is intended to manipulate vectors, and use virtual addressing. The problem is that it actually operates directly on physical memory addresses, even bypassing cache. That’s not only memory, but also includes hardware with memory mapped addresses, entirely bypassing the OS. This instruction is the keys to the kingdom. Continue reading “This Week In Security: GhostWrite, Localhost, And More”

Illustrated Kristina with an IBM Model M keyboard floating between her hands.

Keebin’ With Kristina: The One With The KiCad Plugin

A low-profile split keyboard with a sliding, round track pad on each half.
Image by [fata1err0r81] via reddit
The most striking feature of the Tenshi keyboard has to be those dual track pads. But then you notice that [fata1err0r81] managed to sneak in two extra thumb keys on the left, and that those are tilted for comfort and ease of actuation.

The name Tenshi means ‘angel’ in Japanese, and creator [fata1err0r81] says that the track pads are the halos. Each one slides on a cool 3D-printed track that’s shaped like a half dovetail joint, which you can see it closer in this picture.

Tenshi uses a pair of RP2040 Zeros as controllers and runs QMK firmware. The track pads are 40 mm each and come from Cirque. While the Cirques have been integrated into QMK, the pull request for ZMK has yet to be merged in. And about those angled keys — [fata1err0r81] says they tried risers, but the tilting feels like less effort. Makes total sense to me, but then again I’m used to a whole keyboard full of tilted keys.

Continue reading “Keebin’ With Kristina: The One With The KiCad Plugin”

Magnesium And Copper Makes An Emergency Flashlight

Many of us store a flashlight around the house for use in emergency situations. Usually, regular alkaline batteries are fine for this task, as they’ll last a good few years, and you remember to swap them out from time to time. Alternatively, you can make one that lasts virtually indefinitely in storage, and uses some simple chemistry, as [JGJMatt] demonstrates.

The flashlight uses 3D printing to create a custom battery using magnesium and copper as the anode and cathode respectively. Copper tape is wound around a rectangular part to create several cathode plates, while magnesium ribbon is affixed to create the anodes. Cotton wool is then stuffed into the 3D-printed battery housing to serve as a storage medium for the electrolyte—in this case, plain tap water.

The custom battery is paired with a simple LED flashlight circuit in its own 3D-printed housing. The idea is that when a blackout strikes, you can assemble the LED flashlight with your custom battery, and then soak it in water. This will activate the battery, producing around 4.5 V and 20 mA to light the LED.

It’s by no means going to be a bright flashlight, and realistically, it’s probably less reliable than just keeping a a regular battery-powered example around. Particularly given the possibility of your homebrew battery corroding over the years unless it’s kept meticulously dry. But that’s not to say that water-activated batteries don’t have their applications, and anyway it’s a fun project that shows how simple batteries really are at their basic level. Consider it as a useful teaching project if you have children interested in science and electricity!