If you need to make round things, you probably need a lathe. Can you build one as nice as one you can buy? Probably not. But can you build one that will work and allow you to do more things than having no lathe at all? [Mikeandmertle] say absolutely! You can see the contraption in operation in the video below.
The build is decidedly functional-looking and only requires a few parts. Most of the components are unremarkable, save for a threaded bar, a metal pipe, some bearings, and a few threaded inserts. Well, there’s also a drill chuck and two lathe centers. Those don’t have to be very expensive, but they may well be the bulk of what you have to spend to make this project.
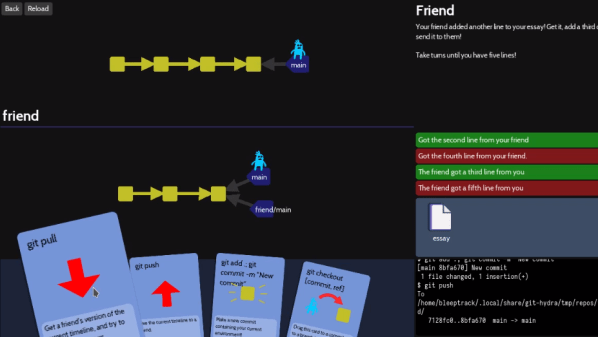
What better way to learn to use Git than a gamified interface that visualizes every change? That’s the idea behind Oh My Git! which aims to teach players all about the popular version control system that underpins so many modern software projects.
Git good, with a gameified git interface.
Sometimes the downside to a tool being so ubiquitous is that it tends to be taken for granted that everyone already knows how to use it, and those starting entirely from scratch can be left unsure where to begin. That’s what creators [bleeptrack] and [blinry] had in mind with Oh My Git! which is freely available for Linux, Windows, and macOS.
The idea is to use a fun playing-card interface to not only teach players the different features, but also to build intuitive familiarity for operations like merging and rebasing by visualizing in real-time the changes a player’s actions make.
The game is made with beginners in mind, with the first two (short) levels establishing that managing multiple versions of a file can quickly become unwieldy without help. Enter git — which the game explains is essentially a time machine — and it’s off to the races.
It might be aimed at beginners, but more advanced users can learn a helpful trick or two. The game isn’t some weird pseudo-git simulator, either. The back end uses real git repositories, with a real shell and git interface behind it all. Prefer to type commands in directly instead of using the playing card interface? Go right ahead!
Oh My Git! uses the free and open-source Godot game engine (not to be confused with the Godot machine, a chaos-based random number generator.)
Workholding is generally not a problem on a big CNC plasma cutter.; gravity does a pretty good job of keeping heavy sheet steel in place on the bed. But what if your CNC table isn’t a table? The answer: magnets — lots of magnets.
The backstory on this is a bit involved, but the condensed version is that [Lucas] needed a CNC plasma cutter big enough to cut full-sized sheets of steel, but lacked the floor space in his shop for such a beast. His solution was to build a custom CNC machine that stands more or less vertically, allowing him to cut full sheets in a mere fraction of the floor space. It’s a fantastic idea, one that he put a lot of effort into, but it’s not without its problems. Chief among them is the tendency for the sheet metal to buckle and bulge during cutting since gravity isn’t working for him, along with the pesky problem of offcuts slipping away.
To help hold things in place, [Lucas] decided to magnetize the bed of his cutter. That required winding a bunch of magnets, which is covered in the video below. Mass production of magnets turns out not to be as easy as you’d think. Also unexpected was the need to turn off magnets when the cutting torch is nearby, lest the magnetic field bork the cutting plasma. [Lucas] grabbed some code from the LinuxCNC forum that streams the gantry coordinates over serial and used an Arduino to parse those messages. When the torch is getting close to one of the magnets, a relay board cuts power to just that magnet. You can see it in action in the video below; at around the 18:15 mark, you can see the sheet bulging up a bit when the torch comes by, and sucking back down when it moves on.
The amount of work [Lucas] put into this project is impressive, and the results are fantastic. This isn’t the first time he’s relied on the power of magnets to deal with sheet steel, and it probably won’t be the last.
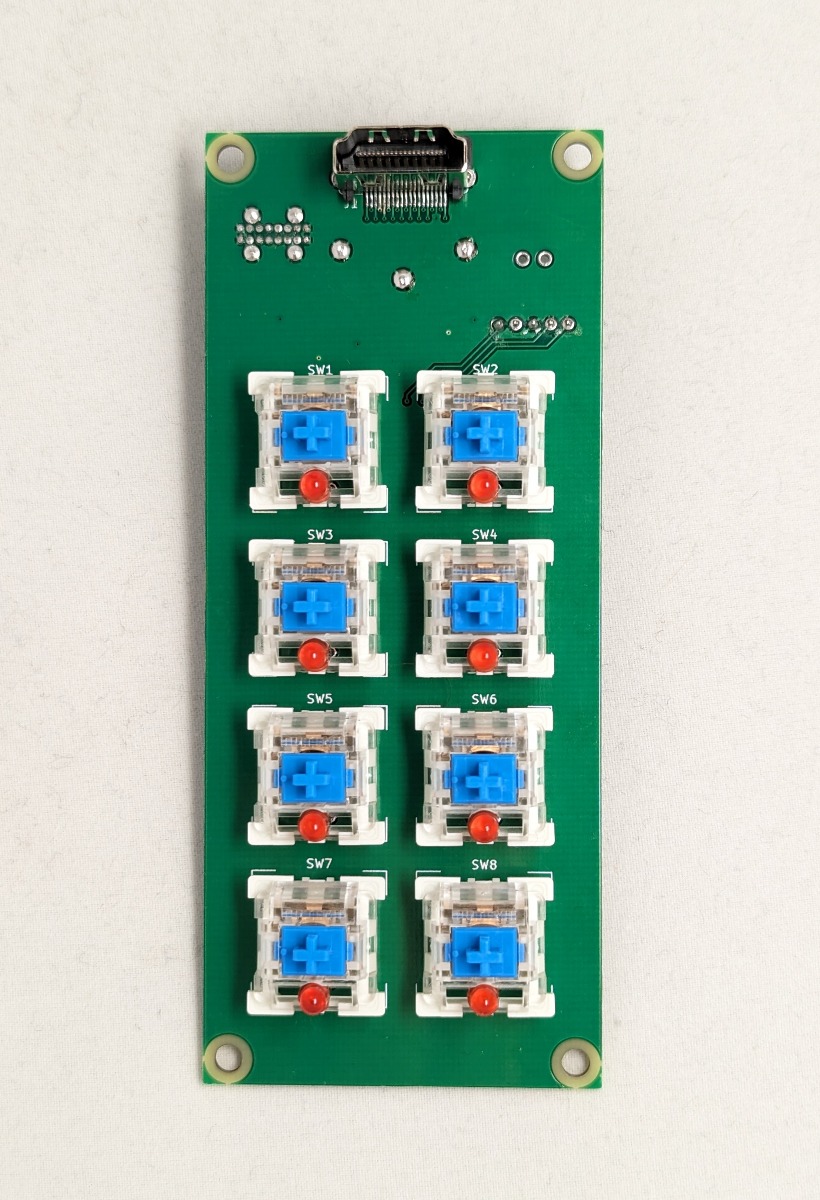
Sometime last year, [Jon Petter Skagmo] bought a Dell U3421WE monitor. It’s really quite cool, with a KVM switch and picture-by-picture support for two inputs at the same time. The only downside is that control is limited to a tiny joystick hiding behind the bezel. It’s such a pain to use that [Jon] doesn’t even use all of the features available.
[Jon] tried ddcutil, but ultimately it didn’t work out. Enter the rack-mounted custom controller keyboard, a solution which gives [Jon] single keypress control of adjusting the brightness up and down, toggling picture-by-picture mode, changing source, and more.
How does it work? It uses the display data channel (DDC), which is an I²C bus on the monitor’s HDMI connector. More specifically, it has a PIC18 microcontroller sending those commands via eight Cherry MX-style blues.
Check this out — [Jon] isn’t even wasting one of the four monitor inputs because this build uses an HDMI through port. The finished build looks exquisite and fits right into the rack with its CNC-routed aluminium front panel. Be sure to check it out in action after the break.
The prolific [Peter Waldraff] is at back it with another gorgeous micro train layout. This time, there are no plugs and no batteries. And although it’s crank-powered, it can run on its own with the flip of a switch. How? With a supercapacitor, of course.
The crank handle is connected a 50 RPM motor that acts as a generator, producing the voltage necessary to both power the train and charge up the supercapacitor. As you’ll see in the video below, [Peter] only has to move the train back and forth about two or three times before he’s able to flip the switch and watch it run between the gem mine and the cliff by itself.
The supercapacitor also lights up the gem mine to show off the toiling dwarfs, and there’s a couple of reed switches at either end of the track and a relay that handles the auto-reverse capability. Be sure to stick around to the second half of the video where [Peter] shows how he built this entire thing — the box, the layout, and the circuit.
Want to see more of [Peter]’s trains and other work? Here you go.
Before Elliot Williams jumps on a train for Hackaday Europe, there was just enough time to meet up virtually with Tom Nardi to discuss their favorite hacks and stories from the previous week. This episode’s topics include the potential benefits of having a dual-gantry 3D printer, using microcontrollers to build bespoke note taking gadgets, the exciting world of rock tumbling, and the proper care and maintenance required to keep your World War II battleship in shape. They’ll also go over some old school keyboard technologies, DIP chip repairs, and documenting celestial events with your home solar array. By the end you’ll hear about the real-world challenges of putting artificial intelligence to work, and how you can safely put high-power lithium batteries to work in your projects without setting your house on fire.
Check out the links below if you want to follow along, and as always, tell us what you think about this episode in the comments!
The central selling point of qubit-based quantum processors is that they can supposedly solve certain types of tasks much faster than a classical computer. This comes however with the major complication of quantum computing being ‘noisy’, i.e. affected by outside influences. That this shouldn’t be a hindrance was the point of an article published last year by IBM researchers where they demonstrated a speed-up of a Trotterized time evolution of a 2D transverse-field Ising model on an IBM Eagle 127-qubit quantum processor, even with the error rate of today’s noisy quantum processors. Now, however, [Joseph Tindall] and colleagues have demonstrated with a recently published paper in Physics that they can beat the IBM quantum processor with a classical processor.
In the IBM paper by [Yougseok Kim] and colleagues as published in Nature, the essential take is that despite fault-tolerance heuristics being required with noisy quantum computers, this does not mean that there are no applications for such flawed quantum systems in computing, especially when scaling and speeding up quantum processors. In this particular experiment it concerns an Ising model, a statistical mechanical model, which has many applications in physics, neuroscience, etc., based around phase transitions.
Unlike the simulation running on the IBM system, the classical simulation only has to run once to get accurate results, which along with other optimizations still gives classical systems the lead. Until we develop quantum processors with built-in error-tolerance, of course.