3D Printing Sensor Mounts For The Oculus Rift

While browsing an oculus rift thread on reddit, I saw someone mention how nice it would be to have some actual mounts for external sensors on their Rift. The idea is that adding additional sensors or cameras will allow us to expand the capabilities of the rift. With something like the Razor Hydra, you can add quick positional tracking (the rift only tracks rotation, not position). With some webcams, you could theoretically do some stereoscopic augmented reality.  Unfortunately, attaching all these things to the rift is a bit of a pain at the moment.

I had all the things right here in front of me to make this happen, so I did! I’ve quickly tossed together two accessories for the Rift.

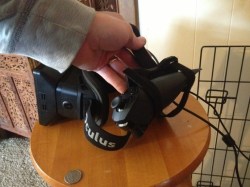
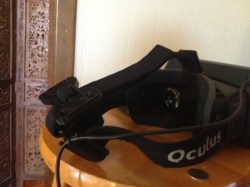
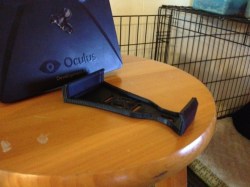
1. a small bracket that feeds onto the velcro on the back. People will likely use this for “heavy” position sensors. They may be fairly light, but any additional weight on the front of the rift is unwanted.

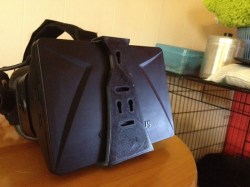
2. A snap-on face plate that has a modular design. This wold be for mounting cameras on the front of the rift.

All of these files can be downloaded here.

Working 3D Printed Stepper Motor

Stepper Small 1

Most 3D printers use stepper motors to control the movement of the extruder head. If you could actually print those motors it would be one more big step toward self-replicating hardware. Now obviously [Chris Hawkins’] working 3d printed stepper motor wasn’t built 100% through 3D printing, but the majority of the parts were. All that he had to add was the electronic driver pieces, magnets, wire, and a few nails.

The coils are made up of nails wrapped in magnet wire. The rotor is a 3D printed framework which accepts neodymium rare earth magnets. The axle is pointed which reduces the friction where it meets the cone-shaped support on either side of the frame. The IC on the upper right is a transistor array that facilitates switching the 20V driving the coils. The board on the lower right is a Digispark, which is an ATtiny85 breakout board that includes a USB edge connector for programming and a linear regulator which is how he gets away with feeding 20V as the source.

Don’t miss the demo video after the break where you can see the motor stepping 7.5 degrees at a time.

Continue reading “Working 3D Printed Stepper Motor”

Making PLA Stick To A 3D Printer Build Platform By Using Hairspray Or An Acetone ABS Slurry

[Chris] has been having some real problems getting PLA to stick to the build platform of his Printrbot. This is of course not limited to this brand of printers, and affects all extruder-based hardware using the PLA as a source material. He came up with a couple of ways to fix the problem.

The first is something we’re quite familiar with. The image above shows [Chris] applying a thin layer of hairspray to the platform. This is a technique the we use with our own 3D printer. The sheets of paper are used as a mask to help keep the sticky stuff off of the threaded rod. For more info on the hairspray trick [Chris] recommends that you read this article.

The second technique uses a slurry made from saturating a bottle of acetone with ABS leftovers. In the clip after the break he shows off a glass jar of the solvent with scraps from past print jobs hanging out inside. After a couple of days like that it’s ready to use. He takes a paper towel, wets it with the solution, and wipes on a very small amount. He does mention that this will eventually eat through the Kapton tape so apply it rarely and sparingly.

Continue reading “Making PLA Stick To A 3D Printer Build Platform By Using Hairspray Or An Acetone ABS Slurry”

H-bot Style 3D Printer Moves Bed For Z-axis

Check out this 3D printer (translated) which [Arkadiusz Śpiewak] has been working on. When sending in the tip about his project he made the important distinction that it isn’t finished, but he has reached that critical threshold where he has printed items with it.

He decided to go with a design that is sometimes referred to as an H-bot. If you’re completely unfamiliar with it, you may find this H-bot design article helpful. The gist of it is that this technique makes it so that the motors used to move the extruder along the X and Y axes are themselves stationary. One large timing (toothed) belt makes a circuit around the top of this cube in the shape of the letter H. This is a bit easier to see in [Arkadiusz’s] rendered image found after the jump along with video of an early print test.

The Z axis uses two motors mounted along the bottom of the cube. These raise and lower the bead, instead of moving the extruder itself. All-in the printer should have a maximum object size of 30x30x30 centimeters. It’s being driven by a Smoothieboard, which was mentioned quite a bit when we were discussing using the RA driver board with a 3D printer.

Continue reading “H-bot Style 3D Printer Moves Bed For Z-axis”

Hall Effect Limit Switches For A 3D Printer

hall-effect-limit-switches

We’re used to thinking of limit switches as a mechanical device that cuts the motor connection before physical damage can occur. [Anthony] decided to try a different route with this project. He built this set of no-contact limit switches using a hall effect sensor. The small black package sticking out past the end of the protoboard is the sensor. It is used to detect a magnetic field.

[Anthony] chose to use an Allegro A3144 sensor. Apparently it is no longer in production but was easy to find for a song and dance on eBay. When thinking about the design he decided to add two LED indicators, one lights when the switch is open and the other when it has been tripped. This would have been easy to do with just one LED, but he needed to add more parts to get both working. In the lower left corner of the protoboard you can see the configurable gate device (74LVC1G58) he added to monitor the hall effect sensor and switch the output and LEDs accordingly.

Installing GLaDOS In The Ceiling Of Your House

glados-ceiling-light

Install this light fixture in your bedroom and you might kiss your nights of peaceful sleep goodbye. Fans of the Portal game franchise will recognize it as a smaller version of the megalomaniacal artificial intelligence character from the game. This particular rendition is how she looked in the second installment of the series. The lamp is the creation of [Dragonator]. It was entirely 3D printed before being outfitted with LEDs to actually function as a light.

Our first thought is that this project is all about 3D design to get the final product t0 look so fantastic. But if you dig a little deeper you’ll see that it’s so much more than that. To get pieces that look this fantastic you must have a well tuned printer and be willing to let it run for 40-60 hours as it burns through 2 kg of filament. At that point you’re still far from the finish line as the [Dragonator] then set to work sanding and painting all of the pieces. From there he lovingly assembled everything, including gears and motors to give it motion.

In the end the electronics did not work as he envisioned. But maybe after a bit of time off from all that work he’ll revisit the project and make a bit more progress. For us, the aesthetic already makes the hack. Making it move and sound like the character would be over the top.

If you liked this you can’t miss the GLaDOS potato.

Fixing Tools With 3D Printers

saw

Over at the Manchester Hackerspace, [Bob] has been busy getting a 30-year-old bandsaw up and running. The saw worked great, but it was missing a fence, making straight cuts difficult to say the least.  The solution, of course, was to build a new fence, and [Bob] decided to capitalize on his hackerspace’s workshop by making a new fence with a 3d printer.

[Bob] began by taking careful measurements of the saw’s table and the channel running down the length of it. These measurements were plugged into OpenSCAD, and after a few iterations, [Bob] had an extremely well-fitting profile a fence could be attached to.

With the profile down, [Bob] created a new part in OpenSCAD that would hold an aluminum angle piece. This was attached to the plastic parts with screws, and the entire assembly clamps down to the saw with the help of a few 5mm bolts. For a machine that is usually dedicated to making 3D printer parts and Yoda heads, [Bob] did a great job making good use of his 3D printer.