[Renzo Mischianti] got himself a Chinese 3D printer, specifically a FlyingBear Ghost 5. (Cracking name, huh?) He was more than a little irritated with the fact that whilst the controller, an MKS Robin Nano, did have a integrated Wi-FI module, it provided no browser-based interface for monitoring and control purposes. This seemed a bit short-sighted in this day and age, to say the least. Not being at all happy with that situation, [Renzo] proceeded to write dedicated Wi-Fi firmware using websockets, but not without fully documenting his journey in a detailed series of the blog posts.
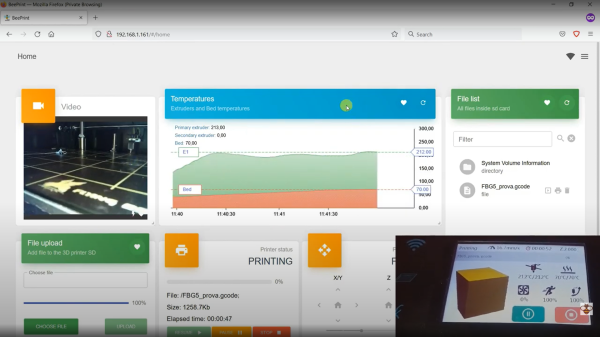
The resulting BeePrint web interface supports all the usual functions you would expect when managing a printer, everything from monitoring warm-up at the prep stage, to keeping tabs on the potential spaghetti monster via the connected IP camera. All good stuff. [Renzo] used an ESP32-cam, which is a low-cost 2 MP unit from our friends at Olimex, but we suspect it wouldn’t vastly difficult to add your own IP camera into the mix.
[Renzo] has a YT channel detailing quite a few other projects, which is definitely worth some viewing time in our opinion.
We’ve been covering 3D printer hacking since the dinosaurs were roaming. This is the oldest, and still one of the strangest, posts that we could find in a quick search. Anyone care to find something older?
Continue reading “3D Printering: Adding A Web Interface Where There Was None Before”