With the Mars 2020 mission now past the halfway point between Earth and its destination, NASA’s Jet Propulsion Lab recently released a couple of stories about the 3D-printed parts that made it aboard the Perseverance rover. Tucked into its aeroshell and ready for its high-stakes ride to the Martian surface, Perseverance sports eleven separate parts that we created with additive manufacturing. It’s not the first time a spacecraft has flown with parts made with additive manufacturing technique, but it is the first time JPL has created a vehicle with so many printed parts.
To take a closer look at what 3D-printing for spaceflight-qualified components looks like, and to probe a little into the rationale for additive versus traditional subtractive manufacturing techniques, I reached out to JPL and was put in touch with Andre Pate, Additive Manufacturing Group Lead, and Michael Schein, lead engineer on one of the mission’s main scientific instruments. They both graciously gave me time to ask questions and geek out on all the cool stuff going on at JPL in terms of additive manufacturing, and to find out what the future holds for 3D-printing and spaceflight.
Even a decade later, homebrew 3D printing still doesn’t stop when it comes to mechanical improvements. These last few months have been especially kind to lightweight direct-drive extruders, and [lorinczroby’s] Orbiter Extruder might just set a paradigm for a new kind of direct drive extruder that’s especially lightweight.
Weighing in at a mere 140 grams, this setup features a 7.5:1 gear reduction that’s capable of pushing filament at speeds up to 200 mm/sec. What’s more, the gear reduction style and Nema 14 motor end up giving it an overall package size that’s smaller than any Nema 17 based extruder. And the resulting prints on the project’s Thingiverse page are clean enough to speak for themselves. Finally, the project is released as open source under a Creative Commons Non-Commercial Share-Alike license for all that (license-respecting!) mischief you’d like to add to it.
This little extruder has only been around since March, but it seems to be getting a good amount of love from a few 3D printer communities. The Voron community has recently reimagined it as the Galileo. Meanwhile, folks with E3D Toolchangers have been also experimenting with an independent Orbiter-based tool head. And the Annex-Engineering crew has just finished a few new extruder designs like the Sherpa and Sherpa-Mini, successors to the Ascender, all of which derive from a Nema 14 motor like the one in the Orbiter. Admittedly, with some similarity between the Annex and Orbiter designs, it’s hard to say who inspired who. Nevertheless, the result may be that we’re getting an early peek into what modern extruders are starting to shape into: smaller steppers and more compact gear reduction for an overall lighter package.
Possibly just as interesting as the design itself is [lorinczroby’s] means of sharing it. The license terms are such you can faithfully replicate the design for yourself, provided that you don’t profit off of it, as well as remix it, provided that you share your remix with the same license. But [lorinczroby] also negotiated an agreement with the AliExpress vendor Blurolls Store where Blurolls sells manufactured versions of the design with some proceeds going back to [lorinczroby].
This is a clever way of sharing a nifty piece of open source hardware. With this sharing model, users don’t need to fuss with fabricating mechanically complex parts themselves; they can just buy them. And buying them acts as a tip to the designer for their hard design work. On top of that, the design is still open, subject to remixing as long as remixers respect the license terms. In a world where mechanical designers in industry might worry about having their IP cloned, this sharing model is a nice alternative way for others to both consume and build off of the original designer’s work while sending a tip back their way.
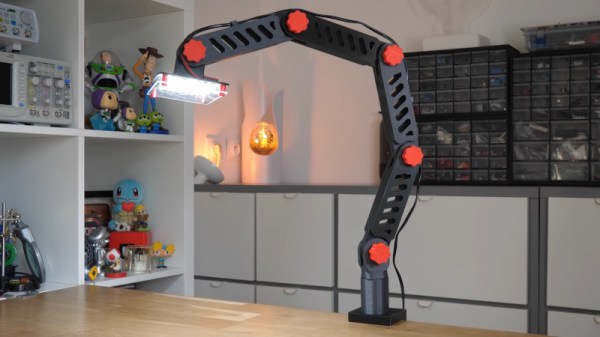
The lamp has plenty of neat design touches that speak to [Heliox]’s experience in the 3D printed arts. The articulating arms are modular, and feature integrated cable guides. The lamp base features nuts inserted mid-print for easy assembly, and the swivel is actually a two-piece mechanism printed as a single assembly. The table clamp uses a large screw, and the benefit of 3D printing means its easy to customise to suit any individual table. Using black and orange filaments gives the lamp a proper industrial look, and the bright LED strips are perfect for illuminating a bench for fine detailed work.
It’s a great addition to [Heliox]’s workspace, and the tall articulated design means it can cast light without getting in the way of what you’re doing. We’ve featured her work before, too – like this glorious infinity cube. Video after the break.
There was a time, not so very long ago, that buying a reliable 3D printer was a fairly expensive proposition. Many chose to build their own printer instead, and for a few years, we were flooded with very impressive custom designs. But as you might expect, with the prices on decent 3D printers now having hit rock bottom, the custom builds have largely dried up.
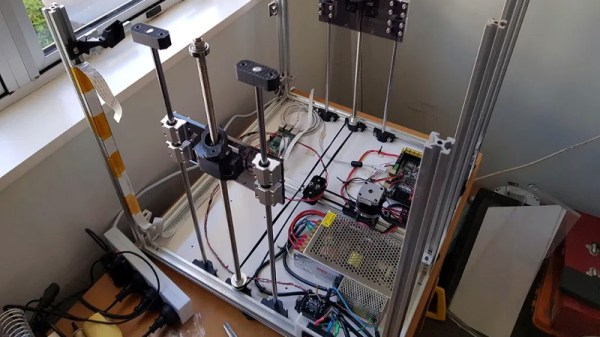
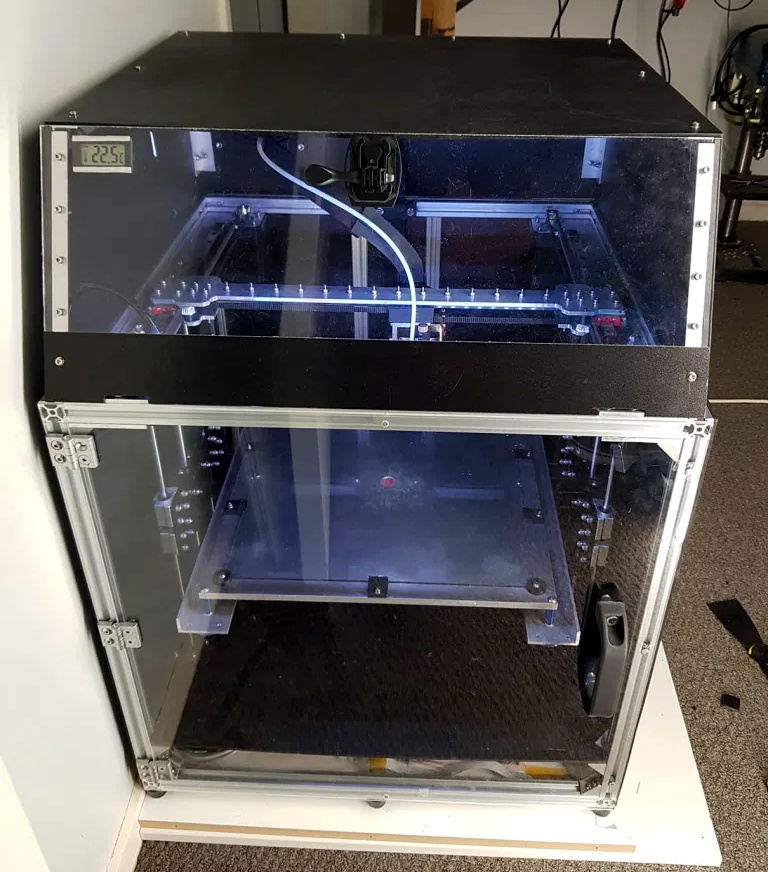
Arguably, the only reason you’d build rather than buy in 2020 is if you want something very specific. Which is precisely how [Joshendy] ended up building the Big F… Printer or BFP. No doubt the F stands for Fun, or Friendly. Either way, it’s certainly something special. With a 300 mm³ build volume and heavy-duty Z axis, this fully enclosed CoreXY machine is ready to handle whatever he throws at it.
It did take [Joshendy] a few attempts to get everything the way he wanted though. In fact, the prototype for the machine wasn’t even CoreXY, it started as an H-Bot. In his write-up he goes over the elements of the BFP did that didn’t quite live up to his expectations, and what he replaced them with. So when wobbly leadscrews and a knock-off V6 hotend both left something to be desired, they ended up getting replaced with ball screws and an authentic E3D Hemera, respectively.
To control this monster, [Joshendy] is using OctoPrint on a Raspberry Pi and a BigTreeTech SKR Pro running Klipper. OctoPrint gives him the ability to control and monitor the printer remotely, complete with a camera mounted inside the enclosure to keep an eye on things, while the Klipper firmware on the SKR board pushes all the computationally expensive aspects of 3D printing onto the vastly more powerful ARM chip in the Pi. The end result is faster and more accurate control of the steppers through the TMC2130 drivers than would be possible otherwise.
When the slicer software for a 3D printer model files into GCode, it’s essentially creating a sequential list of connected line segments, organized by layer. But when the features of the original model are dense, or when the model is representing small curves, slicers end up creating a proliferation of teeny segments to represent this information.
This is just the nature of the beast; lots of detail translates into lots of teeny segments. Unfortunately, some printers actually struggle to print these models at the desired speeds, not because of some mechanical limitation, but because the processor cannot recalculate the velocities of these segments fast enough. The result is that some printers simply stutter or slow down the print, resulting in print times that are much higher than they should be.
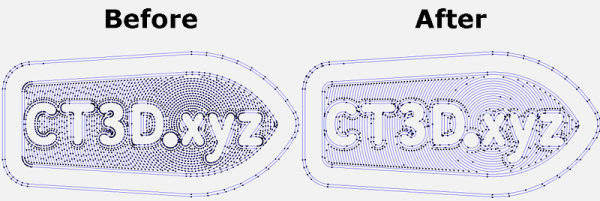
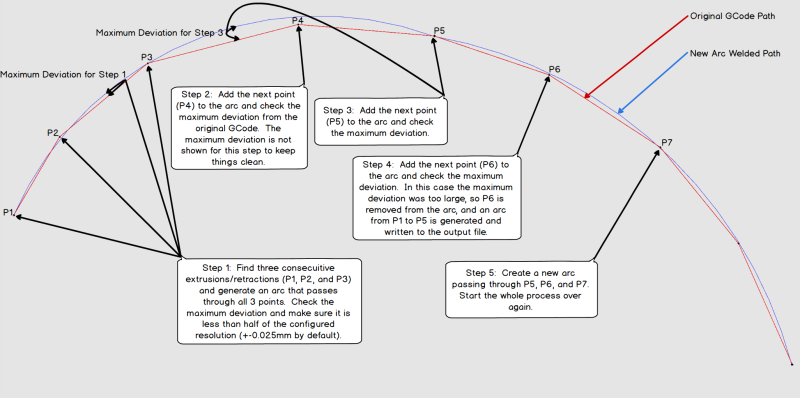
Enter Arc Welder, a GCode compression tool written by [FormerLurker] that scrutinizes GCode files, hunts for these tiny segments, and attempts to replace contiguous clusters of them with a smaller number of arcs. The result is that the number of GCode commands needed to represent the model drop dramatically as connected clusters of segment commands become single arc commands.
“Now wait”, you might say, “isn’t an arc an approximation of these line segments?” And yes–you’re right! But here lies the magic behind Arc Welder. The program is written such that arcs only replace segments if (1) an arc can completely intersect all the segment-to-segment intersections and (2) the error in distance between segment and arc representation is within a certain threshold. These constraints act such that the resulting post-processing is true to the original to a very high degree of detail.
A concise description of Arc Welder’s main algorithm as pulled from the docs
This whole program operates under the assumption that your 3D printer’s onboard motion controller accepts arc commands, specifically G2 and G3. A few years ago, this would’ve been uncommon since, technically, 3D printing and STL file only requires moving in straight line segments. But with more folks jumping on the bandwagon to use these motion control boards for other non-printing applications, we’re starting to see arc implementations on boards running Marlin, Smoothieware, and the Duet flavor of RepRap Firmware.
For the curious, this program is kindly both well documented on operating principles and open source. And if [FormerLurker] seems like a familiar name before–you’d be right–as they’re also the mind behind Octolapse, the 3D printing timelapse tool that’s a hobbyist crowd favorite. Finally, if you give Arc Welder a spin, why not show us what you get in the comments?
The average cost of a desktop 3D printer has dropped like a stone over the last few years. They went from a piece of equipment you had to wait your turn to use at the hackerspace to something you can pick up on Prime Day, which has definitely been a good thing for our community. But to get the price down, these printers are almost exclusively running single extruder setups with no provision for multi-material printing other than swapping the filament manually.
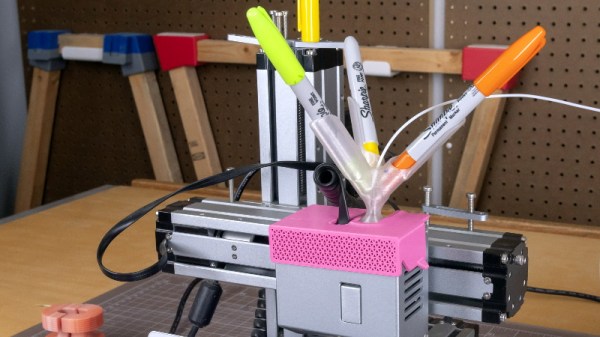
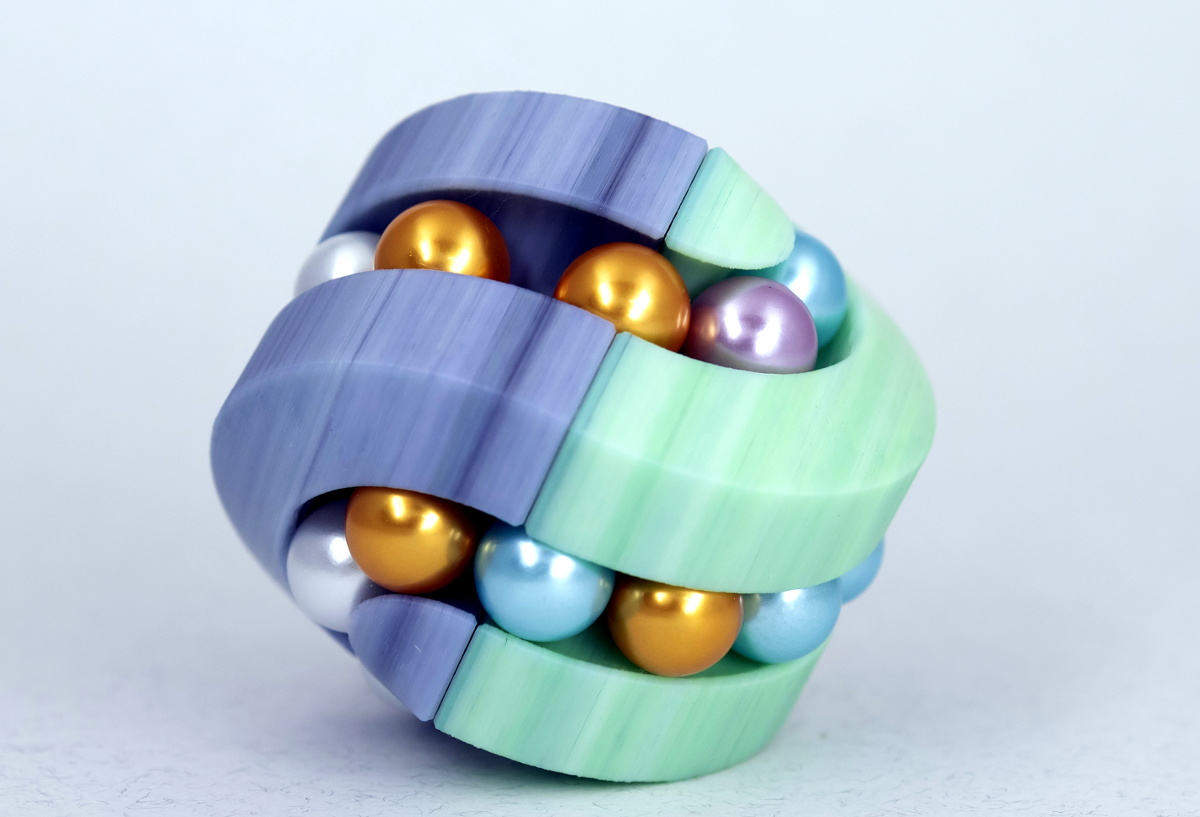
From a practical standpoint, that’s not much of a problem. But wanting to add a little visual flair to his prints, [Devin Montes] came up with a simple 3D printed mount that holds the tip of up to three Sharpie permanent markers against the filament as it enters the top of the extruder. When used with white or translucent filaments, these markers can give the final print an interesting splash of color. Obviously it’s not true multi-color 3D printing, but it can certainly make for some attractive decorative objects.
The mount is designed for the Snapmaker 3-in-1 3D printer, which is relatively well suited to such a contraption as it has a direct drive extruder and there’s plenty of clearance for the markers to stick up. The concept could certainly be adapted to other printers, but it might be a little trickier in the case of a Bowden extruder or an i3 clone that has frame components running over the top. It sounds like [Devin] is working on a generic version of the marker holder that can work on other printers, so it should be interesting to see how he addresses these issues.
Technically this isn’t a new concept, as makers were pulling off similar tricks back in the earliest days of desktop 3D printing. But this is an especially well-implemented version of the idea, and if [Devin] can really come up with a mount that will work on a wider array of hardware, we could certainly see it becoming a popular way to make printed projects a bit more exciting.
Recent price drops put entry level masked stereolithography (MSLA) resin 3D printers at around $200 USD, making them a very compelling tool for makers and hackers. But as you might expect, getting the price this low often involves cutting several corners. One of the ways manufacturers have made their machines so cheap is by simplifying the electronics and paring down the feature set to the absolute minimum.
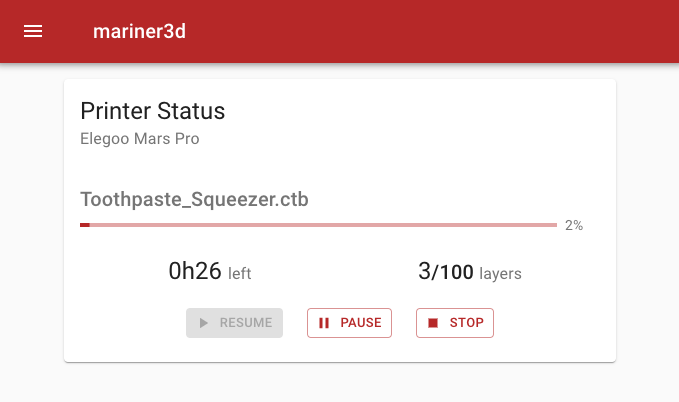
So it was hardly a surprise for [Luiz Ribeiro] to find that his new Elegoo Mars Pro didn’t offer WiFi connectivity or a remote control interface. You’re supposed to just stick a USB flash drive into the printer and select the object you want to print from its menu system. But that doesn’t mean he couldn’t hack the capability in himself.
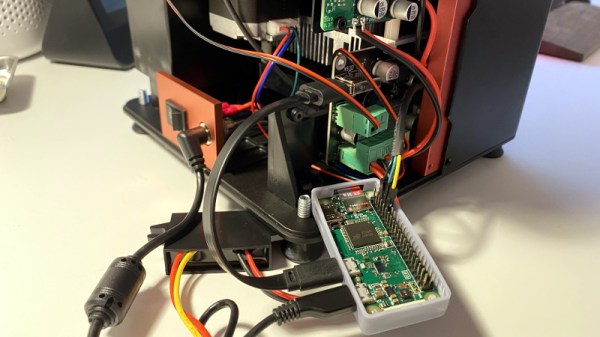
Monitoring a print with Mariner.
If this were a traditional 3D printer, he might have installed OctoPrint and been done with it. But resin printers are a very different beast. In the end, [Luiz] had to develop his own remote control software that worked around the unique limitations of the printer’s electronics. His software runs on a Raspberry Pi Zero and uses Linux’s “USB Gadget” system to make it appear as a flash drive when plugged into the USB port on the Elegoo Mars Pro.
This allows sending object files to the printer over the network, but there was a missing piece to the puzzle. [Luiz] still needed to manually go over to the printer and select which file he wanted to load from the menu. Until he realized there was an exposed serial port on control board that allowed him to pass commands to the printer. Between the serial connection and faux USB Mass Storage device, his mariner software has full control over the Mars Pro and is able to trigger and monitor print jobs remotely.