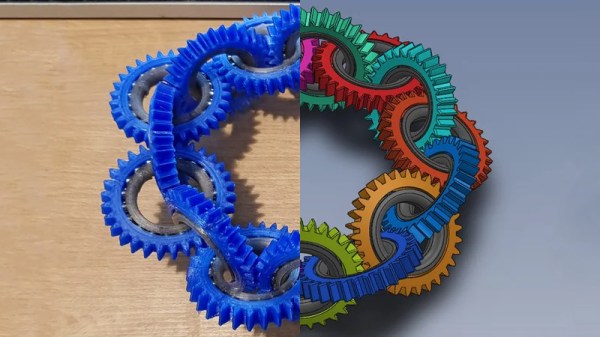
Underwater VR Offers Zero Gravity On A Budget

Someday Elon Musk might manage to pack enough of us lowly serfs into one of his super rockets that we can actually afford a ticket to space, but until then our options for experiencing weightlessness are pretty limited. Even if you’ll settle for a ride on one of the so-called “Vomit Comet” reduced-gravity planes, you’ll have to surrender a decent chunk of change, and as the name implies, potentially your lunch as well. Is there no recourse for the hacker that wants to get a taste of the astronaut experience without a NASA-sized budget?

Well, if you’re willing to get wet, [spiritplumber] might have the answer for you. Using a few 3D printed components he’s designed, it’s possible to use Google Cardboard compatible virtual reality software from the comfort of your own pool. With Cardboard providing the visuals and the water keeping you buoyant, the end result is something not entirely unlike weightlessly flying around virtual environments.

To construct his underwater VR headset, [spiritplumber] uses a number of off-the-shelf products. The main “Cardboard” headset itself is the common plastic style that you can probably find in the clearance section of whatever Big Box retailer is convenient for you, and the waterproof bag that holds the phone can be obtained cheaply online. You’ll also need a pair of swimmers goggles to keep water from rudely interrupting your wide-eyed wonderment. As for the custom printed parts, a frame keeps the waterproof bag from pressing against the screen while submerged, and a large spacer is required to get the phone at the appropriate distance from the operator’s eyes.

To put his creation to the test, [spiritplumber] loads up a VR rendition of NASA’s Neutral Buoyancy Laboratory, where astronauts experience a near-weightless environment underwater. All that’s left to complete the experience is a DIY scuba regulator so you can stay submerged. Though at that point we wouldn’t be surprised if a passerby confuses your DIY space simulator for an elaborate suicide attempt.

Continue reading “Underwater VR Offers Zero Gravity On A Budget”

Ease Rover Development With These Self-Contained Track Units

Tracked drive systems are great, but implementation isn’t always easy. That’s what [nahueltaibo] found every time he tried to use open sourced track designs for his own rovers. The problem is that a tracked drive system is normally closely integrated with a vehicle’s chassis, mixing and matching between designs is impractical because the tracks and treads aren’t easily separated from the rest of the vehicle.

To solve this, [nahueltaibo] designed a modular, 3D printable rover track system. It contains both a motor driver and a common DC gearmotor in order to make a standalone unit that can be more easily integrated into other designs. These self-contained rover tracks don’t even have a particular “inside” or “outside”; they can be mounted on a vehicle’s left or right without any need to mirror the design. The original CAD design is shared from Fusion 360, but can also be downloaded from Thingiverse. A bit more detail is available from [nahueltaibo]’s blog, where he urges anyone who tries the design or finds it useful to share a photo or two.

3D printed tank tracks — including this one — often use a piece of filament as a hinge between track segments and sometimes slightly melted on the ends to act as a kind of rivet, which is itself a pretty good hack.

3D Printers Get A Fuel Gauge: Adding A Filament Scale To OctoPrint

It seems a simple enough concept: as a 3D printer consumes filament, the spool becomes lighter. If you weighed an empty spool, and subtracted that from the weight of the in-use spool, you’d know how much filament you had left. Despite being an easy way to get a “fuel gauge” on a desktop 3D printer, it isn’t something we often see on DIY machines, much less consumer hardware. But with this slick hack from [Victor Noordhoek] as inspiration, it might become a bit more common.

He’s designed a simple filament holder which mounts on top of an HX711 load cell, which is in turn connected to the Raspberry Pi running OctoPrint over SPI. If you’re running OctoPrint on something like an old PC, you’ll need to use an intermediate device such as an Arduino to get it connected; though honestly you should probably just be using a Pi.

On the software side, [Victor] has written an OctoPrint plugin that adds a readout of current filament weight to the main display. He’s put a fair amount of polish into the plugin, going through the effort to add in a calibration routine and a field where you can enter in the weight of your empty spool so it can be automatically deducted from the HX711’s reading.

Hopefully a future version of the plugin will allow the user to enter in the density of their particular filament so it can calculate an estimate of the remaining length. The next logical step would be adding a check that will show the user a warning if they try to start a print that requires more filament than the sensor detects is currently loaded.

This is yet another excellent example of the incredible flexibility and customization offered by OctoPrint. If you’re looking for more reasons to make the switch, check out our guide on using OctoPrint to create impressive time lapse videos of your prints, or how you can control the printer from your mobile device.

Results Of 3D-Printed Cylinder Head Testing Fail To Surprise

It’s the suburbanista’s weekend nightmare: you’re almost done with the weekly chores, taking the last few passes with the lawn mower, when you hear a pop and bang. The cylinder head on your mower just blew, and you’re out of commission. Or are you? You’ve got a 3D printer – couldn’t it save the day?

If this bench test of plastic cylinder heads is any indication, it’s possible – just as long as you’ve only got 40 seconds of mowing left to do. [Project Farm] has been running all sorts of tests on different materials as field-expedient cylinder heads for small gasoline engines, using everything from JB Weld epoxy to a slab of walnut. For this test, two chunky heads were printed, one from ABS, of the thermochromic variety apparently, the other in PLA. The test went pretty much as expected for something made of thermoplastic exposed to burning gasoline at high pressure, although ABS was the clear winner with two 40-second runs. The PLA only lasted half as long before the spark plug threads melted and the plug blew out. A gasket printed from flexible filament was also tested, with predictably awful results.

As bad as all this was, it still shows that 3D-printed parts are surprisingly tough. Each part was able to perform decently under a compression test, showing that they can stand up to pressure as long as there’s no heat. If nothing else, it was a learning experience. And as an aside, the cylinder heads were printed by [Terry] from the RedNeckCanadians YouTube channel. That video is worth a watch, if just for a few tips on making a 3D-printed copy of an object. Continue reading “Results Of 3D-Printed Cylinder Head Testing Fail To Surprise”

DIY Scientific Calculator Powered By Pi Zero

It’s the eternal question hackers face: do you built it, or do you buy it? The low cost and high availability of electronic gadgets means we increasingly take the latter option. Especially since it often ends up that building your own version will cost more than just buying a commercial product; and that’s before you factor in the time you’ll spend working on it.

But such concerns clearly don’t phase [Andrea Cavalli]. Sure he could just buy a scientific calculator, but it wouldn’t really be his scientific calculator. Instead, he’s taking the scenic route and building his own scientific calculator from scratch. The case is 3D printed, the PCB is custom, and even the software is his own creation.

His PCB hooks right up to the GPIO pins of the internal Raspberry Pi Zero, making interfacing with the dome switch keyboard very easy. The board also holds the power management hardware for the device, including the physical power switch, USB connection for charging, and TPS79942DDCR linear regulator.

The case, including the buttons, is entirely 3D printed. At this point the buttons don’t actually have any labels on them, which presumably makes the calculator more than a little challenging to use, but no doubt [Andrea] is working on that for a later revision of the hardware. A particularly nice detail is the hatch to access the Pi’s micro SD card, making it easy to update the software or completely switch operating systems without having to take the calculator apart.

After the kernel messages scroll by, the Pi boots right into the Java calculator environment. This gives the user a fairly standard scientific calculator experience, complete with nice touches like variable highlighting. The Mario mini-game probably isn’t strictly required, but if you’re writing the code for your own calculator you can do whatever you want.

Here at Hackaday we’ve seen a calculator that got a Raspberry Pi upgrade, a classic scientific calculator emulated with an Arduino, and of course we’ve raved about the NumWorks open source graphing calculator. Even with such stiff competition, we think this project is well on its way to being one of the most impressive calculators we’ve ever come across.

Continue reading “DIY Scientific Calculator Powered By Pi Zero”

Classy CoreXY Build Breaks Down The Design Pinchpoints

Ever since [Ilan Moyer] published the design, CoreXYs have been exploding in the homebrew 3D Printer community. Nevertheless, not all designs are created equal, and a solid design means adhering to some unspoken constraints. Fear not, though. [Mark Rehorst’s] blog post pulls the lid off these constraints and puts them up-front-and-center.  For anyone looking to succeed with their own CoreXY build, this thoughtful critique will keep us away from stray design paths.

[Mark’s] blogpost centers around the xy-stage of his UMMD printer. Here, he walks through the constraints of where belts should be located to guarantee dimensional accuracy of parts. Engineering doesn’t always result in designing the parts ourselves, but rather picking them from a list of options. This geometry-constraint breakdown gives us a more acute set of eyes the next time we pick a CoreXY frame to download and clone off of a place like Thingiverse.

What’s more, for all the antagonizing forces acting on our xy-stage like thermal expansion and frame flexing, [Mark] comes in with a countermeasure. Belts are thickened. Moving stages are constrained correctly, and pulley blocks are reinforced for a stage that is both precise and accurate. Given that it’s so easy to get another printer to start producing parts, lessons learned here will guide us on what underlying measures they need to counteract for a successful print stage.

It’s hard not to love [Mark Rehorst’s] foray into at-home printer builds. Not only do we see new ideas that constantly reinvent how we design printers, each build comes bundled with a wealth of tips and drawbacks. [Mark] gives us a tested design and a critical set of eyes on it that better helps us explore the space if we so choose. For more thoughtful additions to your next 3D printer, check out [Mark’s] CPAP-style remote cooling fan and belt-driven z axis.

H2gO Keeps Us From Drying Out

The scientific community cannot always agree on how much water a person needs in a day, and since we are not Fremen, we should give it more thought than we do. For many people, remembering to take a sip now and then is all we need and the H2gO is built to remind [Angeliki Beyko] when to reach for the water bottle. A kitchen timer would probably get the job done, but we can assure you, that is not how we do things around here.

A cast silicone droplet lights up to show how much water you have drunk and pressing the center of the device means you have taken a drink. Under the hood, you find a twelve-node NeoPixel ring, a twelve millimeter momentary switch, and an Arduino Pro Mini holding it all together. A GitHub repo is linked in the article where you can find Arduino code, the droplet model, and links to all the parts. I do not think we will need a device to remind us when to use the bathroom after all this water.

Another intrepid hacker seeks to measure a person’s intake while another measures output.

Continue reading “H2gO Keeps Us From Drying Out”