Derby the Dog

Derby’s Got Legs, He Knows How To Use Them

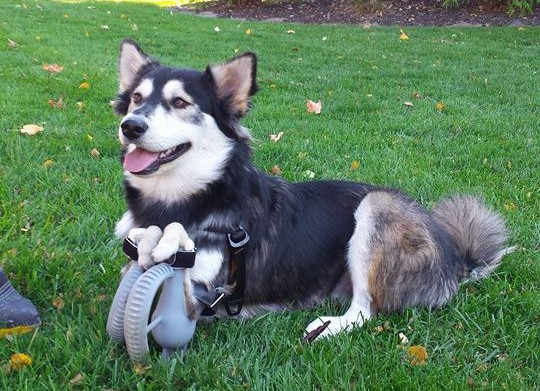
There’s just something about the holidays and man’s best friend that brings out the best in people. [Tara Anderson], Director of CJP Product Management at 3D Systems, fostered a husky mix named Derby.  Derby was born with a congenital defect: his forelegs were underdeveloped with no paws.  This precluded the poor fellow from running around and doing all of the things dogs love to do.  [Tara] had fitted him with a wheel cart, but she still felt that Derby deserved more mobility and freedom.  Deciding that 3D-printed prosthetics was the answer, she turned to her colleagues and collaborated with Derrick Campana, a certified Animal Orthotist, to create a new set of forelegs for Derby.

The design is different from typical leg prosthetics; Tara felt that the typical “running man” design would not work for a dog, since they’d just sink right into the ground. Instead, the “loop” design was used, allowing for more playful canine antics. They were constructed using MultiJet Printing on the 3DS’ ProJet 5500X.  MultiJet Printing enabled the prosthetics to be printed with firm and soft parts, both needed for comfort and durability.

Continue reading “Derby’s Got Legs, He Knows How To Use Them”

3D Printed Lens

3D Printed Lenses Open Up Possibilities

Now this is some seriously cool stuff. The folks over at FormLabs decided to try a little experiment to test the optical clarity of their clear resin. It’s pretty damn clear.

Using their own slicing software, PreForm, [Craig Broady] printed the lens piece in an orientation that would maximize resin flow around the lens to help prevent defects, keeping it as smooth as possible. While the printed part looks quite clear, all lenses require some form of polishing to become optically clear. It was printed with a 50 micron resolution, and [Craig] used a power drill to sand the lens down from 220 grit to 2000 grit sand paper.

Continue reading “3D Printed Lenses Open Up Possibilities”

How to cast rings

Casting Engagement Rings (Or Other Small Metal Parts!)

[Paul Williams] wrote in to tell us about his most recent and dangerous endeavor. Marriage.

As a masters student in Mechanical Engineering, he wanted to give his wife (to be) to be a completely unique engagement ring — but as you can imagine, custom engagement rings aren’t cheap. So he decided to learn how to make it himself.

During the learning process he kept good notes and has produced a most excellent Instructable explaining the entire process — How to make the tools you’ll need, using different techniques and common problems you might have. He even describes in detail how to make your own mini-kiln (complete with PID control), a vacuum chamber, a wax injector and even the process of centrifugal casting. Continue reading “Casting Engagement Rings (Or Other Small Metal Parts!)”

Making T-Glase Crystal Clear

There are 3D printing filaments out there with a lot of interesting properties. Whether it’s the sanded-down MDF feel you get from Laywood, the stretchy and squishy but somehow indestructible feel of Ninjaflex, or just regular ‘ol PLA, there’s a filament out there for just about any use. Even optically clear printed objects. Yes, you can now do some post-processing on printed parts to make T-glase crystal clear.

The big advance allowing translucent parts to be made clear is a new product from Smooth-On that’s meant to be a protective and smoothing coating for 3D printed objects. With PLA, ABS, and powder printed parts, this coating turns objects shiny and smooth. Strangely – and I don’t think anyone planned this – it also has the same index of refraction as T-glase. This means coating an object printed with T-glase will render the layers invisible, smooth out the tiny bumps in the print, and turn a single-walled object clear.

There is a special technique to making clear objects with T-glase. The walls of the print must be a single layer. You’ll also want a perfect layer height on your print – you’re looking for cylindrical layers, not a nozzle that squirts out to the side.

The coating for the pictures above was applied on a makeshift lathe built out of an electric drill and a sanding pad. This gave the coating a nice, even layer until it dried. After a few tests, it was determined lenses could be printed with this technique. It might not be good enough for 3D printed eyeglasses, but it’s more than sufficient for creating windows for a model, portholes for an underwater ROV, or anything else where you want nothing but light inside an enclosure.

Prosthetic arm made at summer camp

Kid Designs His Own Prosthetic Arm At A Summer Camp

Ever heard of the summer camp called Superhero Cyborgs? It’s where [Coby Unger] met nine-year-old [Aidan Robinson] and helped him design his very own custom prosthetic arm.

The camp is put on by KIDmob for kids who have various limb disabilities, and helps give them the tools and guidance to be able to make their very own prosthetics. Some of the designs the children come up with are cool, useful, pretty and sometimes not overly functional — but [Aidan’s] designs really intrigued [Coby] who is a designer and part of the staff at Pier 9, a world-class fabrication facility (and makerspace) run by Autodesk.

There’s a lot of problems with prosthetics for children. They’re very expensive, kids don’t stay the same size, and even though they might cost a lot, they don’t necessarily work that well. [Aidan] had a few commercial options but didn’t like any of them, so much so that he preferred not wear them period. But when he attended the camp he realized he had the ability to design a prosthetic that he’d actually want to wear.

Continue reading “Kid Designs His Own Prosthetic Arm At A Summer Camp”

Connected Thermostat

Raspberry PiPhone Thermostat Monitors Your Entire House — Or At Least That’s The Plan

[Jeff McGehee] or how he likes to be known, [The Nooganeer] just finished his first big tech project after finishing grad school. It’s a connected thermostat that makes use of his old iPhone 4, and a Raspberry Pi.

Ever since [The Nooganeer] bought his first home with his wife back in the spring of 2014, he’s had ever consuming dream of adding home automation to every appliance. As he puts it…

Home automation has always been a fascination of mine.  How much time and irritation would I save if I didn’t have to worry about turning things on and off, or wonder in which state they were left?  How much more efficient would my home be?  Wouldn’t it be cool to always know the state of every power consumer in my home, and then be able to record and analyze that data as well?

His first challenge was making a smart thermostat — after all, heating and cooling your house typically takes the most energy. Having used a Raspberry Pi before he figured it would be the best brain for his system. After researching a bit about HVAC wiring, [The Nooganeer] settled on a Makeatronics Solid State Relay board to control the HVAC. This allows him to use the GPIO’s on the Raspberry Pi in order to control the furnace and AC unit.  Continue reading “Raspberry PiPhone Thermostat Monitors Your Entire House — Or At Least That’s The Plan”

Scanning On The Cheap

[Will] recently stumbled across the MakerBot Digitizer, a device that’s basically a webcam and a turntable that will turn a small object into a point cloud that can then be printed off on a MakerBotⓇ 3D printer. Or any other 3D printer, for that matter. The MakerBot Digitizer costs $800, and [Will] wondered if he could construct a cheaper 3D scanner with stuff sitting around his house. It turns out, he can get pretty close using only a computer, a webcam, and a Black and Decker line laser/level.

The build started off with a webcam mounted right next to the laser line level. Software consisted of Python using OpenCV, numpy, and matplotlib to grab images from the webcam. The software looks at each frame of video for the path of the laser shining against the object to be scanned. This line is then extracted into a 3D point cloud and reconstructed in MeshLab to produce a 3D object that might or might not be 3D printable.

This is only [Will]’s first attempt at creating a scanner. He’s not even using a turntable with this project – merely manually rotating the object one degree for 360 individual frames. It’s extremely tedious, and he’ll be working on incorporating a stepper motor in a future version.

This is only attempt number 1, but already [Will] has a passable scanned object created from a real-world thing.