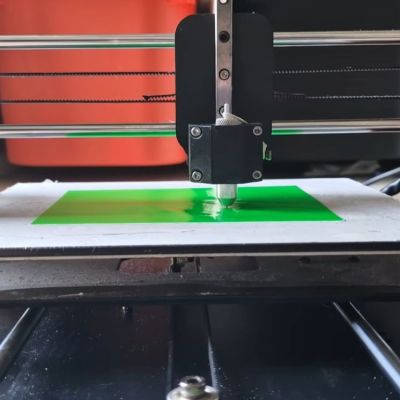
Why Can’t I 3D Print With Rubber?

A friend of mine and I both have a similar project in mind, the manufacture of custom footwear with our hackerspace’s shiny new multi-material 3D printer. It seems like a match made in heaven, a machine that can seamlessly integrate components made with widely differing materials into a complex three-dimensional structure. As is so often the case though, there are limits to what can be done with the tool in hand, and here I’ve met one of them.

I can’t get a good range of footwear for my significantly oversized feet, and I want a set of extra grippy soles for a particular sporting application. For that the best material is a rubber, yet the types of rubber that are best for the job can unfortunately not be 3D printed. In understanding why that is the case I’ve followed a fascinating path which has taught me stuff about 3D printing that I certainly didn’t know.

The extruder unit from a Prusa Mini 3D printer
Newton strikes back, and I can’t force rubber through this thing.

A friend of mine from way back is a petrochemist, so I asked him about the melting points of various rubbers  to see if I could find an appropriate filament His answer, predictably, was that it’s not that simple, because rubbers don’t behave in the same way as the polymers I am used to. With a conventional 3D printer filament, as the polymer is fed into the extruder and heated up, it turns to liquid and flows out of the nozzle to the print. It ‘s then hot enough to fuse with the layer below as it solidifies, which is how our 3D prints retain their shape. This property is where we get the term “plastic” from, which loosely means “Able to be moulded”.

My problem is that rubber doesn’t behave that way. As any casual glance at a motor vehicle will tell you, rubber can be moulded, but it doesn’t neatly liquefy and flow in the way my PLA or PET does. It’s a non-Newtonian fluid, a term which I was familiar with from such things as non-drip paint, tomato ketchup, or oobleck, but had never as an electronic engineer directly encountered in something I am working on. Continue reading “Why Can’t I 3D Print With Rubber?”

Chamber-Master

Chamber Master: Control Your 3D Printer Enclosure Like A Pro

Having an enclosed 3D printer can make a huge difference when printing certain filaments that are prone to warping. It’s easy enough to build an enclosure to stick your own printer in, but it can get tricky when you want to actively control the conditions inside the chamber. That’s where [Jayant Bhatia]’s Chamber Master project comes in.

This system is built around the ESP32 microcontroller, which provides control to various elements as well as hosts a web dashboard letting you monitor the chamber status remotely. The ESP32 is connected to an SSD1306 OLED display and a rotary encoder, allowing for navigating menus and functions right at the printer, letting you select filament type presets and set custom ones of your own. A DHT11 humidity sensor and a pair of DS18B20 temperature sensors are used to sense the chamber’s environment and intake temperatures.

One of the eye-catching features of the Chamber Master is the iris-controlled 120 mm fan mounted to the side of the chamber, allowing for an adjustable-size opening for air to flow. When paired with PWM fan control, the amount of airflow can be precisely controlled.

Continue reading “Chamber Master: Control Your 3D Printer Enclosure Like A Pro”

FibreSeeker 3: Continuous Carbon Fiber Vs Chopped CF

Although you can purchase many types of FDM filaments containing ‘carbon fiber’ these days, they are in no way related to the carbon fiber (CF) composite materials used for rocket hulls and light-weight bicycles. This is because the latter use continuous fibers, often in weaved CF mats, whereas the FDM filaments just use small, chopped, fragments of CF. Obviously this will not result in the same outcome, which makes it interesting that a company called Fibre Seek is now running a KickStarter for a very affordable co-extrusion FDM printer that can add continuous CF to any part. They also sent a few test parts to [Dr. Igor Gaspar] for testing against regular FDM CF prints.

It should be noted here that continuous CF with FDM is not new, as Markforged already does something similar, though at a ‘Contact us for a price quote’ level. The advantage of the Fibre Seek solution is then the co-extrusion that would make printing with continuous CF much more flexible and affordable. Based on the (sponsored) [CNC Kitchen] video of a few weeks ago at a tradeshow, the FibreSeeker 3 printer is effectively a standard CoreXY FDM printer, with the special co-extrusion dual print head that allows for CF to be coated with the target thermoplastic before being printed as normal.

Continue reading “FibreSeeker 3: Continuous Carbon Fiber Vs Chopped CF”

Printing With Metal On The Ender 3 Using Only A Friction Wheel

Printing metal as easily as it is to print with thermoplastics has been a dream for a very long time, with options for hobbyists being very scarce. This is something which [Rotoforge] seeks to change, using little more than an old Ender 3 FDM printer and some ingenuity. Best of all is that the approach on which they have been working for the past year does not require high temperature, molten metals and no fussing about with powdered metal.

Additive manufacturing using friction welding. (Credit: Ruishan Xie, et al., j.mtcomm, 2021)

Rather than an extruder that melts a thermoplastic filament, their setup uses metal wire that is fed into a friction welding tool head, the details of which are covered in the video as well as on the GitHub project page. Unlike their previous setup which we reported on last year, this new setup is both safer and much riskier. While there’s no more molten metal, instead a very loud and very fast spinning disk is used to provide the friction required for friction welding, specifically friction and rolling-based additive manufacturing (FRAM) as in the cited 2021 paper by [Ruishan Xie] et al. in Materials Today Communications. By the same lead author there’s also a 2025 paper that explores more complex implementations of FRAM.

Continue reading “Printing With Metal On The Ender 3 Using Only A Friction Wheel”

Breathe Easy While Printing With This VOC Calculator

We love 3D printing here, but we also love clean air, which produces a certain tension. There’s no way around the fact that printing produces various volatile organic compounds (VOCs), and that we don’t want to breathe those any more than necessary. Which VOCs, and how much? Well, [Jere Saikkonen] has created a handy-dandy calculator to help you guesstimate your exposure, or size your ventilation system, at least for FDM printing.

The emissions of most common FDM filaments are well-known by this point, so [Jere] was able to go through the literature and pull out values for different VOCs of concern like styrene and formaldehyde for ABS, PLA, Nylon, HIPS and PVA. We’re a bit disappointed not to see PETG or TPU on there, as those are common hobbyist materials, but this is still a great resource.

If you don’t like the numbers the calculator is spitting out, you can play with the air exchange rate setting to find out just how much extra ventilation you need. The one limitation here is that this assumes equilibrium conditions, which won’t be met save for very large prints. That’s arguably a good thing, since it errs on the side of over- rather than underestimating your exposure.

If you want to ground-truth this calculator, we’ve featured VOC-sensing projects before. If you’re convinced the solution to pollution is dilution, check out some ventilated enclosures. If you don’t want to share chemistry with the neighborhood, perhaps filtration is in order. 

Thanks to [Jere] for the tip!

A grey and blue coreXY 3D printer is shown, with a small camera in place of its hotend. On the print bed is a ChArUco pattern, a grid of square tiles containing alternating black fill and printed patterns.

Calibrating A Printer With Computer Vision And Precise Timing

[Dennis] of [Made by Dennis] has been building a Voron 0 for fun and education, and since this apparently wasn’t enough of a challenge, decided to add a number of scratch-built improvements and modifications along the way. In his latest video on the journey, he rigorously calibrated the printer’s motion system, including translation distances, the perpendicularity of the axes, and the bed’s position. The goal was to get better than 100-micrometer precision over a 100 mm range, and reaching this required detours into computer vision, clock synchronization, and linear algebra.

To correct for non-perpendicular or distorted axes, [Dennis] calculated a position correction matrix using a camera mounted to the toolhead and a ChArUco board on the print bed. Image recognition software can easily detect the corners of the ChArUco board tiles and identify their positions, and if the camera’s focal length is known, some simple trigonometry gives the camera’s position. By taking pictures at many different points, [Dennis] could calculate a correction matrix which maps the printhead’s reported position to its actual position.

Continue reading “Calibrating A Printer With Computer Vision And Precise Timing”

3D printed Origami mechanism

Origami On Another Level With 3D Printing

Origami has become known as a miracle technique for designers. Elegant compliant mechanisms can leverage the material properties of a single geometry in ways that are sometimes stronger than those of more complicated designs. However, we don’t generally see origami used directly in 3D printed parts. [matthew lim] decided to explore this uncharted realm with various clever designs. You can check out the video below.

Continue reading “Origami On Another Level With 3D Printing”