Arc Overhangs Make “Impossible” 3D Prints

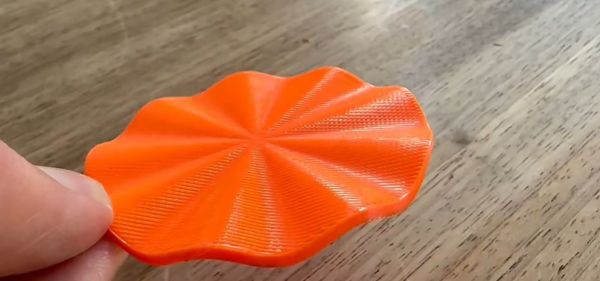
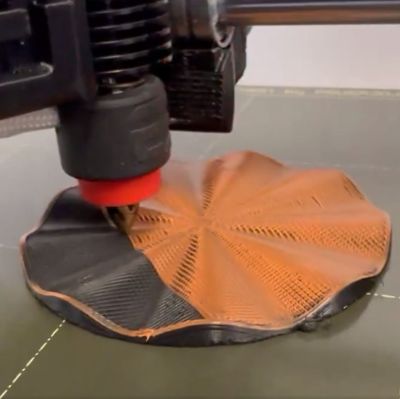
An accidental discovery by [3DQue] allows overhangs on FDM printers that seem impossible at first glance. The key is to build the overhang area with concentric arcs. It also helps to print at a cool temperature with plenty of fan and a slow print speed. In addition to the video from [3DQue], there’s also a video from [CNC Kitchen] below that covers the technique.

If you want a quick overview, you might want to start with the [CNC Kitchen] video first. The basic idea is that you build surfaces “in the air” by making small arcs that overlap and get further and further away from the main body of the part. Because the arcs overlap, they support the next arc. The results are spectacular. There’s a third video below that shows some recent updates to the tool.

We’ve seen a similar technique handcrafted with fullcontrol.xyz, but this is a Python script that semi-automatically generates the necessary arcs that overlap. We admit the surface looks a little odd but depending on why you need to print overhangs, this might be just the ticket. There can also be a bit of warping if features are on top of the overhang.

You don’t need any special hardware other than good cooling. Like [CNC Kitchen], we hope this gets picked up by mainstream slicers. It probably will never be a default setting, but it would be a nice option for parts that can benefit from the technique. Since the code is on GitHub, maybe people familiar with the mainstream slicers will jump in and help make the algorithm more widely available and automatic.

What will you build with this tool? If you don’t like arcs, check out conical slicing or non-planar slicing instead.

Continue reading “Arc Overhangs Make “Impossible” 3D Prints”

Self-Assembling Virus Model Is 3D Printed

Sometimes a visual or tactile learning aid can make all the difference to elucidating a concept to an audience. In the case viruses and their methods of self-assembly, [AtomicVirology] made a 3D printed device to demonstrate how they work. 

The result of this work is a printed dodecahedron, assembled from multiple components. Each face of the dodecahedron consists of a 5-sided pentagon, and is a separate piece. Each face contains magnets which allow the various faces to stick together. Amazingly, when a bunch of these faces are all thrown into a container and jumbled together, they eventually assemble themselves into complete dodecahedrons.

While it’s no virus, and the parts can’t replicate themselves en masse,  the demonstration is instructive. Viruses themselves self-assemble in a similar fashion, thanks to sub-units that interact with each other in the tumultuous environment of a host cell.

We love a good teaching tool around these parts. 3D printing has the benefit of allowing teachers to create their own such devices with just a few hours spent in some CAD software.

Continue reading “Self-Assembling Virus Model Is 3D Printed”

DrLCD Is Here To Give Your MSLA Printer A Checkup

Over the last couple years, we’ve seen an absolute explosion of masked stereolithography (MSLA) 3D printers that use an LCD screen to selectively block UV light coming from a powerful LED array. Combined with a stepper motor that gradually lifts the build plate away from the screen, this arrangement can be used to produce high-resolution 3D prints out of photosensitive resins. The machines are cheap, relatively simple, and the end results can be phenomenal.

But they aren’t foolproof. As [Jan Mrázek] explains, these printers are only as good as their optical setup — if they don’t have a consistent UV light source, or the masking LCD isn’t working properly, the final printed part will suffer. In an effort to better understand how these factors impact print quality, he designed the DrLCD: a TSL2561 luminosity sensor mounted to a robotic arm with associated software to map out the printer’s light source.

The individual LED assemblies are clearly visible.

The results when running DrLCD against a few different types of printers is fascinating. [Jan] was clearly able to make out the type of lenses used, and in one case, was even able to detect that a darker spot in the scan was due to a bit of resin having leaked into the light source and clouded up the optics.

But DrLCD can do more than just tell you where you’ve got a dark spot. Using the data collected from the scan, it’s possible to create a “compensation map” that can be combined with the sliced model you wish to print. As the slicer assumes an idealistic light source, this map can help by adding additional masking where bright spots in the display have been detected.

[Jan] goes on to compare the dimensional accuracy of printed parts before and after the compensation map has been applied to the model, and was able to identify a small but distinctive improvement. Not everyone is going to be concerned about the 157 µm deviation observed without the backlight compensation, but we certainly aren’t going to complain about 3D printers getting even more dimensionally accurate.

A couple years back we covered a similar technique that used a DSLR to capture high-resolution images of the bed. While arguably much easier to pull off, we can’t help but fall in love with the glorious overengineering that went into the DrLCD system, and we can’t wait until it starts making house calls.

Microscopic Metal 3D Printing With Gels

Everyone wants to 3D print with metals, but it is a difficult task. You need high temperatures and metals with high thermal conductivity make the problem even worse. Researchers at Caltech have a way of printing tiny metal structures. The trick? They don’t print metals at all. Instead, they 3D print a hydrogel and then use it as a scaffold to form metallic structures. You can read the full paper, if you are interested in the details.

Hydrogels are insoluble in water and made from flexible polymer chains. If you’ve ever handled a soft contact lens, that’s a hydrogel. Like resin printing, UV light triggers chemical reactions in the hydrogels, causing them to harden in the desired pattern.

What about the metal? They infuse the hydrogel with a metallic salt dissolved in water.  This saturates the hydrogel. Burning in a furnace causes the hydrogel to burn away but leaves the metal. The furnace also causes the structure to shrink, so this is a good method for very tiny pieces. The team has made prints with feature sizes around 40 microns.

By altering the metal salts, you can work with different metals or even mix different metals. The team has produced parts using copper, nickel, silver, and several alloys.

Printing small structures is a big research goal with many different approaches. We’ve even seen a tiny welder.

PSA: Watch Out For White Filament

We all know that using 3D printing filament with exotic filament that has metal or carbon fibers in it will tend to wear standard nozzles. That’s why many people who work with filaments like that use something other than conventional brass nozzles like hardened steel. There are even nozzles that have a ruby or diamond surfaces to prevent wear. However, [Slant 3D] asserts something we didn’t know: white filament may be wearing your nozzle, too. You can see his argument in the video below.

The reason? According to Slant 3D, the problem is the colorant added to make it white: titanium dioxide. Unlike some colorants, the titanium dioxide colorant has a large grain size. The video claims that the hard titanium material has a particle size of about 200 nm, which is much larger than, say, carbon black, which is about 20 times smaller.

Continue reading “PSA: Watch Out For White Filament”

Homebrew 3D Printer Goop Promises Better Bed Adhesion

Back when 3D printers were pretty new, most of us had glass beds with or without painter’s tape. To make plastic stick, you’d either use a glue stick or hair spray. Many people have moved on to various other build surfaces that don’t require help, but some people still use something to make the bed sticky and there are quite a few products on the market that claim to be better than normal glue or hairspray. [Jonas] wanted to try it, but instead of buying a commercial product, he found a recipe online for “3D printer goop” and made it himself.

You need four ingredients: distilled water and isopropyl alcohol are easy to find. The other two chemicals: PVP and PVA powder, are not too hard to source and aren’t terribly dangerous to handle. The recipe was actually from [MakerBogans] who documents this recipe as “Super Goop” and has another formula for “Normal Goop.” You’ll probably have to buy the chemicals in huge quantities compared to the tiny amounts you really need.

We assume the shots of the 3D printer printing its first layer is showing how effective the glue is. This looks like a very simple thing to mix up and keep in a sprayer. If you have some friends,  you could probably do a group buy of the chemicals and it would cost nearly nothing for the small amounts of chemicals you need.

If you don’t want to order exotic chemicals, you might not need them. We used to make “goop” by dissolving ABS in acetone, but hairspray usually did the trick.

Continue reading “Homebrew 3D Printer Goop Promises Better Bed Adhesion”

Radial Vector Reducer Rotates At Really Relaxed Velocity

When [Michael Rechtin] learned about Radial Vector Reducers, the underlying research math made his head spin, albeit very slowly. Realizing that it’s essentially a cycloidal drive meshed with a planetary gear set, he got to work in CAD and, in seemingly no time, had a design to test. You can see the full results of his experiment in the video below the break. Or head on out to Thingiverse to download the model directly.

[Michael] explains that while there are elements of a cycloidal drive, itself a wonderfully clever gear reduction mechanism, the radial vector reducer actually has more bearing surfaces, and should be more durable as a result. Two cycloidal disks are driven by a planetary gear reduction for an even greater reduction, but they don’t even spin, they just cycle in a way that drives the outer shell, setting them further apart from standard cycloidal drives.

How would this 3D printed contraption hold up? To test this, [Michael] built a test jig with a NEMA 23 stepper providing the torque, and an absurd monster truck/front loader wheel — also printed — to provide traction in the grass and leaves of his back yard. He let it drive around its tether for nearly two weeks before disassembling it to check for wear. How’d it look? You’ll have to check the video to find out.

If you aren’t familiar with cycloidal drives, check out this fantastic explanation we featured. As for planetary drives, what better way to demonstrate it than by an ornamental planetary gear clock!

Continue reading “Radial Vector Reducer Rotates At Really Relaxed Velocity”