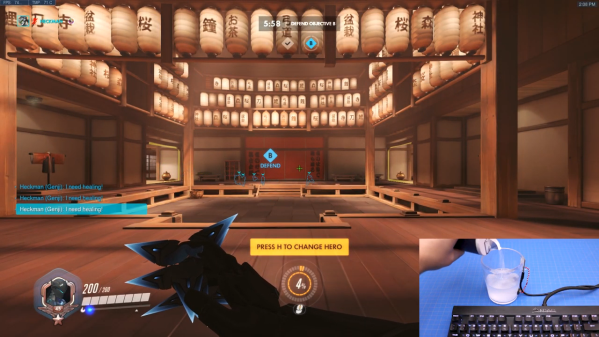
Sim Panel Proves You Can Always Use More Buttons

Many people enjoy playing flight simulators or making the occasional orbit in Kerbal Space Program, but most are stuck controlling the onscreen action with nothing more exotic than a keyboard and mouse. A nice compromise for those that don’t have the space (or NASA-sized budget) to build a full simulator cockpit is a USB “button box” that you can plug in whenever you need a couple dozen extra knobs, switches, and lights.

If you’ve been considering building one for yourself, this incredible build by [nexprime] should prove quite inspirational. Now at this point, a box of buttons hooked up to a microcontroller isn’t exactly newsworthy. But there are a few features that [nexprime] packed in which we think make this particular build worth taking a closer look at.

For one, the powder coated 8.5” x 10” enclosure is absolutely gorgeous. The console itself was purchased from a company called Hammond Manufacturing, but of course it still took some work to turn it into the object you’re currently drooling over. A CNC machine was used to accurately cut out all the necessary openings, and the labels were laser etched into the powder coat.

But not all the labels. One of the things we like best about this build is that [nexprime] thought ahead and didn’t just design it for one game. Many of the labels are printed on strips of paper which slide into translucent plastic channels built into the front of the box. Not only does this allow you to change out the overlays for different games, but the paper labels look fantastic when lit with the LED strips placed behind the channels.

Internally, [nexprime] used a SparkFun Pro Micro paired with a SX1509 I/O expander. The electronics are all housed on professionally manufactured PCBs, which gives the final build an incredibly neat look despite packing in 68 separate inputs for your gaming pleasure. On the software side this box appears as a normal USB game controller, albeit one with a crazy number of buttons.

If this build doesn’t have enough switches and buttons for you, don’t worry. This Kerbal Space Program cockpit has banks of switches below and above the player, so one can more realistically scramble for the correct onet to flip when things start going sideways. On the other hand, we’ve seen slightly less intense builds if you’re not quite ready to take out a loan just to get into orbit.

Be Vewy Vewy Quiet, We’re Hunting Baofengs

In the world of ham radio, a “Fox Hunt” is a game where participants are tasked with finding a hidden transmitter through direction finding. Naturally, the game is more challenging when you’re on the hunt for something small and obscure, so the ideal candidate is a small automated beacon that can be tucked away someplace inconspicuous. Of course, cheap is also preferable so you don’t go broke trying to put a game together.

As you might expect, there’s no shortage of kits and turn-key transmitters that you can buy, but [WhiskeyTangoHotel] wanted to come up with something that could be put together cheaply and easily from hardware the average ham or hacker might already have laying around. The end result is a very capable “fox” that can be built in just a few minutes at a surprisingly low cost. He cautions that you’ll need a ham license to legally use this gadget, but we imagine most people familiar with this particular pastime will already have the necessary credentials.

The heart of this build is one of the fairly capable, but perhaps more importantly, incredibly cheap Baofeng handheld radios. These little gadgets are likely familiar to the average Hackaday reader, as we discussed their dubious legal status not so long ago. At the moment they are still readily available though, so if you need a second (or third…), you might want to pull the trigger sooner rather than later.

Continue reading “Be Vewy Vewy Quiet, We’re Hunting Baofengs”

Spot This DIY Electronic Load’s Gracefully Hidden Hacks

Sometimes it’s necessary to make do with whatever parts one has on hand, but the results of squashing a square peg into a round hole are not always as elegant as [Juan Gg]’s programmable DC load with rotary encoder. [Juan] took a design for a programmable DC load and made it his own in quite a few different ways, including a slick 3D-printed enclosure and color faceplate.

The first thing to catch one’s eye might be that leftmost seven-segment digit. There is a simple reason it doesn’t match its neighbors: [Juan] had to use what he had available, and that meant a mismatched digit. Fortunately, 3D printing one’s own enclosure meant it could be gracefully worked into the design, instead of getting a Dremel or utility knife involved. The next is a bit less obvious: the display lacked a decimal point in the second digit position, so an LED tucked in underneath does the job. Finally, the knob on the right could reasonably be thought to be a rotary encoder, but it’s actually connected to a small DC motor. By biasing the motor with a small DC voltage applied to one lead and reading the resulting voltage from the other, the knob’s speed and direction can be detected, doing a serviceable job as rotary encoder substitute.

The project’s GitHub repository contains the Arduino code for [Juan]’s project, which has its roots in a design EEVblog detailed for an electronic load. For those of you who prefer your DIY rotary encoders to send discrete clicks and pulses instead of an analog voltage, a 3D printed wheel and two microswitches will do the job.

The No-Parts Temperature Sensor In Your Arduino

[Edward], creator of the Cave Pearl project, an underwater data logger, needed a way to measure temperature with a microcontroller. Normally, this problem is most easily solved by throwing a temperature sensor on the I2C bus — these sensors are cheap and readily available. This isn’t about connecting a temperature sensor in your Arduino. This build is about using the temperature sensor in your clock.

The ATMega328p, the chip at the heart of all your Arduino Uno clones, has within it a watchdog timer that clicks over at a rate of 110 kHz. This watchdog timer is somewhat sensitive to temperature, and by measuring this temperature sensor you can get some idea of the temperature of the epoxy blob that is a modern microcontroller. The trick is calibrating the watchdog timer, which was done with a homemade ‘calibration box’ in a freezer consisting of two very heavy ceramic pots with a bag of rice between them to add thermal mass (you can’t do this with water because you’re putting it in a freezer and antique crocks are somewhat valuable).

By repeatedly taking the microcontroller through a couple of freeze-thaw cycles, [Edward] was able to calibrate this watchdog timer to a resolution of about 0.0025°C, which is more than enough for just about any sensor application. Discussions of accuracy and precision notwithstanding, it’s pretty good.

This technique measures the temperature of the microcontroller with an accuracy of 0.005°C or better, and it’s using it with just the interrupt timer. That’s not to say this is the only way to measure the temperature of an ATMega; some of these chips have temperature sensors built right into them, and we’ve seen projects that use this before. However, this documented feature that’s clearly in the datasheet seems not to be used by many people.

Thanks [jan] for sending this in.

FPGA Brings Arduboy To The Game Boy Advance

Hackaday readers are perhaps familiar with the Arduboy, an open source handheld gaming system that aims to combine the ease of Arduino development with the seething nostalgia the Internet has towards the original Nintendo Game Boy. While not quite the same as getting one of your games published for a “real” system, the open source nature of the Arduboy platform allows an individual to develop a game playable on a commercially manufactured device.

While the Arduboy hardware itself is actually quite slick, that hasn’t stopped people from trying to bring its games to other pieces of hardware. Now thanks to the efforts of [uXe], the Game Boy Advance is well on its way to becoming Arduboy compatible, in a way bringing the whole project full circle. Assuming this gadget becomes a commercial device (it sounds like that’s still up in the air), Arduboy developers will be able to proudly play their creations on the final and objectively best entry into the Game Boy line.

Getting to this point has been something of an adventure, as documented in a thread from the Arduboy forums. Members of the community wondered what it would take to get Arduboy games running on a real Game Boy, but pretty quickly it was decided that the original beige brick model wasn’t quite up to the task. Eventually its far more capable successor the Game Boy Advance became the development target, and different approaches were considered for getting existing games running on the platform.

While there were some interesting ideas, such as using the GBA’s link port to “feed” the system games over SPI, in the end [uXe] decided to look into creating an FPGA cartridge that would actually run the Arduboy games. In this scenario, the GBA itself is basically just being used as an interface between the FPGA and the human player. In addition to these low-level hardware considerations, there was considerable discussion about the more practical aspects of bringing the games to the new hardware, such as how to best scale the Arduboy’s 128 x 64 output to the GBA’s 240 × 160 screen.

As demonstrated in the videos after the break, [uXe] now as all the elements for playing Arduboy games on the GBA in place, including the ability to disable full screen scaling by using the shoulder buttons. Now he just needs to shrink the hardware down to the point it will fit inside of a standard GBA cartridge. Beyond that, who knows? Perhaps the appeal of being able to run Arduboy games on a real Game Boy is enough to warrant turning this hack into a new commercial product.

Thanks to a hardware swap we’ve seen Arduboy games played on the Dreamcast VMU, and [uXe] himself previously grafted Arduboy-compatible hardware into an original Game Boy, but being able to play these games on an unmodified Game Boy Advance obviously has its own appeal. At the very least, it will be a bit more ergonomic than using a hacked classroom gadget.

Continue reading “FPGA Brings Arduboy To The Game Boy Advance”

Building A Semiautomatic Swag Launcher

Regular readers of Hackaday have certainly seen the work of [Jeremy Cook] at this point. Whether you remember him from his time as a writer for this fine online publication, or recognize the name from one of his impressive builds over the last few years, he’s a bona fide celebrity around these parts. In fact, he’s so mobbed with fans at events that he’s been forced to employ a robotic companion to handle distributing his personalized buttons for his own safety.

Alright, that might be something of a stretch. But [Jeremy] figured it couldn’t hurt to have an interesting piece of hardware handing out his swag at the recent Palm Bay Mini Maker Faire. Anyone can just put some stickers and buttons in a bowl on a table, but that’s hardly the hacker way. In the video after the break, he walks viewers through the design and construction of this fun gadget, which takes a couple unexpected turns and has contains more than a few useful tips which are worth the cost of admission alone.

Outwardly the 3D printed design is simple enough, and reminds us of those track kits for Matchbox cars. As you might expect, getting the buttons to slide down a printed track was easy enough. Especially when [Jeremy] filed the inside smooth to really get them moving. But the goal was to have a single button get dispensed each time the device was triggered, but that ended up being easier said than done.

The first attempt used magnets actuated by two servos, one to drop the button and the other to hold up the ones queued above it. This worked fine…at first. But [Jeremy] eventually found that as he stacked more buttons up in the track, the magnets weren’t strong enough to hold them back and they started “leaking”. This is an excellent example of how a system can work perfectly during initial testing, but break down once it hits the real world.

In this case, the solution ended up being relatively simple. [Jeremy] kept the two servos controlled by an Arduino and a capacitive sensor, but replaced the magnets with physical levers. The principle is the same, but now the system is strong enough to hold back the combined weight of the buttons in the chute. It did require him to cut into the track after it had already been assembled, but we can’t blame him for not wanting to start over.

Just like the arcade inspired candy dispenser, coming up with a unique way of handing out objects to passerby is an excellent way to turn the ordinary into a memorable event. Maybe for the next iteration he can make it so getting a button requires you to pass a hacker trivia test. Really make them work for it.

Continue reading “Building A Semiautomatic Swag Launcher”

Text Projector With — You Know — Lasers

We missed [iliasam’s] laser text projector when it first appeared, perhaps because the original article was in Russian. However, he recently reposted in English and it really caught our eye. You can see a short video of it in operation, below.

The projector uses raster scanning where the beam goes over each spot in a grid pattern. The design uses one laser from a cheap laser pointer and a salvaged mirror module from an old laser printer. The laser pointer diode turned out to be a bit weak, so a DVD laser was eventually put into service. A DVD motor also provides the vertical scan which is just a slight wobble of a mirror. A Blue Pill CPU provides all the smarts. You can find the code on GitHub.

Continue reading “Text Projector With — You Know — Lasers”