Watch The World Spin With The Earth Clock

With the June solstice right around the corner, it’s a perfect time to witness first hand the effects of Earth’s axial tilt on the day’s length above and beyond 60 degrees latitude. But if you can’t make it there, or otherwise prefer a more regular, less deprived sleep pattern, you can always resort to simulations to demonstrate the phenomenon. [SimonRob] for example built a clock with a real time rotating model of Earth to visualize its exposure to the sun over the year.

The daily rotating cycle, as well as Earth’s rotation within one year, are simulated with a hand painted plastic ball attached to a rotating axis and mounted on a rotating plate. The hand painting was done with a neat trick; placing printed slivers of an atlas inside the transparent orb to serve as guides. Movement for both axes are driven by a pair of stepper motors and a ring of LEDs in the same diameter as the Earth model is used to represent the Sun. You can of course wait a whole year to observe it all in real time, or then make use of a set of buttons that lets you fast forward and reverse time.

Earth’s rotation, and especially countering it, is a regular concept in astrophotography, so it’s a nice change of perspective to use it to look onto Earth itself from the outside. And who knows, if [SimonRob] ever feels like extending his clock with an aurora borealis simulation, he might find inspiration in this northern lights tracking light show.

This is a spectacular showpiece and a great project you can do with common tools already in your workshop. Once you’ve mastered earth, put on your machinists hat and give the solar system a try.

3D Printer Tech Cuts Paper

While 3D printing has been a great thing all by itself, it has also made electromechanical hardware a commodity item. Instead of raiding an old printer for motors and rods of unknown provenance, you can now buy everything very inexpensively due to the economy of scale and offshore manufacturing.

[Mr. Innovation] proves this point with his recent paper cutting machine which feeds and slices paper strips with user-selected width and quantity. He did steal one roller assembly from an old printer, but most of it is straight out of a 3D printer build. There’s NEMA stepper motors, modular motor driver boards, smooth rods, belts, and pulleys.

The blade of the cutter is just a standard snap off box cutter blade. It is angled so it doesn’t drag when the motor pulls it back to the home position after a cut. Honestly, we might have made the paper mechanism retract the paper a bit at that point, but that would be simple to add to the device’s firmware.

Continue reading “3D Printer Tech Cuts Paper”

A Crash Course In Reliable Communication

It’s probably fair to say that anyone reading these words understands conceptually how physically connected devices communicate with each other. In the most basic configuration, one wire establishes a common ground as a shared reference point and then the “signal” is sent over a second wire. But what actually is a signal, how do the devices stay synchronized, and what happens when a dodgy link causes some data to go missing?

All of these questions, and more, are addressed by [Ben Eater] in his fascinating series on data transmission. He takes a very low-level approach to explaining the basics of communication, starting with the concept of non-return-to-zero encoding and working his way to a shared clock signal to make sure all of the devices in the network are in step. Most of us are familiar with the data and clock wires used in serial communications protocols like I2C, but rarely do you get to see such a clear and detailed explanation of how it all works.

He demonstrates the challenge of getting two independent devices to communicate, trying in vain to adjust the delays on the receiving and transmitting Arduinos to try to establish a reliable link at a leisurely five bits per second. But even at this digital snail’s pace, errors pop up within a few seconds. [Ben] goes on to show that the oscillators used in consumer electronics simply aren’t consistent enough between devices to stay synchronized for more than a few hundred bits. Until atomic clocks come standard on the Arduino, it’s just not an option.

[Ben] then explains the concept of a dedicated clock signal, and how it can be used to make sure the devices are in sync even if their local clocks drift around. As he shows, as long as the data signal and the clock signal are hitting at the same time, the actual timing doesn’t matter much. Even within the confines of this basic demo, some drift in the clock signal is observed, but it has no detrimental effect on communication.

In the next part of the series, [Ben] will tackle error correction techniques. Until then, you might want to check out the fantastic piece [Elliot Williams] put together on I2C.

[Thanks to George Graves for the tip.]

Continue reading “A Crash Course In Reliable Communication”

Poetry Is The Fruit Of This Loom

We’d wager that most people reading these words have never used a loom before. Nor have most of you churned butter, or ridden in a horse-drawn wagon. Despite these things being state of the art technology at one point, today the average person is only dimly aware of their existence. In the developed world, life has moved on. We don’t make our own clothes or grow our own crops. We consume, but the where and how of production has become nebulous to us.

[David Heisserer] and his wife [Danielle Everine], believe this modern separation between consumption and production is a mistake. How can we appreciate where our clothing comes from, much less the people who make it, without understanding the domestic labor that was once required to produce even a simple garment? In an effort to educate the public on textile production in a fun and meaningful way, they’ve created a poetry printing loom called Meme Weaver.

The Meme Weaver will be cranking out words of woolen wisdom at the Northern Spark Festival taking place June 15th and 16th in downtown Minneapolis. If any Hackaday readers in the area get a chance to check out the machine, we’d love to hear about it in the comments. Take photos! Just don’t blame us if you have a sudden urge to make all of your clothing afterwards.
Continue reading “Poetry Is The Fruit Of This Loom”

Automatic Sunglasses For The Lazy Hacker

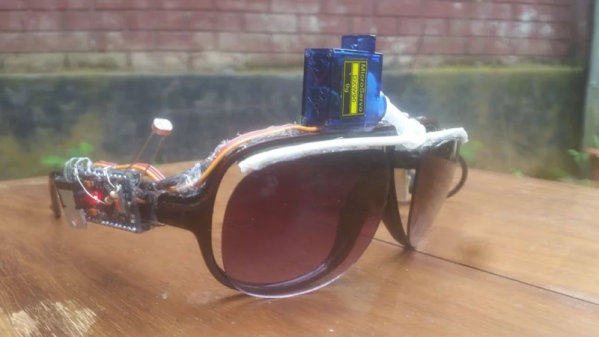
[Andreas] may have created the ultimate lazy hacker accessory: automatic sunglasses, or “Selfblending sunglasses” as he creatively titled his video. If you can’t tell from the name, these are glasses that you never have to take off. If the light is dim, they move away from your eyes. Going back outside to bright light? The glasses move to protect your eyes.

The glasses consist of a couple of micro servos which move tinted lenses toward or away from the user’s eyes. A side-mounted Arduino Uno reads a CdS cell light sensor and drives the servos.  Why an Uno rather than a much more wearable Arduino Nano? It’s what [Andreas] had lying around.

Yes, a good portion of the fun of this build is [Andreas’] comedy. But the best part comes when he tests the glasses out — in an actual car on the highway. The glasses work better than expected — moving the lenses into and out of [Andreas] field of view as he drives through tunnels. You can actually see how surprised [Andreas] is that it works so well.

These aren’t the first automatic sunglasses we’ve seen, nor are they the most peril-sensitive. Still, it’s a fun project and the video gave us a few chuckles.

Continue reading “Automatic Sunglasses For The Lazy Hacker”

Simplifying Basic LED Effects

There was a time when having a blinking blue LED on a project was all you needed to be one of the cool kids. But now you need something more complex. LEDs should not just snap on, they should fade in and out. And blinking? Today’s hotness is breathing LEDs. If that’s the kind of project you want, you should check out [jandelgado’s] jled library.

At first glance, an Arduino library for LED control might seem superfluous, but if you are interested in nice effects, the coding for them can be a bit onerous. If you don’t mind stopping everything while you fade an LED on (or off) then sure, you just write a loop and it is a few lines of code. But if you want to have it happen while other things continue to execute, it is a little different. The library makes it very simple and it is also nicely documented.

Continue reading “Simplifying Basic LED Effects”

ESP8266 Uses LiFi To Get On WiFi

Connecting your shiny new ESP8266 to WiFi can be as simple or as complicated as you please. Most people decide to manually add it. Some people find clever ways to make the bloody thing connect itself. [Eduardo Zola] transfers his WiFi password using the flashing light of a smartphone screen.

A simple photo-resistor and a bit of tinkering allows him to easily send credentials — or any data really — to his ESP8266, through the power of LiFi. Short for Light Fidelity, LiFi transmits data using light with on and off states representing digital values. It can use visible light, or reach into either the ultraviolet or infra-red radiation if need be. For the nitty-gritty details on the subject, check out our primer on LiFi.

 A flashing LCD screen and a photo-resistor barely make the cut for a one-way LiFi system, but [Eduardo Zola] makes it work. The approach is to build a resitor divider and watch an input pin on the ESP for changes.

The trick is to keep ambient light out of the mix. The test sensor shown here places the LDR in a black cap, but [Eduardo] 3D-Printed a slick little enclosure for his reverse flashlight so it fits flush with the phone screen. One click and about half a minute of a flashing screen later, and the Wi-Fi credentials are transferred. This circuit could really be added onto any project, for short data transfers. With a bit more work on the sensor circuit, speed could be improved with the limiting factor being the timing on the phone screen itself.

Since the ESP8266 has its own WiFi connection, it’s likely you’ll use that for data transfer once the LiFi gets it onto the network. But any situation where you don’t have a full user input or a network connection could benefit from this. Pull out that old scrolling LED matrix project and add this as a way to push new messages to the device!
Continue reading “ESP8266 Uses LiFi To Get On WiFi”