IOT Lawnmower

World’s First Internet Connected Lawnmower

Okay so this IOT is getting a bit out of hand. Introducing the world’s first(?) tweeting, internet connected, lawnmower.

[Michel] recently bought one of those new-fangled cordless lawn mowers by EGO. It runs off a 56V lithium ion battery pack, and apparently, works pretty well. Since it has plenty of on-board power, he decided to strap a 64MHz PIC18F25K22 to a ESP8266 and connect it to the internet. That part number has been taking the world by storm and it’s totally freaking awesome. The ESP8266 is a tiny WiFi module that is controllable over a serial port — and it only costs $5. Hello IOT-everything.

Anyway, to avoid voiding his warranty, [Michel] using non-invasive sensors to collect data — A series of hall effect sensors and magnets to be exact. One detects when the cutting system is engaged, and another magnet and sensor pair counts wheel revolutions. In the end, this gives you data on how far you pushed the mower, how long you spent cutting, and how long you were out there. When the job is done, you have the option to push a tweet with your stats. Woo!

He does admit, the tweeting feature is more there just to annoy his friends.

Skateboard

On Your Phone While Driving An Electric Skateboard

Skateboards are fun, but you have to do all that pesky kicking in order to get anywhere. That’s why [Nick] decided to build his own electric skateboard. Not only is the skateboard powered with an electric motor, but the whole thing can be controlled from a smart phone.

[Nick] started out with a long board deck that he had made years ago. After cleaning it up and re-finishing it, the board was ready for some wheels. [Nick] used a kit he found online that came with the trucks, wheels, and a belt. The trucks have a motor mount welded in place already. [Nick] used a Turnigy SK3 192KV electric motor to drive the wheels. He also used a Turnigy electronic speed controller to make sure he could vary the speed of the board while riding.

Next [Nick] needed some interface between a smart phone and the motor controller. He chose to use an Arduino Nano hooked up to a Bluetooth module. The Nano was able to directly drive the motor controller, and the Bluetooth module made it easy to sync up to a mobile phone. The Android app was written using MIT’s App Inventor software. It allows for basic control over the motor speed so you can cruise in style. Check out the video below for a slide show and some demonstration clips.

It’s a popular project, and eerily similar to the one we saw a couple months back.

Continue reading “On Your Phone While Driving An Electric Skateboard”

Pendulum MIDI Controller Really Swings

Once in a while, we see a project that makes us want to stop whatever we’re doing and build our own version of it. This time, it’s Modulum, a pendulum-based MIDI controller. It’s exactly what it sounds like. The swinging pendulum acts as a low-frequency oscillator. In the demo video configuration, you can hear it add a watery, dreamlike quality, sort of like a lap steel guitar on LSD.

The pendulum’s motion is detected by four pieces of stretchy, conductive cord. These are wired to an Arduino Nano in a voltage divider fashion. [Evan and Kirk] used the Maxuino library to determine x and y mapping of possible pendular positions as well as perform the necessary MIDI processing. Get your groove on after the break, and check out some of the many other fantastic MIDI controllers we’ve had the pleasure of covering.

Continue reading “Pendulum MIDI Controller Really Swings”

ShakeIt – An Interactive Light Game

Learning becomes interesting when you make it fun, interactive and entertaining. [Arkadi] built ShakeIt – an interactive game for the Mini MakerFaire in Jerusalem to demonstrate to kids and grownups how light colors are mixed. It is a follow up to his earlier project – Smart juggling balls which we featured earlier.

The juggling balls consist of a 6 dof sensor (MPU 6050), a micro controller, transmitter (NRF24L01+), some addressable RGB LED’s and a LiPo battery. An external magnet activates a reed switch inside the balls and triggers them in to action. The ShakeIt light fixture consists of an Arduino Nano clone, NRF24L01+ with SMA Antenna, buck converter, 74 addressable RGB LED’s, and a bluetooth module. The bluetooth module connects to a smartphone app.

[Arkadi] starts out by handing three juggling balls, each with a predefined color (Red, Green, Blue). When the ball is shaken, the light inside the ball becomes stronger. The ShakeIt light fixture is used as a mixer. It communicates with the balls and receives the value of how strong the light inside each of the smart balls is, mixing them up, and generating the mixed color.

The fun starts when the interactive game mode is enabled. Instead of just mixing the light, the Light fixture generates patterns based on how strong the balls are shaken. At first the light fixture shows all three colors filling up the central ball. The three contenders then fight out to get their color to fill up the sphere completely until only one color remains and the winner is declared.

The kids might be learning some color theory here, but it seems the adults are having a “ball” playing the crazy game. If you’d like to build your own shoulder dislocating ShakeIt game, head over to [Arkadi]’s github repository for the ShakeIt and the Juggling Balls. Check the video below to see the adults having fun.

Continue reading “ShakeIt – An Interactive Light Game”

Optimizing AVR LCD Libraries

A while ago, [Paul Stoffregen], the creator of the Teensy family of microcontrollers dug into the most popular Arduino library for driving TFT LCDs. The Teensy isn’t an Arduino – it’s much faster – but [Paul]’s library does everything more efficiently.

Even when using a standard Arduino, there are still speed and efficiency gains to be made when driving a TFT. [Xark] recently released his re-mix of the Adafruit GFX library and LCD drivers. It’s several times faster than the Adafruit library, so just in case you haven’t moved on the Teensy platform yet, this is the way to use one of these repurposed cell phone displays.

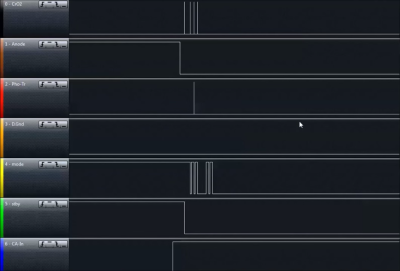
After reading about [Paul]’s experience with improving the TFT library for the Teensy, [Xark] grabbed an Arduino, an LCD, and an Open Workbench Logic Sniffer to see where the inefficiencies in the Adafruit library were. These displays are driven via SPI, where the clock signal goes low for every byte shifted out over the data line. With the Adafruit library, there was a lot of wasted time in between each clock signal, and with the right code the performance could be improved dramatically.

The writeup on how [Xark] improved the code for these displays is fantastic, and the results are impressive; he can fill a screen with pixels at about 13FPS, making games that don’t redraw too much of the screen at any one time a real possibility.

https://www.youtube.com/watch?v=JxL68u_YJ_g

50 Shades Of Gray Water Reuse

Entered into this year’s Hackaday Prize, [TVMiller] built a super cheap Arduino powered gray water recovery system.

The system is very simple and can be easily made for almost any bathroom. By making a zig-zag of PVC pipe underneath the sink, he’s created a simple grey water reservoir sized for his toilet’s flushing capability.  And if you use too much water, it just backs into the drain — think of it as a giant P-Trap! A 12V solenoid and 240L/h water pump switch on after the toilet has been flushed — refilling the tank with reused gray water! He’s also added an Arduino and an LCD screen to keep track of the water saved; with the nice touch of a HaD logo of course.

We love [TVMiller’s] project brief build logs — he doesn’t hold anything back.

Pipes were glued, the inhaled toxins coursing through my lungs and penetrating the cells, turning me in an enhanced human, now capable of lifting small things with great ease, like a stapler or Big Gulp.

Continue reading “50 Shades Of Gray Water Reuse”

Mimimalist Arduino Gaming Platform

A pretty color LCD screen, an Arduino, a buzzer and a joystick is all you need for a minimalist gaming console for under $20. At least, that’s all [João Vilaça] needed to get this sweet version of Tetris up and running. He’s working on Breakout right now. His Breakout looks even better. See the postscript below for details.

It’s a testament to the current state of the hardware hacking scene that [João] could put this device together in an afternoon for so cheap, presumably after waiting a while for shipments from China. The 320×240 SPI color TFT LCD screen used to cost twice as much as this whole project did. And wiring it up is a simple matter of connecting this pin to that pin. Almost child’s play.

Equally impressive is the state of open source software. A TFT library from Seeed Studios makes the screen interface a piece of cake. [João] wrote his own sound and joystick code, and of course the Tetris gameplay itself, but it’d be much more than a few weeks’ work without standing on the shoulders of giants. Check out [João]’s Github for the project code and stick with us after the break for a demo video and some of our other favorite Arduino gaming hacks.

Continue reading “Mimimalist Arduino Gaming Platform”