Speech Recognition On An Arduino

Speech recognition is usually the purview of fairly high-powered computers chugging along at hundreds of Megahertz with megabytes of RAM. Bringing speech recognition to the low-power microcontroller you’d find in an Arduino sounds like the work of a mad scientist or Ph.D. candidate, but that’s exactly what [Arjo Chakravarty] did. He developed the μSpeech library for the Arduino to allow for speech recognition for a limited set of voice commands.

Where most speech recognition systems use FFT and very fancy math to determine what phonemes a user is saying, [Arjo]’s system does away with this unnecessary complexity in favor of using very, very basic integral and differential calculus.

From [Arjo]’s user guide for μSpeech (PDF warning) we can see it’s possible to connect a small microphone to the analog input of an Arduino and accept voice commands such as ‘left’, ‘right’, and ‘stop’. The accuracy is pretty good, as well – 80% if μSpeech is trying to recognize words, and 30-40% if μSpeech is programmed to recognize single phonemes.

Sadly we couldn’t find a demo video of μSpeech in action, but you’re more than welcome to grab it via github for your own project. Send us a video of μSpeech in action and we’ll put it up.

Wiring Up A Lot Of LED Segment Displays

One look at this display and you know there’s a whole lot of pins that need to be wired up. Now look at what those display modules are mounted on. That’s right, [Kemley] is using point-to-point soldering to rig up this big display. It sports four sixteen segment modules on top for alpha-numeric information, and eight large seven segment modules for displaying numbers only.

We’re not certain as to how the electronics are arranged. When talking about the 16-segment modules he mentions that all four are in parallel with NPN transistors to switch the common anode of each. That’s easy enough to understand. But when you get a look at the transistor board you’ll see 24 of them in use. He’s included a 150 ohm resistor on the collector of each transistor. It must be set up to only allow one segment of each group to switch on at a time? We’d guess that each segment is divided into two (upper and lower pins are multiplexed separately), which would explain the double set of transistors. As for date and time, an Arduino board monitors a DS1307 RTC and manages the scanning of the display.

Tuitwall Uses PHP-fed Arduino To Display Tweets

[Santiago] recently completed this project which he calls Tuitwall. It will display your Twitter feed on an LED matrix. The method he used to put it together will come in handy for any project where you need to scrape information from the Internet.

The project does require a server in addition to the Arduino hardware seen above. On the Arduino side [Santiago] uses an Ethernet shield and an LED matrix which is addressed via SPI. The server is running a PHP script which takes advantage of the twitteroauth library to handle authentication.

There’s a little bit of configuration to be done, most of it having to do with how Twitter handles 3rd party applications. But once everything is set up you can take the hardware with you and plug it into any network (as long as it offers DHCP). With this framework as a guide it’s a snap to bend it to your will. It could be used as an RSS reader, time and temperature, server farm status, a prank ticket displaying fake headlines, etc.

Scrolling Tweets With A WiFi LED Matrix

For his most ambitious build to date, [Param] thought it would be a cool idea to have a LED matrix display spitting tweets out via a WiFi connection. The build is now done, and we’ve got to hand it to him for a very nice build.

The build is based on an Arduino with a Sparkfun WiFi shield providing the network connection. The Arduino pings a Javascript app that pulls down tweets from The Verge and displays them on an 8×8 LED matrix display.

What makes [Param]’s build so cool is its portable nature; the entire device is completely wireless, getting its power from a Sparkfun LiPower shield  and an apparently extremely capacious LiPoly battery.

With a rat’s nest of wires hanging out the back of the LED display, [Param]’s build is crying out for a proper enclosure, but even given that it remains a quality project. You can see a video of the WiFi’d Twitter display after the break.

Continue reading “Scrolling Tweets With A WiFi LED Matrix”

RC Car Upgraded To Bluetooth Control

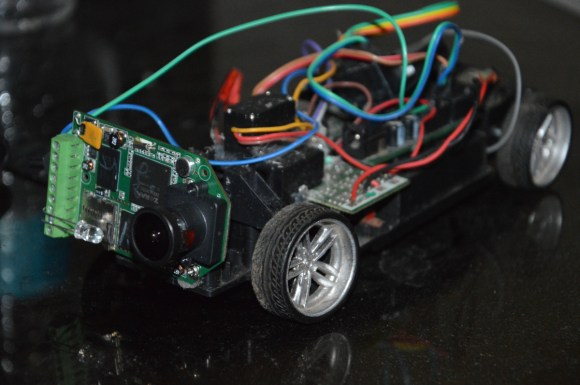
[Chet] is showing off the Bluetooth controller upgrade for this RC car. The donor vehicle is a rather inexpensive Porche which he purchased to make sure he didn’t start hacking up his more expensive toys.

He took a bit different route than the IOIO RC truck we saw earlier in the week, but the concept is basically the same. That build used an IOIO board with a USB Bluetooth dongle. This one uses an Arduino Mini with a serial Bluetooth module. He patched into the motor driver circuits on the original PCB. While he was at it he also soldered in some LEDs to use as switchable headlights.

There was one issue which he had to overcome. The current draw from the motor starting up would sometimes dip the voltage low enough to reset the Arduino. He tried using a bigger capacitor to feed the board, but in the end opted to add a boost converter.

Disco Planet, A Massive RGBW LED Array In A 6′ Globe

About half a year ago [John] over at Frank’s Kitchens came to me with an idea for a giant lighting project. He had this 6ft diameter aluminum frame globe rescued from the Philadelphia Theater Company and wanted it to be an interactive display of sorts. After a few discussions we got together and somehow managed to order 800 3 watt LEDs in red, green, blue, and white. We had a system that worked great on paper, and managed to get it built by Valentines day for a big show. It failed miserably and hardly even illuminated the LEDs. I, naturally, took this far too personally and set out for a complete redesign, looking in the direction of digitally addressable LED strips.

In addition to building a crazy turbo charged LED array I also spent a lot (a whole lot) of time coding a nice clean fully functioning RGB LED strip controller using an Arduino Pro Mini (5V 16 MHz), the MSGEQ7 audio frequency multiplexer (PDF) , and an IR remote. I plan on using this for other projects so the code can be easily reconfigured to use many different LED strips and a whole slew of IR remotes.

The schematic of the globe is here. The top half  of that schematic be catered to other projects using a variety of pre-built LED strips. The pastebin with code is here,  fastSPI_LED and IRRemote here and here. Some code jockeying was required to get IRRemote.h and FastSPI_LED to play nicely together, so check the code comments.

Continue reading “Disco Planet, A Massive RGBW LED Array In A 6′ Globe”

Bits And Pieces Robotic Arm

[V0R73X], who is 17  has been working on a project, to build A robotic arm. This project started out as a challenge put forward from one of his school teachers to build a robotic arm for $200.  [VoR73X] accepted, and the challenge began.

He came up with a robotic arm that can be controlled from his mobile phone and other bluetooth enabled devices. He also designed it so that he can control it from the infrared remote control of an old tv set. [VoR73X] decided to kept the design simple, to make it easy for others to build.  [VoR73X] has shared the code and a step by step process of how to build in the hopes that others would also like to take up the challenge.  Watch the video after the break for further details on his project.

via[Instructables]

Continue reading “Bits And Pieces Robotic Arm”