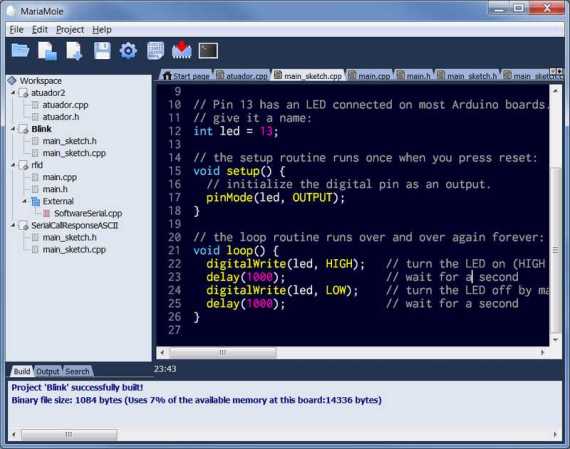
Data From Your Coffee Maker Turned Into Art

This is what your coffee looks like as it is being brewed. The three different art pieces seen above were generated based on data from different parts of a high-end coffee maker. This isn’t a bargain basement single switch drip maker (we reserve those for NES retrofits) but a top-of-the-line espresso machine. And before you cry foul we’ll warn you that the project is a marketing device for the manufacturer. But we still think it’s interesting so read on or jump directly to the video after the break.

We’re unsure if the sensors are normally included in the machine or if they were added during the hack. An Arduino pulls in data about the brew process from two flow meters, a steam indicator LED, and three thermistors. The measured values are sent to a Processing application which turns them into the generative art seen above. What results is a widescreen display that aims to turn your bleary-eyed wait for morning coffee into something interesting.

Continue reading “Data From Your Coffee Maker Turned Into Art”

programmable-rc-car

How To Control Your Cheap RC Car With A Computer

[Jon] wrote in to tell us about his programmable RC car, and the Howto guide that he’s made. According to him, this project can be constructed with $9 worth of parts plus an Arduino and a small toy car. So around $50 if you’re starting from scratch.

At it’s core, this project is about using the Arduino to allow your computer to send signals to the toy car. For this, [Jon] has included JAVA code that should be able to run on Mac, Linux, and PC operating systems. The Arduino code is also included.

Most small RC cars like those used in this project switch on at full speed or turn off, but this project allows the PC/Arduino to give the car PWM signals to control the speed. As pointed out in the video after the break, this can be a bit jerky at slow speed, but still a neat effect. A decent amount of soldering is required to get this project working, but it may be a good project especially if you have some of the parts already available! Continue reading “How To Control Your Cheap RC Car With A Computer”

10bitworks Shows Us How To Light Up A Synchronized Swarm Of LED Jellyfish

10bitworks-led-tshirts

[Jeremy Zunker] from 10bitworks recently wrote in to share a cool build the group put together for the Luminaria 2012 festival which took place in March of this year. As you might have guessed, the fest is home to a wide array of light-themed projects, so the team at 10bitworks thought long and hard to come up with a design which would help them stand out from the other 79 featured artists.

At the core of their project is a t-shirt which features a deep-sea diver surrounded by swarm of jellyfish. Each of the jellyfish is backlit by an LED module, allowing the group to create intricate light patterns on the shirt.

10bitworks brought 8 shirts to the show, each fitted with a small control pack that contained a set of batteries and a Jeenode wireless board. A ninth Jeenode and a large antenna were used as the master control unit, sending signals to each of the t-shirts in order to synchronize the light display.

The final result turned out very nicely as you can see in the video below, where [Jeremy] walks through all of the project’s finer details.

Continue reading “10bitworks Shows Us How To Light Up A Synchronized Swarm Of LED Jellyfish”

No Secret Knocks Required At [Steve’s] House – Your Subway Pass Will Do

rfid-door-lock

[Steve] is often host to all sorts of guests, and he was looking for an easy way to let his friends come and go as they please. After discovering that his front door came equipped with an electronic strike, he decided that an RFID reader would be a great means of controlling who was let in, and when.

Giving all your friends RFID cards and actually expecting that they carry them is a bit of a stretch, but lucky for [Steve] he lives near Boston, so the MBTA has him covered. Just about everyone in town has an RFID subway pass, which pretty much guarantees that [Steve’s] cohorts will be carrying one when they swing by.

He crafted a stylish set of wooden boxes to contain both the RFID reader and the Arduino that controls the system, matching them to the Victorian styling of his home. A single button can control the setup, allowing him to add and remove cards from access lists without much fuss. For more granular control however, [Steve] can always tweak settings from the Arduino serial console.

The card system is both stylish and useful – a combination that’s hard to beat.

Arduino WiFi Shield Available, Costs $85 USD

Over on the Arduino blog, the release of the official Arduino WiFi shield was just announced. On the spec page for this WiFi shield. we can see this new board isn’t a slouch; it’s powered by a 32-bit ATMega 32UC3 microcontroller, has provisions for WEP and WPA2 encryption, and supports both TCP and UDP with the Arduino WiFi library. It also costs €69/$85/£55 from the Arduino store.

Now that the announcement of the Arduino WiFi shield is over with, we’ll take this opportunity to go through a few other WiFi adapters for the Arduino that don’t cost an arm and a leg.

The WiFly shield – available from Sparkfun – is a WiFi adapter with the same form factor as the ever popular XBee modules. Of course, it’s possible to make your own breakout board; the WiFly only needs a TX, RX, power and ground connection to connect your Arduino project to the Internet.

We’ve seen a few projects use the WiShield from async labs. It’s a WiFi module packaged in the familiar Arduino shield form factor, and costs $55 USD.

For the hardcore hackers out there, you could always get a bare Microchip WiFi module and get it to work with an AVR as [Quinn Dunki] attempted to. In all fairness, [Quinn] was trying to de-Arduinofy the WiFi library; if you’re cool with Arduino code swimming around in your project, this method will probably work.

There’s also the very, very cool Electric Imp. Basically, it’s an SD card with a built-in WiFi module. After configuring the Imp by holding it up to patterns flashing on your smartphone screen, this device serves as a transparent bridge to the magical ‘cloud’ we’ve been hearing about. The Electric Imp was supposed to have been released in late July/early August, and we’ll put a post up when this cool device actually launches.

Of course we’re neglecting the simplest solution to getting WiFi running on an Arduino project: just use a wireless router. Really, all you need is a pair of TX and RX pins and a copy of OpenWRT. Easy, and you probably have the necessary hardware lying around.

We’re missing a few methods of Arduinofying a WiFi connection (or WiFying an Arduino…), but we’ll let our readers finish what we started in the comments.

tft-with-arduino

Use A Nokia N82 TFT Panel With Your Arduino

[Andy] has been hard at work reverse-engineering the Nokia N82 2.4 inch cell phone display for use with an Arduino. As pointed out in the article, this same 2.4 inch display can be found in at least seven other Nokia products, so they are readily available. The panels can be found for as low as 3 pounds (or a little less than 5 dollars) on Ebay.

The results are quite good and can be seen in the videos after the break. The first demo displays a simulated weather report, and the second displays some JPEG images. Although an Arduino Mega was used in this demonstration, a standard Arduino can be used as well. Schematics as well as a bill of materials is included in the article, however if you’d rather just buy a board, he’s selling the rest of what he’s built on a first come first served basis. No word on how many he has in stock though!
Continue reading “Use A Nokia N82 TFT Panel With Your Arduino”

Lite Brites Fade, But LED Clocks Are Forever

litebrite-clock

Ahh, the Lite Brite.

What could be more fun than pushing dozens of little plastic pegs through a piece of black paper in order to create a pixelated, though colorful image? Well, I can think of quite a few things more engaging than that, and luckily so can [Lonnie Honeycutt] over at MeanPC.

While contemplating what to build with a pile of LEDs, his daughter came into the room with her portable Lite Brite. He thought that the pegs she was using looked awfully similar to the LEDs on his desk, so he did some test fitting and was surprised to see that they fit almost perfectly.

[Lonnie] thought that the toy would make an excellent clock, and his daughter happily agreed to let Dad do some tinkering. A few hours, an Arduino, and some Charlieplexing later, he had a nice looking clock that his kids were sure to enjoy.

If you’re interested in seeing more about how constructed, be sure to check out his YouTube channel and Instructable, where he happily provides all of the build details.