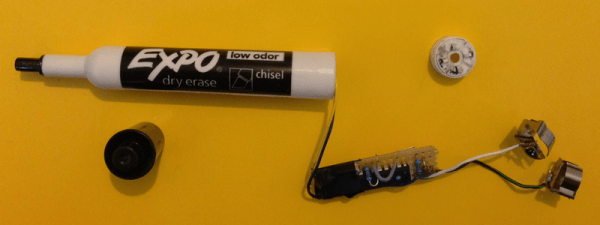
Not Quite Building A Raspi Arduino Bridge


A few months ago, [Omer] sent in a Raspberry Pi to Arduino bridge he’s been working on called Ponte. Now that he’s gotten a few assembled, he can actually test out his ideas for combining the powerful Raspi with the ubiquitous Arduino.

Ponte revision 0 used a pair of 12-bit analog to digital converters, but during the soldering and debugging phase of development [Omer] discovered a few things were wrong with his original design. The FETs on the fabricated boards had the drain and source pins mixed up, but that problem was easily solved with a bit of board surgery.

The worst problem was the mechanical design of Ponte rev. 0 – the power jack on the Ponte is directly above the Raspi’s USB port, meaning it’s impossible to plug the Ponte into the Pi.

[Omer] is working on these problems and should have  the revised boards completed shortly. A few people have asked where they can get a Ponte, but right now there are no plans to assemble and ship boards. That may change, but for now if might be worth bugging [Omer] to put his new and improved Ponte (with an 8-port I2C port expander!) up on SeeedStudio


Arduino Taipan! Clone Stays True To The Original

taipan

Fans of vintage Apple ][ and TRS-80 games will undoubtedly recognize the image above in short order. Taipan! was a popular game in its time, and [Simon] decided it was a great title to try recreating with an Arduino.

His goal was to use a standard Arduino Duemilanove to reproduce the game, rather than opting for a Mega or something like the Raspberry Pi. Seeing those two options as “too easy”, he ventured into the project with some self-imposed limitations, making it a more fruitful adventure.

In the end, [Simon] had to use two Arduinos – one to control the gameplay and another to run the display. Simon tucked both boards, a keypad, and an LCD screen inside a first run copy of Tai-Pan, a move that is sure to please Apple aficionados and Xzibit fans alike.

[Simon] made sure that no detail was overlooked during the port, making sure to include every line of text as well as every bug found in the original game.

Check out a video of the finished project below, and be sure to swing by his site for a very thorough build log.

Continue reading “Arduino Taipan! Clone Stays True To The Original”

Reading Punch Cards With An Arduino And Digital Camera

[digitaltrails] wanted the data on a few old IBM 80-column punch cards he had lying around, but didn’t have decades old computer hardware in his garage. He decided to build his own out of LEGO, an Arduino, a digital camera, and a bit of Python.

The hardware portion of [digitaltrails] build includes a crank-operated feed mechanism made entirely out of LEGO. For each turn of the crank, the feed mechanism sends one card down a chute where a photodetector wired into an Arduino tells a camera to take a picture. After that, a servo is activated, sending the card into the ‘already scanned’ bin.

On the software side of the build, [digitatrails] used the Python Imaging Library to scan one row of pixels where each column is expected to be. The software outputs the code and data contained on the 80-column card as well as a very cool ASCII art version of each card.

Considering you just can’t go down to Fry’s and buy an IBM 80-column punch card reader, we’re loving [digitatrails]’ clever way of getting data off an otherwise unreadable storage medium. Check out the video of the card reader in action after the break.

Continue reading “Reading Punch Cards With An Arduino And Digital Camera”

A Wireless MAME Coffee Table Controller

MAME coffee table plan

Although we’ve featured quite a few MAME controllers here, we thought we’d feature one more. It’s only a well-drawn mechanical plan at this point, but if the results are anything like the model or detail drawing, we will be quite impressed.

One thing that is of particular interest is the planned parts list. Amongst them are the typical joysticks, buttons, and even a trackball. What may be new to some of our readers is the bluetooth arcade controller by [Wayne and Layne] opensource hardware kits. Although they aren’t cheap at just under $80, and requre an Arduino Mega for use, this is nonetheless an interesting control option. The maximum button presses may be another limiting factor at 6, but it should be a cleaner solution than cannibalizing one or more wireless controllers.

Of course, we’d be negligent if we didn’t at least give you a link to a completed MAME controller. Be sure to feast your eyes on these images if you’d like some finished controller eye candy or check out the pic after the break!

Continue reading “A Wireless MAME Coffee Table Controller”

Decoding NOAA Weather Radio With An Arduino

The National Oceanic and Atmospheric Administration is responsible for broadcasting the signals used in weather radios. They use a protocol called Specific Area Message Encoding (SAME) and [Ray Dees] recently published an Arduino library that lets you decode the SAME message packets.

He doesn’t provide a method of tuning the radio signal, but at first you can use the audio samples he points to. The actual broadcasts happen on one of seven frequencies between 162.400 MHz and 162.550 MHz but the tones are also broadcast on TV and Radio alerts. Once you have the audio it is fed into a pair of XR-2211 Tone decoders. This provides just three interface pins for the Arduino to watch.

The annoying noise that grabs your attention at the beginning of a weather alert, or test of the alert system is actually what the SAME data packets sound like. From those tones this system will be able to decode what type of alert is being issued, and the geographic locations it affects. If you interested in more info about SAME head over to the Wikipedia article on the topic.

Bending A Home Security Control Panel To Your Will

Does your home have a security system but you don’t subscribe to the monitoring service to make it work? Rip that baby off of the wall and do something with it, or just build your own system around it. If you have a DSC PC1500RK control panel [CaitSith2] shows us how easy it is to control the buttons, LEDs, and buzzer. If you’ve got a different model this is still a good jumping off point to start your own reverse engineering.

There are only four connections that need to be made. [CaitSith2] is using an Arduino for the demonstration. He connected the red wire to voltage, the black wire to ground, the yellow wire (clock) to digital pin 3 and the green wire (data) to digital pin 2. A communication cycle starts by setting the data line high, then clocking out eight bits to capture keypresses. 16-bits are then clocked in to set the LEDs and drive the buzzer. This is shown in the video after the break as well as documented in his sample code. We’ve embedded the sketch after the break to preserve it in case the pastebin code goes missing in the future.

Continue reading “Bending A Home Security Control Panel To Your Will”

Building An Artificial Moon For Burning Man

lune-and-tide-burning-man

If you were lucky enough to score passes to this year’s Burning Man, be sure to keep a look out for [Laurence Symonds] and crew, who are putting together an ambitious fixture for the event. In reality, we’re guessing you won’t have to look far to find their giant moon replica floating overhead – in fact it will probably be pretty hard to miss.

They are calling the sculpture “Lune and Tide”, which of an 8 meter wide internally lit moon which hovers over a spinning platform that’s just as big across. The inflatable sphere is made up of giant ripstop nylon panels which are home to 36,000-odd sewn-in LEDs. The LEDs illuminate the sphere to reflect the natural color of the moon, though with a simple command, [Laurence] and Co. can alter the lighting to their heart’s content.

If Hack a Day’s [Jesse Congdon] makes his way out to the festival again this year, we’ll be sure he gets some footage of Lune and Tide in action. For now, you’ll have to satisfy your curiosity by checking out the project’s build log.