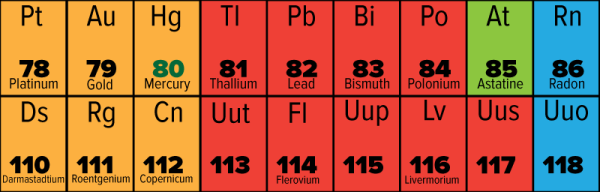
Clever Chemistry Leads To Much Faster 3D Printing

Resin printing, it can be messy but you get really great resolution thanks to the optical nature of curing the sticky goo with light from a projector. Soon it will have a few more notches in its belt to lord over its deposition cousins: speed and lack of layers. A breakthrough in resin printing makes it much faster than ever before and pretty much eliminates layering from the printed structure.

The concept uses an oxygen-permeable layer at the bottom of the resin pool. This inhibits curing, and apparently is the source of the breakthrough. The resin is cured right on the border of this layer and allows for what is described as a continuous growth process rather than a layer-based approach. One of the benefits described is no need for resin to flow in as the part is extracted but we’re skeptical on that claim (the resin still needs to flow from somewhere). Still, for us the need to work with resin which is expensive, possibly messy, and has an expiry (at least when compared to plastic filament) has kept deposition as a contender. The speed increase and claims of strength benefits over layer-based techniques just might be that killer feature.

The technology is coming from a company called Carbon3D. They are branding it CLIP, or Continuous Liquid Interface Production. After the break you can see a video illustration of the concept (which is a bit too simple for our tastes) as well as a TED talk which the company’s CEO, [Joseph Desimone] gave this month. Of course there is also the obligatory time-lapse print demo.

So what do you think: game changer or not, and why do you feel that way? Let us know in the comments.

Continue reading “Clever Chemistry Leads To Much Faster 3D Printing”

Store Digital Files For Eons In Silica-Encased DNA

If there’s one downside to digital storage, it’s the short lifespan.  Despite technology’s best efforts, digital storage beyond 50 years is extremely difficult. [Robert Grass, et al.], researchers from the Swiss Federal Institute of Technology in Zurich, decided to address the issue with DNA.  The same stuff that makes you “You” can also be used to store your entire library, and then some.

As the existence of cancer shows, DNA is not always replicated perfectly. A single mismatch, addition, or omission of a base pair can wreak havoc on an organism. [Grass, et al.] realized that for long-term storage capability, error-correction was necessary. They decided to use Reed-Solomon codes, which have been utilized in error-correction for many storage formats from CDs to QR codes to satellite communication. Starting with uncompressed digital text files of the Swiss Federal Charter from 1291 and the English translation of the Archimedes Palimpsest, they mapped every two bytes to three elements in a Galois field. Each element was then encoded to a specific codon, a triplet of nucleotides. In addition, two levels of redundancy were employed, creating outer- and inner- codes for error recovery. Since long DNA is very difficult to synthesize (and pricier), the final product was 4991 DNA segments of 158 nucleotides each (39 codons plus primers).

Continue reading “Store Digital Files For Eons In Silica-Encased DNA”

Etching Steel With A DC Wall Wart

[Dan Comeau] is a modern-day Renaissance DIY Jedi — or so he says… He loves re-purposing things and hacking in general. But one of his favorite pastimes is producing custom hand-made knives. He etches his logo on each, using a professional etching machine, but when a fan asked how to do it themselves, he came up with this simple and easy way to etch metal at home with a few things you probably already have!

It’s actually incredibly simple. Just by cracking open a DC power supply (a wall wart will do just fine), you can easily make your own etching/marking device with a few modifications. Ideally you want something in the range of 5-12VDC at 1A or more.  Continue reading “Etching Steel With A DC Wall Wart”

Cheap DIY Microscope Sees Individual Atoms

This is not an artist’s rendering, nor a physics simulation. This device held together with hardware-store MDF and eyebolts and connected to a breadboard, is taking pictures of actual atomic structures using actual measurements. All via an 80¢ piezo buzzer? Madness.

HAD - STM6
Gold atoms in a crystal.

This apparent wizardry is called a scanning tunneling microscope which takes advantage of quantum tunneling. The device brings a needle atomically close to the object to be measured (by hand), applying a small voltage (+-15V), and stopping when it starts to conduct. Depending on the distance between the tip and the target, the voltage varies and does so precisely enough to identify whether an atom is underneath or not, and by how much.

The “pictures” are not photographs like a camera might take from a standard optical microscope, however they are neither guesses nor averages. They are representations of real physical measurements of specific individual atoms as they exist on the infinitesimal area being probed. It “sees” by measuring small voltage changes. Another difference lies in the “scanning.” The probe examines atoms the way one would draw ASCII images – single pixels at a time until an entire atom was drawn. Note that the resolution – as shown in the pictures – is sub-atomic. Sizes of atoms are apparent as are the distances between them. In this they are closer related to the far more expensive Scanning Electron Microscope technology, but are 10-100x zoomier; resolving 0.00000000001m, or 0.00000000039″.

HAD - STM4
Scan Head – Piezo cut into quadrants

One would presume that dealing with actual atoms requires precision machining vast orders of magnitude beyond the home hobbyist but, no. Any one of us could make this at home or in our hackerspaces, for nearly free. Apparently even sharpening a tip to a single atom is, as [Dan] says “not as hard to achieve as you might think!” You take some tungsten wire and pull on it as you cut so that it shatters diagonally. There are better ways he suggests, but that method is good enough.

The ordinary piezo buzzer that is key to the measurement is chopped into quadrants with an ordinary X-Acto knife by hand. Carefully, because it is fragile, but, nothing more to it than that. There are two better and common methods but they cost hundreds of dollars, not 80 cents. It should be carefully glued since soldering heat will damage it, but, [Dan] soldered his anyway because it was easier. Continue reading “Cheap DIY Microscope Sees Individual Atoms”

Copper Plated print

Electroplating Copper And Silver Onto 3D Prints

While researching copper plating graphite for a project, [Dave] stumbled upon a blog post illustrating a brilliant approach to metal plating 3D printed parts.

Our pioneers in this new technique are [Aaron], who runs a jewelry business, and [Bryan], a professor of Digital Media. By mixing graphite powder into an acetone solution, it is possible to make a kind of graphite paint that sticks extremely well to ABS plastic.

Using the graphite painted part as the cathode, and a chunk of copper as the anode, it becomes possible to electroplate the part with a variety of electro-forming solutions. In the first test (seen above), [Bryan] uses a Midas Bright Electro-forming Copper Solution (copper sulfate solution).

Continue reading “Electroplating Copper And Silver Onto 3D Prints”

Developing Film With Lego

Developing film at home is most certainly a nearly forgotten art nowadays, but there are still a few very dedicated people who care enough to put in the time and study to this craft. [Jan] is one of the exceptional ones. He’s developing 35mm film with Lego (Dutch, Google translate).

For the build, [Jan] is using the Lego RCX 1.0, the first gen of the Lego Mindstorms, released in the late 90s. According to eBay, this is a significantly cheaper option for programmable Lego. The mechanics of the Lego film developer consisted of multiple tanks of chemicals. The film was loaded on a reel, suspended from a Lego gantry, and dunked into each tank for a specific amount of time.

A second revision of the hardware (translate) was designed, with the film loaded into a rotating cylinder. A series of chemicals would then be pumped into this unit with the hope of reducing the amount of chemicals required. This system was eventually built using the wiper fluid pump from a car. Apparently, the system worked well, judging from the pictures developed with this system. Whether it was easy or efficient is another matter entirely.

You can check out a video of the first revision of the Lego film developing system below.

Thanks [Andrew] for sending this in.

Continue reading “Developing Film With Lego”

InfoFuse

This Message Will Self Destruct… As You Read It?

A group of Harvard chemists have come up with a novel use for fire. Through experimentation, they have been able to build what they call an InfoFuse. As the name implies, it’s essentially a burning fuse that can “transmit” information.

The fuse is made from flash paper, which is paper made from nitrocellulose. Flash paper burns at a relatively constant speed and leaves no smoke or ash, making it ideal for this type of project. The chemists developed a method of conveying information by changing the color of the flame on the paper. You might remember from high school chemistry class that you can change the color of fire by burning different metal salts. For example, burning copper can result in a blue flame. This is the key to the system.

The researchers dotted the flash paper with small bits of metal salts. As the flame reaches these spots, it briefly changes colors. They had to invent an algorithm to convert different color patterns to letters and numbers. It’s sort of like an ASCII table for fire. Their system uses only three colors. The three colors represent eight possible combinations of color at any given time. Just two quick pulses allow the researchers to convey all 26 letters of the English alphabet as well as ten digits and four symbols. In one test, the researchers were able to transmit a 20 character message in less than 4 seconds.

[Ben Krasnow] found the Harvard project and just had to try it out for himself. Rather than use colors to convey information, he took a more simple approach. He started with a basic strip of flash paper, but left large tabs periodically along its length. As the paper burns from end to end, it periodically hits one of these tabs and the flame gets bigger momentarily.

[Ben] uses an optical sensor and an oscilloscope to detect the quantity of light. The scope clearly shows the timing of each pulse of light, making it possible to very slowly convey information via fire. Ben goes further to speculate that it might be possible to build a “fire computer” using a similar method. Perhaps using multiple strips of paper, one can do some basic computational functions and represent the result in fire pulses. He’s looking for ideas, so if you have any be sure to send them his way! Also, be sure to check out Ben’s demonstration video below. Continue reading “This Message Will Self Destruct… As You Read It?”