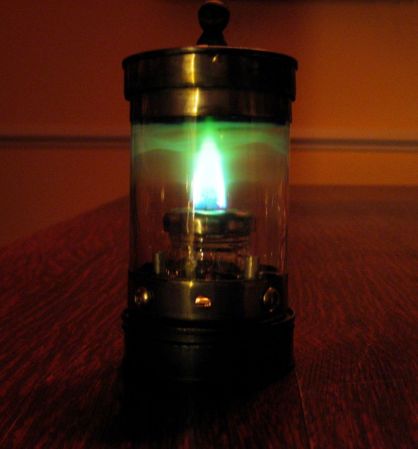
Making High Concentrations Of Hydrogen Peroxide At Home

Hydrogen peroxide – the same stuff you can pick up from a drug store or beauty supply store – is one of those very interesting chemicals that belongs on every maker’s cabinet. At concentrations of about 30%, it’s perfect for etching PCB boards, and at even higher concentrations – about 70% – it can be used as rocket fuel. Unfortunately for the home hacker, it’s very difficult and expensive to obtain peroxide in concentrations above 3% or so. That’s alright with [Charlie], though, because he’s come up with a way to concentrate peroxide and measure the concentration once he’s done.

There are a few YouTube videos of kitchen chemists concentrating peroxide by heating it on a stove to just under 100°C. Because hydrogen peroxide boils at 150°C, they’re simply boiling off the water and increasing the concentration of peroxide. This is a qualitative method, and you’ll never know what concentration you’re getting. [Charlie] rigged up a small-scale with a pipette to measure the weight of his concentrated peroxide per unit of volume, giving him the density of his concoction and thus the concentration.

We have to note that concentrated peroxide is dangerous stuff, but the results of [Charlie]’s lab work aren’t much more dangerous than what hair stylists work with every day. If you’re going for high-test peroxide, good job, that’s awesome, but do be aware of the risks.

Mr. Tea Is A Hot Plate And Magnetic Stirrer In The Same Enclosure

mr-tea-stir-and-hot-plate

Not being a coffee drinker [Hunter Scott] wanted a way to make tea while lurking in his workshop. Well it’s not exactly rocket science, as all you need is water at the right temperature and a vessel in which the tea can be steeped. But we do commend him on not only building a nice little hot plate enclosure, but rolling a magnetic stirrer into the other side of the box.

You heard us right, the stirrer is not combined with the plate, but resides on the underside of the same PSU enclosure. The plate itself is from a unit he bought at the store and cannibalized. The light switch dimmer lets him adjust the heat it puts out. When not hot, he can flip it over and use the stir plate. This consists of a hard drive magnet attached to a PC fan. For the stirrer itself he encased a neodymium magnet in some thermoplastic. The magnetic combination works well together with a demonstration which shows it stirring water through the base of a tea-cup.

An Arduino Hydrogen Blimp… Oh The Humanity!

arduino-hydrogen-balloon

This sort of flying contraption seems more suited for indoor use. Well, except for the fire hazard presented by building an Android controlled hydrogen blimp. The problems we often see with quadcopters come into play when a motor wire comes loose and the thing goes flying off in a random direction. Loosing a motor on this airship will be no big deal by comparison.

Because the build relies on the buoyancy of the gas, light-weight components are the name of the game. The frame of the chassis is built from balsa wood. It supports two tiny DC motors which are almost indistinguishable in the image above. An Arduino nano and wireless receiver monitor commands from the transmitter and drive the propellers accordingly.

You may have noticed that we categorized this one as a chemistry hack. That’s because [Btimar] generated the hydrogen himself. He used an Erlenmeyer flask with a spout for the chemical reaction. After placing several heat sinks and other scraps of solid aluminum in the flask he poured on the lye solution. This generates the H2 but you need to keep things cool using ice to keep the reaction from getting out of control. We’re going to stick with helium filled blimps for the time being!

See this beast flying around [Btimar’s] living room in the clip after the break.

Continue reading “An Arduino Hydrogen Blimp… Oh The Humanity!”

Making Graphene With A DVD Burner

A group of researchers have figured out how to produce graphene using a DVD drive. This discovery helps clear the path for mass production of the substance, which was discovered in the late 1980’s. More recently, the 2010 Nobel Prize for Physics was awarded to a team that produced two-dimensional graphene; a substance one just atom thick. One method of doing so used Scotch tape and is mentioned in the video after the break as a technique that works but is not feasible for large-scale production.

The process seen here starts with graphite oxide because it can be suspended in water. This allows a lab technician to evenly distribute the substance on a plastic surface. Note the use of optical discs. The second part of the process involves hitting the dried layer of graphite oxide with a laser. It just so happens that this can be done with a consumer DVD drive. The result is graphene that can be used in circuits and may have potential as a fantastic super-capacitor.

Continue reading “Making Graphene With A DVD Burner”

Comprehensive Home PCB Fabrication Tutorial

home-pcb-fabrication

From what we’ve seen we’d say [Jianyi Liu] is really good at etching PCBs at home. Now you can learn from his experience. He just published a mammoth guide to fabricating your own PCBs at home. That link goes to his index page which leads to all eight parts of the guide.

He starts off by mentioning that fab house boards are rather inexpensive these days. This will save you a lot of trouble (like acquiring the equipment and raw materials needed to get up and running) but you can’t beat the turnaround time of doing it yourself.

After discussing the particulars about trace width, copper thickness, and a few design considerations he lays out his board and prints the artwork to a sheet of transparency film. A pre-sensitized board is cut to size before a trip through an exposure rig with the film taped onto it. The image above shows him rinsing the board after applying the developer chemical. From here he uses cupric chloride he mixed himself to etch the board. [Jianyi] recommends populating the components before cutting the panel apart — a task which he accomplishes with a hack saw.

10 Ways To Etch PCBs At Home

[youtube=http://www.youtube.com/watch?v=Q4tWEse2rDI&w=580]

There are a ton of benefits for etching your own circuit boards at home, chief among them the ability to design a circuit in the morning and have a prototype in your hand by lunch. There’s always the question of how to etch the board, but [NurdRage] over on Youtube has all the chemistry covered on ten different etchant solutions for DIY PCB manufacturing.

The peroxide-based methods use simple over-the-counter Hydrogen Peroxide to remove all the copper on a PCB. By combining H2O2 with either Hydrochloric (muriatic) acid or Sulfuric acid, you’ll get a relatively easy to acquire and somewhat safe etching solution.

Historically, the favorite etchant for the home PCB manufacturer has been Ferric Chloride and is still surprisingly available at a few Radio Shacks around the US. Another chloride etchant – Copper Chloride – is one of the most reusable etchants available, able to be regenerated by simply bubbling air through the solution. You can actually make Copper Chloride etchant by reducing down the products of an H2O2 + HCl etchant, making this a very good etchant for PCB pros.

In the ‘miscellaneous’ category, [NurdRage] goes over some alternative etchants such as Bleach and HCl, Nitric acid, and potassium nitrate and HCl; the potassium nitrate etchant is fairly similar to aqua regia, so if you’ve ever wanted a gold PCB, this is the way to go.

Balancing the ease of production and safety of all these etchants, we’ll stick with our Hydrogen Peroxide and HCl etchant for now, at least until we move up to CuCl for the best etching machine we’ve ever seen.

Continue reading “10 Ways To Etch PCBs At Home”

Acoustic Levitation Of Water Droplets

acoustic-levitation-water-droplets

These water droplets are not falling; they’re actually stuck in place. What we’re seeing is the effects of an acoustic levitator. The device was initially developed by NASA to simulate microgravity. Now it’s being used by the pharmaceutical industry do develop better drugs.

The two parts of the apparatus seen in the image above are both speakers. They put out a sound at about 22 kHz, which is beyond the human range of hearing. When precisely aligned they interfere with each other and create a standing wave. The droplets are trapped in the nodes of that wave.

So are these guys just playing around with the fancy lab equipment? Nope. The levitation is being used to evaporate water from a drug without the substance touching the sides of a container. This prevents the formation of crystals in the solution. But we like it for the novelty and would love to see someone put one of these together in their home workshop.

Don’t miss the mystical demo in the clip after the break.

Continue reading “Acoustic Levitation Of Water Droplets”