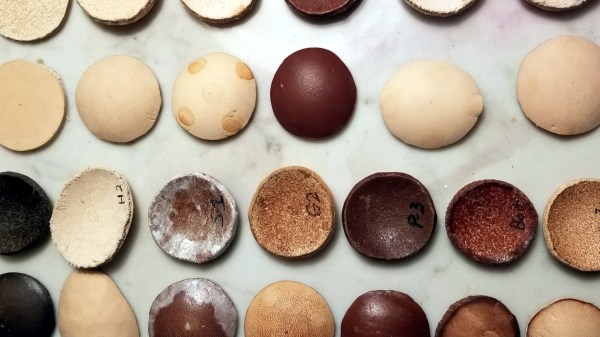
Raspberry Pi Revives Stand-Alone DivX Player

It might seem almost comical to our more fresh-faced readers, but there was a time when you could go into a big box retailer and purchase what was known as a “DivX Player”. Though they had the outward appearance of a normal DVD player, these gadgets could read various digital video file formats off of a CD-R or DVD-R, complete with rudimentary file browser. Depending on how much video compression you could stomach, a player like this would allow you to pack an entire season of a show or multiple movies onto a single disc. Before we started streaming everything online, that was kind of a big deal.

Room to grow.

[Roberto Piva] got his hands on one of these early digital media players, a KiSS DP-500 circa 2003, and decided that it was too unique to send off to the recycling center. Not only was he curious about what made it tick, but he thought it would be interesting to try converting it into a Raspberry Pi powered streaming media player. One might say there’s something almost perverse about taking the carcass of one of these devices and stuffing it full of the same technology that made it obsolete in the first place, but who are we to judge?

Upon opening the vintage set top box, [Roberto] was immediately struck by how empty the thing was. He got the impression the device was a rush job, pushed out to capitalize on a relatively short-lived trend. Looking at it, we have to agree. It’s almost as though they got a deal on some old VCR chassis laying around in a warehouse someplace and decided to stick some (at the time) modern electronics in it. It even uses what appears to be a standard IDE optical drive rather than something purpose built.

[Roberto] hoped that he could tap into the player’s original power supply, but upon testing found that it wasn’t quite up to the task to reliably running a modern Pi. So into the cavernous enclosure went a powered USB hub, which he wired up to the original power switch on the player’s front panel. The original PSU couldn’t handle the Pi, but it does work nicely to spin up an IDE hard drive that he mounted to the top of the optical drive with zip ties.

This was enough to get a nice Kodi set top box that’s capable of pulling media from the Internet or the internal HDD, but [Roberto] has more plans for the future. He wants to try and get the optical drive working through a USB-to-IDE adapter so the device can come full circle and once again play burned discs full of video files, and mentions he would like to reverse engineer the front panel and IR receiver to control Kodi.

While this isn’t the first time we’ve seen a DVD player get an internal Raspberry Pi, the fact that this one is using an IDE drive is an interesting spin and should make for a very clean final product. We’ve also seen how integrating the original physical controls can really help sell the experience with these Pi-infused players. If you’ve got the space in your entertainment for one of these early 2000’s leviathans, they might make an ideal base for your own Pi set top box build.

OptoGlitch Is An Optocoupler Built For Distortion

When we are concerned with the accurate reproduction of a signal, distortion and noise are the enemy that engineers spend a great deal of time eliminating wherever possible. However, humans being the imperfect creatures that we are, we sometimes desire a little waviness and grain in our media – typically of the analog variety, as the step changes of digital distortion can be quite painful. Tired of Instagram filters and wanting to take a different approach, [Patrick Pedersen] built the OptoGlitch – a hardware solution for analog distortion.

Changing the number of samples per pixel varies the accuracy of reproduction of the original image, left.

The concept of operation is simple – pixel values of a digital image are sent out by varying the intensity of an LED, and are then picked up by a photoresistor and redigitized. The redigitized image then bears a variety of distortion and noise effects due to the imperfect transmission process.

In the OptoGlitch hardware, the LED and photoresistor are intentionally left open to ambient light to further allow noise and distortion to happen during the transmission process. A variety of calibration methods are used to avoid the results being completely unrecognizable, and there are various timing and sampling parameters that can be used to alter the strength of the final effect.

It’s possible to introduce distortion more intentionally, too – such as this project that hides metadata in malformed glyphs.

Love Inspires CD Player Hack

The heart is an impressive piece of hardware. It’s a rare pump that runs continuously for over 80 years in some cases. It’s also, for some reason or other, become a common human symbol of love and affection. In this vein, [Deepak Khatri] has built a beating electronic heart out of basic, readily available components.

The heart of the build (pun intended) is a lens assembly salvaged from a CD player, which uses a coil and permanent magnet to move the lens in order to read across a disc. In this case, the coil is instead fed pulses from an astable multivibrator circuit built with a hacker favourite, the 555 timer IC. It’s all assembled on a breadboard, which is a great way to build such projects that rely on experimentation through the swapping of component values.

The end result is rather satisfying. [Deepak] has also experimented with an Arduino driven version with a slightly different rhythm.

We haven’t seen too many projects using optical drive lens assemblies, but we’re sure there must be other applications. If you end up using one to agitate biological samples or build an awesome laser projector, be sure to hit up the tips line. Video after the break.

Continue reading “Love Inspires CD Player Hack”

Travelling The Oregon Trail With An Apple II Robot

For one reason or another, we’re going with a retro-futuristic 80s aesthetic in this case, [Mike] decided to turn an Apple IIe into a robot. If you have to ask why, you’ll never know, but this project does have some interesting things going for it. There’s a voice synthesizer, a brand spankin’ new power supply, and it rolls around on the floor thanks to Apple BASIC.

Since this is a mobile robot, there needs to be a power supply in there somewhere. The Apple II had a fantastic switching power supply, but it ran off mains voltage. To make this Apple run off a 14.8 V LiPO battery, [Mike] needed to re-engineer this power supply to give +5, +12, -5, and -12 Volts. The easiest is the positive voltage, and for that, he used a big ‘ol LM1084 linear regulator for the +5 V line. This outputs a ton of heat and probably isn’t the best solution, but it is a solution that works. The +12 line was again another linear regulator, an LM7812CV. Since this is dropping 14.8 V down to 12, the efficiency isn’t that bad, and since there’s no floppy drive it’s not pulling much current anyway. The negative voltages are a MAX764 / MAX765 inverting switching regulators. This completely replaces the original power supply in the Apple II, and is a decent reference design for anyone who wants to make a luggable Apple II laptop.

To move this thing around, the motors run on their own 11.1 V LiPO, with a bunch of Pololu gear tying everything together. The BASIC code was written on an emulator, transferred over with the Floppy Emu. Movement is controlled through the output pins on the joystick port, and there’s a text to speech module that was obviously needed and ties this project together wonderfully. You can check out the video demo of the build below.

Continue reading “Travelling The Oregon Trail With An Apple II Robot”

Electron Microscopes Are Awesome: Everything You Didn’t Know You Wanted To Know

Electron microscopes were once the turf of research laboratories that could foot the hefty bill of procuring and maintaining such equipment. But old models have been finding their way into the hands of eager individuals who are giving us an inside look at the rare equipment. Before you start scouring Craigslist, go on a crash course of what you need to know with Adam McComb’s Hacker’s Guide to Electron Microscopy. He presented the talk at the 2018 Hackaday Superconference and the recording was just published, you’ll find it below.

Continue reading “Electron Microscopes Are Awesome: Everything You Didn’t Know You Wanted To Know”

A Lightweight AVR IDE

It’s entirely possible to do your coding in vim or emacs, hammering out hotkeys to drive the interface and bring your code to life. While working in such a way has its charms, it can be confronting to new coders, and that’s before even considering trying to understand command line compiler settings. The greenhorn coder may find themselves more at home in the warm embrace of an IDE, and [morrows_end] has now built one for those working with AVR assembly code.

The IDE goes by the name of Simple AVR IDE, or savr_ide for short. Programmed in C++ with the FLTK widget library, [morrows_end] has tested it on Windows XP, but notes that it should successfully compile for Linux, Unix, and even MacOS too.

All the basic features are there – there’s syntax highlighting, as well as integration with the AVRA assembler and AVRDUDE for programming chips. It’s a tool that could make taking the leap into assembly code just that little bit easier.  For another taste of bare metal coding, check out [Ben Jojo]’s discussion of x86 bootloaders.

A Network Card For The Trash-80

Around these parts, [Peter] is well-known for abusing the TRS-80 to do things it should never do. You can read Wikipedia on the TRS-80, you can look at Google Images, and you can browse the web. As with any retrocomputer, there are limitations for what you can do. To browse Wikipedia, [Peter] had to set up an AWS instance which translated everything and used serial to IP converters. It can be done, but it’s hard.

Now, after seeing a few interesting projects built around the ESP32, [Peter] built a network card for the TRS-80. It’s called the trsnic, and it’s a working network card for almost all the TRS-80s out there, with the eventual goal of supporting the TRS-80 Model I / II / III / 4 / 12 / 16 / 16B and 6000.

The idea for the trsnic comes from [Arno Puder]’s RetroStoreCard, a device that plugs into the TRS-80 Model III and connects it to a ‘personal cloud’ of sorts that hosts and runs applications without the need for cassettes or floppys. It does this with an ESP32 wired up to the I/O bus in the Model III, and it’s all completely Open Source.

[Peter] took this idea and ran with it. Thanks to the power found in the ESP32, real encrypted Internet communication can happen, and that means HTTPS and TLS.

Right now, documentation for the trsnic is limited, but the project does exist and building it is as easy as stuffing some headers and DIP sockets in a PCB and soldering them on. There’s a bit of work to do on the ESP32 code, but if you’re looking for a network card for your Trash-80, this is the one that works now.