8085-based single board computer

OMEN Alpha: A DIY 8085-Based Computer

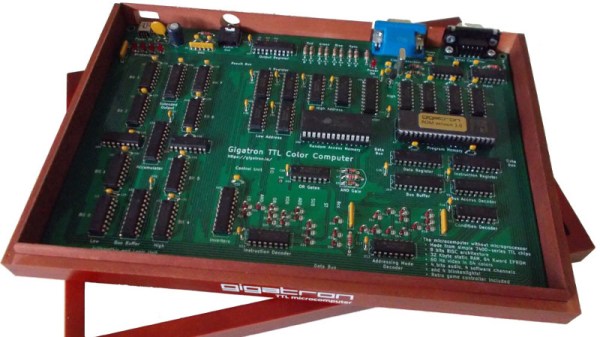
[Martin Malý] has put together a sweet little 8085-based single board computer called OMEN. He needed a simple one for educational purposes, and judging by the schematic we think he’s succeeded.

Now in its fourth iteration, it has a 32K EEPROM, 32K of memory, one serial and three parallel ports. In the ROM he’s put Tiny BASIC and Dave Dunfield’s MON85 Serial Monitor with Roman Borik’s improvements. His early demos include the obligatory blinking LED, playing 8-bit music to a speaker, and also a 7-segment LED display with a hexadecimal keyboard. There is also a system connector which allows you to connect a keyboard, a display, and other peripherals. Of course, you can connect serially at up to 115200 baud, making it very easy to compile some assembly on a PC and use the monitor to paste the hex into the board’s memory and run it. Or you can just jump into the Tiny BASIC interpreter and have some nostalgic fun. He demos all this in the video below.

He’s given enough detail for you to make your own and he also has the boards available in kit form on Tindie for a very reasonable price. With some minimal soldering skills, you can be back in the ’80s in no time.

Continue reading “OMEN Alpha: A DIY 8085-Based Computer”

Installing LibreBoot The (Very) Lazy Way

Recently I was given a somewhat crusty looking ThinkPad T400 that seemed like it would make a good knock around machine to have on the bench, if it wasn’t for the fact the person who gave it to me had forgotten (or perhaps never knew) the BIOS password. Cleaning the machine up, putting more RAM in it, and swapping the wheezing hard drive for an SSD would be a relatively cheap way to wring a few more years of life from the machine, but not if I couldn’t change the boot order in BIOS.

Alright, that’s not entirely true. I could have installed an OS on the SSD from my desktop and then put it into the T400, but there was something else at play. The locked BIOS gave me the perfect excuse to install LibreBoot on it, which is one of those projects I’ve had in the back of my mind for years now. Replacing the BIOS with something entirely different would solve the password issue, but there was only one problem: the instructions for flashing LibreBoot onto the T400 are intimidating to say the least.

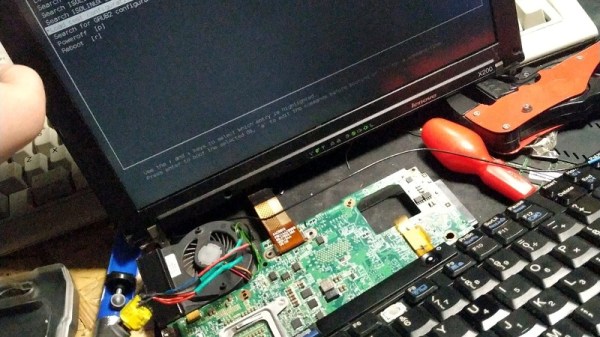
You’re supposed to take the entire machine apart, down to pulling the CPU cooler off and removing the display. All so you can flip the motherboard over to access a flash chip between the CPU and RAM that’s normally covered by a piece of the laptop’s frame. Oh how I hated that diabolical chunk of magnesium which kept me from my silicon quarry. Flashing the chip would take a few minutes, but YouTube videos and first hand accounts from forums told me it could take hours to disassemble the computer and then put it back together after the fact.

Deep into that darkness I peered, long I stood there, wondering, fearing, doubting. Then a thought came to me: maybe I could just cut the thing. If it was a success, it would save me hours of work. If it failed, well, at least the computer didn’t cost me anything. Time to roll the dice.

Continue reading “Installing LibreBoot The (Very) Lazy Way”

PC In An SNES Case Is A Weirdly Perfect Fit

For better or for worse, a considerable number of the projects we’ve seen here at Hackaday can be accurately summarized as: “Raspberry Pi put into something.” Which is hardly a surprise, the Pi is so tiny that it perfectly lends itself to getting grafted into unsuspecting pieces of consumer tech. But we see far fewer projects that manage to do the same trick with proper x86 PC hardware, but that’s not much of a surprise either given how much larger a motherboard and its components are.

So this PC built into a Super Nintendo case by [NoshBar] is something of a double rarity. Not only does it ditch the plodding Raspberry Pi for a Mini-ITX Intel i5 computer, but it manages to fit it all in so effortlessly that you might think the PAL SNES case was designed by a time traveler for this express purpose. The original power switch and status LED are functional, and you can even pop open the cart slot for some additional airflow.

[NoshBar] started by grinding off all the protruding bits on the inside of the SNES case with a Dremel, and then pushed some bolts through the bottom to serve as mounting posts for the ASUS H110T motherboard. With a low profile Noctua CPU cooler mounted on top, it fits perfectly within the console’s case. There was even enough room inside to add in a modified laptop charger to serve as the power supply.

To round out the build, [NoshBar] managed to get the original power slider on the top of the console to turn the PC on and off by gluing a spring-loaded button onto the side of the CPU cooler. In another fantastic stroke of luck, it lined up almost perfectly with where the power switch was on the original SNES board. Finally, the controller ports have been wired up as USB, complete with an adapter dongle.

[NoshBar] tells us the inspiration for sending this one in was the Xbox-turned-PC we recently covered, which readers might recall fought back quite a bit harder during its conversion.

The Wonderful World Of USB Type-C

Despite becoming common over the last few years USB-C remains a bit of a mystery. Try asking someone with a new blade-thin laptop what ports it has and the response will often include an awkward pause followed by “USB-C?”. That is unless you hear “USB 3” or maybe USB 3.1. Perhaps even “a charging port”. So what is that new oval hole in the side of your laptop called? And what can it really do? [jason] at Reclaimer Labs put together a must-read series of blog posts in 2016 and 2017 plumbing the depths of the USB 3.1 rabbit hole with a focus on Power Delivery. Oh, and he made a slick Easy Bake Oven with it too.

A single USB Type-C connector

When talking about USB-C, it’s important to start at the beginning. What do the words “USB-C” entail? Unsurprisingly, the answer is complicated. “USB Type-C” refers only to the physical connector and detail about how it is used, including some of the 24 pins it contains. Then there are the other terms. “USB 3.1” is the overall standard that encompasses the Type-C connector and new high-speed data busses (“USB SuperSpeed” and “SuperSpeedPlus”). In addition there is “USB Power Delivery” which describes power modes and even more pin assignments. We’re summarizing here, so go read the first post for more detail.

The second post devotes a formidable 1,200 words to providing an overview of the electrical specifications, configuration communication, and connector types for USB 3.1.

A GIF of a flipping USB Type C connector
Marketing at its finest

The third post is devoted to USB Power Delivery. Power Delivery encompasses not only the new higher power modes supported (up to 100W!), but the ways to use the extra 10 or 13 pins available on the Type-C connector. This is both the boon and bane of USB-C, allowing apparently identical ports to carry common signals like HDMI or DisplayPort, act as analog audio outputs, and provide more exotic interfaces like PCIe 3.0 (in the form of Thunderbolt 3, which is a yet another thing this connector can be used for).

It should be clear at this point that the topics touched by “USB Type-C” are exceptionally complex. Save yourself the trouble of a 90MB specification zipfile and take a pass through [jason]’s posts to understand what’s happening. For even more detail about Power Delivery, he walks through sample transactions in a separate post.

Gamers Rejoice: Here’s A Fix For ASUS Strix Vega 64 Thermal Issues

Every year, we demand our computers to be ever faster, capable of delivering progressively more eye-watering graphics and doing it all as reliably as ever. Unfortunately, sometimes, new designs miss the mark. [Cloakedbug] was having issues with voltage regulator temperatures on an ASUS Strix VEGA 64 — one of the latest RADEON graphics cards on the market — and decided to investigate.

Right away, issues were apparent; one of the main thermal pads was making poor contact with the FETs it was intended to carry heat for, and was poorly sized to boot. In a show of poor quality, the pad wasn’t nicely sized for the aluminium plate it was attached to, and was applied in a rather haphazard manner. Suspecting this was perhaps one of the root causes of the card running hot, the decision was made to replace the pad with something more suitable.

Specifying a thicker pad that was properly sized to the heatsink plate was the order of the day, and a couple of other smaller heatsink pads were also replaced, all with Thermal Grizzly Minus Pad 8. [Cloakedbug] reports a temperature drop of over 30 degrees C under load on the VR SOC bank, down from 115 C initially. It sounds like this will go a long way to keeping the card happy and healthy over time. Looking around the web, there’s definitely a few reports of thermal issues out there, so this could be a useful fix if you’re having trouble with the same card at home.

In the end, it’s a simple, tidy fix to an expensive piece of hardware that really should have shipped with this sorted from the factory. We’ve seen a fair few thermal fixes over the years here, like this one involving a thermal camera as a diagnosis tool.

[Thanks to Keith O for the tip!]

Computer Programming Unplugged For Kids

There was a time when computers were far too expensive to let mere students use them. In those days, we wrote fake programs for fictitious machines and checked them by hand. That wasn’t fun, but it did teach you to think about the algorithm. You weren’t worried about how many tabs to indent code in the editor, or checking your social media feed, or changing the track on your Spotify playlist. Maybe that was the idea behind Computer Science Unplugged. The site is aimed at educators and gives them lesson plans to teach kids about computer concepts through activities that don’t use a computer.

The target ages are from 5 to 14 and topics range from binary numbers, sorting, searching, error detection, and robotics. For example, one exercise has students line up to be bits in a binary number. Each kid holds a card that is blank on one side or has the right number of dots on the other (for example, bit 0 has 1 dot, bit 2 has 4 dots, and so on).

Continue reading “Computer Programming Unplugged For Kids”

The $4 Z80 Single-Board Computer, Evolved.

We feature hundreds of projects here at Hackaday, and once they have passed by our front page and disappeared into our archives we often have no opportunity to return to them and see how they developed. Sometimes of course they are one-off builds, other times they wither as their creator loses interest, but just occasionally they develop and evolve into something rather interesting.

One that is taking that final trajectory is [Just4Fun]’s Z80-MBC, a single board computer with only 4 ICs, using an Atmel microcontroller to simulate the Z80 support chips. It has appeared as a revised version, on a smart new PCB rather than its original breadboard, and with built-in SD card and RTC support through readily available breakout boards, and banked RAM for CP/M support. You may remember the original from last year, when it was also a Hackaday Prize entry and stage finalist. From a Hackaday perspective this is particularly interesting, because it shows how the Prize can help a project evolve.

The Atmega32A uses the Arduino bootloader with programming through the ICSP port, and full instructions are given in the hackaday.io project page alongside all the files required to build your own board. There is no mention of whether boards can be bought, but we’d say this could be a commercial-quality product if they chose to take it in that direction.