Ever get that funny feeling that things aren’t quite what they used to be? Not in the way that a new washing machine has more plastic parts than one 40 years its senior. More like “my laptop can churn through hundreds of gigaflops, but when I scroll it doesn’t feel great.” That perception of smoothness might be based on a couple factors, including system latency. A couple years ago [danluu] had that feeling too and measured the latency of “devices I’ve run into in the past few months” (based on this list, he lives a more interesting life than we do). It turns out his hunch was objectively correct. What he wrote was a wonderful deep dive into how and why a wide variety of devices work and the hardware and software contributors to latency.
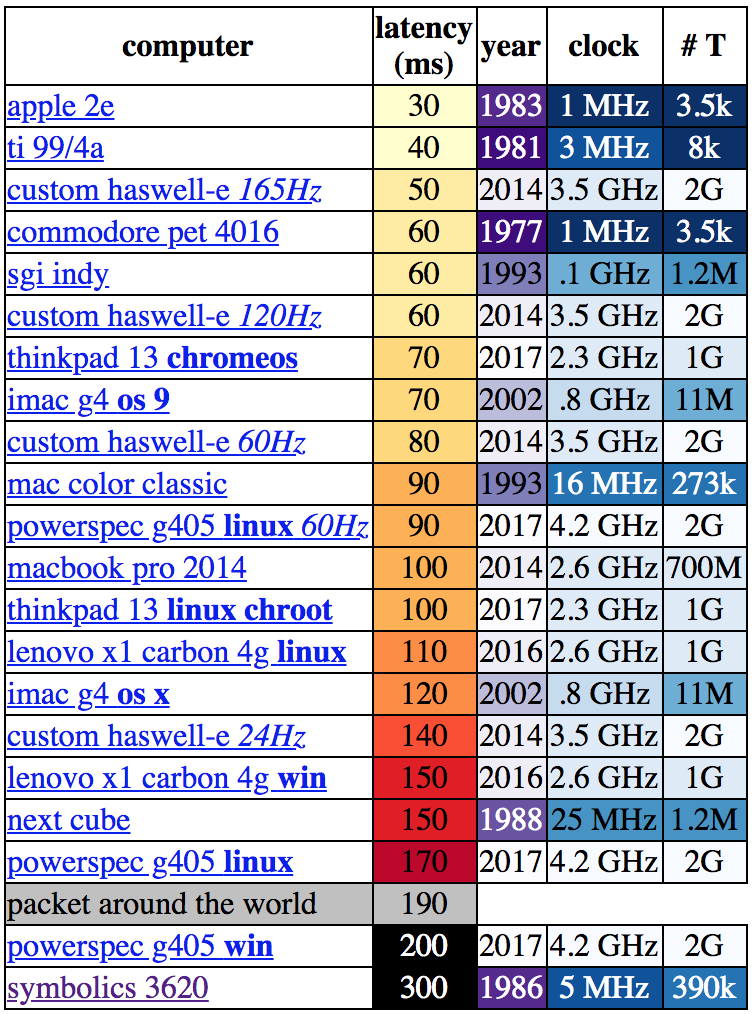 Let’s be clear about what “latency” means in this context. [danluu] was checking the time between a user input and some response on screen. For desktop systems he measured a keystroke, for mobile devices scrolling a browser. If you’re here on Hackaday (or maybe at a Vintage Computer Festival) the cause of the apparent contradiction at the top of the charts might be obvious.
Q: Why are some older systems faster than devices built decades later? A: The older systems just didn’t do much! Instead of complex multi-tasking operating systems doing hundreds of things at once, the CPU’s entire attention was bent on whatever user process was running. There are obvious practical drawbacks here but it certainly reduces context switching!
In some sense this complexity that [danluu] describes is at the core of how we solve problems with programming. Writing code is all about abstraction. While it’s true that any program could be written directly in machine code and customized to an individual machine’s hardware configuration, it would be pretty inconvenient for both developer and user. So over time layers of sugar have been added on top to hide raw hardware behind nicer interfaces written in higher-level programming languages.
And instead of writing every program to target exact hardware configurations there is a kernel to handle the lowest layers, then layers adding hotplug systems, power management, pluggable module and driver infrastructure, and more. When considering solutions to a programming problem the approach is always recursive: you can solve the problem, or add a layer of abstraction and reframe it. Enough layers of the latter makes the former trivial. But it’s abstractions all the way down.
[danluu]’s observation is that we’re just now starting to curve back around and hit low latency again, but this time by brute force! Modern solutions to latency largely look like increasingly exotic display technologies and complex optimizations which reach from UI draw functions all the way down to the silicon, not removing software and system infrastructure. It turns out the benefits of software complexity in terms of user experience and ease of development are worth it most of the time.
For a very tangible illustration of latency as applied to touchscreen devices, check out the Microsoft Research video after the break (linked to in [danluu]’s piece).
Continue reading “Faster Computers Lead To Slower Experiences?”