Case Mod Takes “All In One” Printer To The Next Level

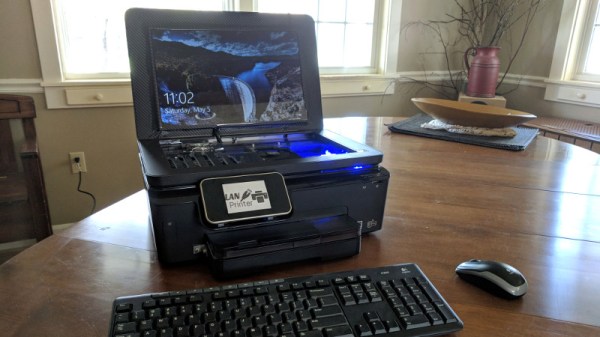
You’ve seen printers with scanners in them, printers with copiers in them, even ones with the ancient technology known as “facsimile” built-in. But have you ever seen a printer with a full gaming computer built into it? No? Well, you still haven’t, technically. There’s no printer to be had anymore inside this re-purposed HP Photosmart 6520 case, but it’s probably the closest we’re going to get.

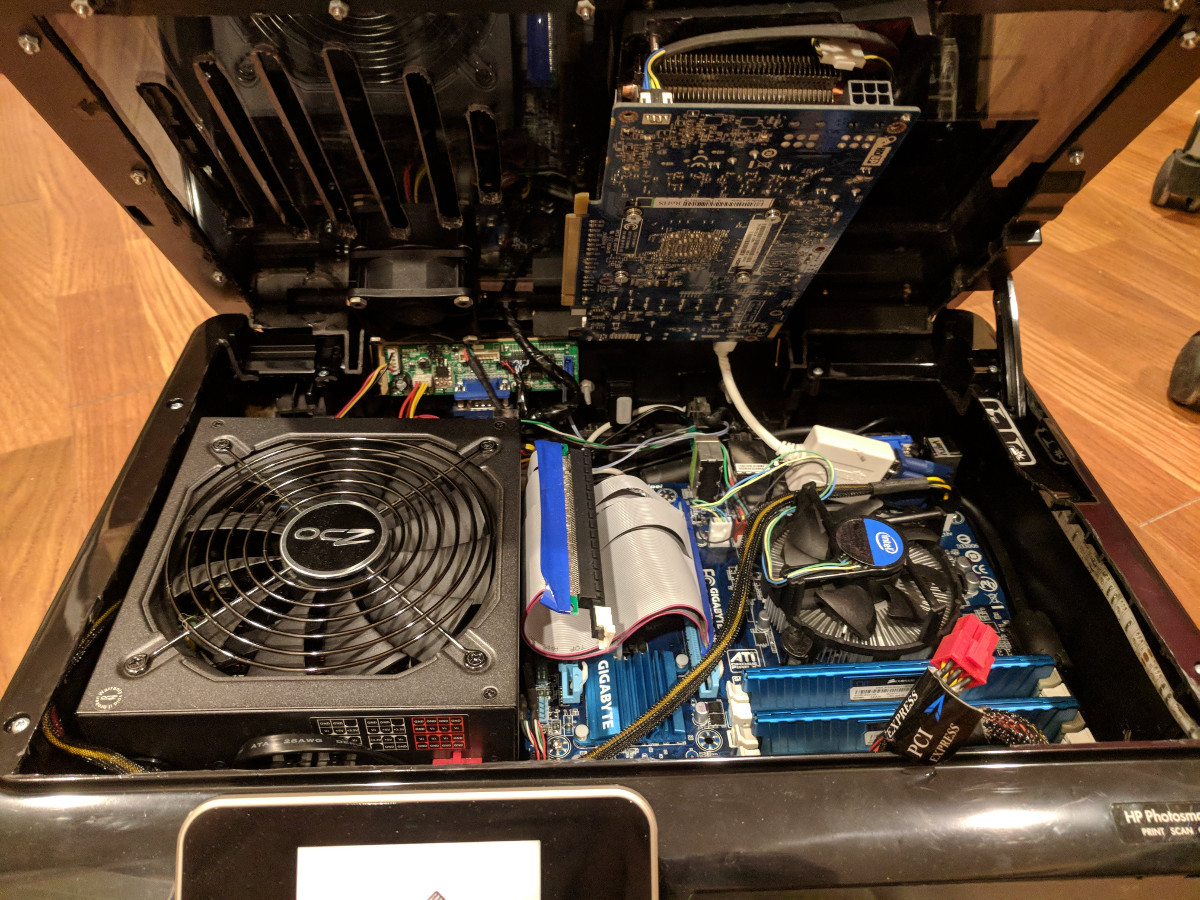
[Jacob Lee] wrote in to share this awesome build with us, which sees the motherboard, graphics card, ATX power supply, and hard drives all fit seamlessly into the shell of a disused “All-in-one” style printer. Incredibly, he even managed to integrate an LCD into the top; which hinges open when in use and gives a look down into the madness that makes this build tick.

To say there’s a lot of hardware packed into this thing is an understatement. Which is all the more impressive when you consider that he] didn’t take the easy way out for any of it. He could have used a mini-ITX motherboard, or a slim PSU. He could have even dropped the graphics card for integrated. No, [Jacob] is clearly a subscriber to the “Go big or go home” ethos.

As if putting all this gear inside of a normal looking printer case wasn’t impressive enough, he even went as far as adding female ports for Ethernet, HDMI, and USB on the rear of the device to give it a stock look. He mentions there’s some room for improvement with the USB ports, but the power switch and IEC port really look like they could have been original components.

In the age of the Raspberry Pi and other diminutive computers, we don’t see too many proper desktop computer projects anymore. Fewer still that are so well executed and creative. We don’t know how many other people might be trying to stick a computer in a printer case, but if they’re out there, the bar has just been set pretty high.

Dark Field Microscopy On The Cheap With A PCB

It might seem like a paradox that you want a dark field to see things with an expensive microscope. As [IMSAI Guy] explains, a dark field microscope doesn’t make the subject dark. It makes the area surrounding the subject dark. After selling his expensive microscope, he found he missed having the capability, so he decided to make one cheaply. You can see how he did it in the video, below.

Dark field microscopy gives better contrast and resolution by discarding light that shines directly through or reflects directly from a sample. The only light you see is any that scatters. If you think about a normal microscope, you can imagine a cone of light coming from the top or the bottom. The tip of the cone hits the sample and then spreads back out into another cone of light. What hits your eye –well, actually, the eyepiece — is all the light from that cone. In a dark field instrument, the illumination cone is hollow — the light is just a ring. That means any light the sample doesn’t scatter gets blocked by a stop in the objective. When there is no sample, there’s no unblocked light, so you see a “dark field.”

Light that either refracts through the sample (from below) or bounces off a feature (from the top) will wind up in the hollow area that passes through the objective and you’ll see the image. It may surprise you that you may already have a piece of dark field technology on your desk. Optical computer mice that can work on glass surfaces use this same technique. If you want to see some examples and a diagram of how it all works, we did a post on a similar lower tech mod. There’s also Wikipedia.

The secret to doing this cheaply was to get a used dark field objective with a little rust on the barrel and then modify them with a custom PC board to create an LED ring light. This is different from the usual illuminator which shines a light through a patch stop to block the inner light. In this case, the light is made into a ring shape by virtue of the arrangement of the LEDs.

Continue reading “Dark Field Microscopy On The Cheap With A PCB”

Lucky Cat POV Display Ditches The Waving And Windmills Out Of Control

If you’ve been in a Japanese restaurant, you’ve probably seen a maneki-neko, the lucky cat charm, where a cat welcomes you with a beckoning arm. It’s considered to bring good luck, but we’re not sure if [Martin Fitzpatrick] is pushing his luck with this Lucky Cat POV display. He hacked one of the figurines so the arm forms a persistence of vision (POV) display, where blinking LEDs on the paw create a dot-matrix style display.

Inside the hapless neko is a Wemos D1, motor driver, and a few other components that turn the cat into a working display. The five LEDs he attached to the paw are wide enough to display 5×7 characters. The tricky part in the mechanical design is getting signals from a stationary base to a spinning arm(ature). In this case it was easily solved with a 6-wire slip ring from Adafruit. [Martin] revs the lucky cat up using a brushed DC motor and a couple of gears.

The ESP8266 is running MicroPython — the combination should make this a snap to hook into any web service API you want to display your own messages. Right now the arm doesn’t have positional awareness so the message isn’t locked in a single position like it would be if a hall effect sensor was used. But [Martin] says there’s plenty of room left inside the cat and a future upgrade could include stashing the batteries inside for a cordless, all-in-one build. If he takes that on it’s a perfect time to add some type of shaft encoding as well.

Check the Lucky Cat showing off in the clip after the break.

Continue reading “Lucky Cat POV Display Ditches The Waving And Windmills Out Of Control”

Hawkeye, The 3D-Printed Tourbillon Movement

As if building tiny mechanisms with dozens of moving parts that all need to mesh together perfectly to work weren’t enough, some clock and watchmakers like to put their horology on hard mode with tourbillon movements. Tourbillons add multiple axes to the typical gear trains in an attempt to eliminate errors caused by the influence of gravity — the movement essentially spins on gimbals while tick-tocking away.

It feels like tourbillons are too cool to lock inside timepieces meant for the ultra-rich. [Alduinien] agrees and democratized the mechanism with this 3D-printed tourbillon. Dubbed “Hawkeye,” [Alduinien]’s tourbillon is a masterpiece of 3D printing. Composed of over 70 pieces, the mechanism is mesmerizing to watch, almost like a three-axis mechanical gyroscope.

The tourbillon is designed to be powered either by the 3D-printed click spring or by a small electric motor. Intended mainly as a demonstration piece, [Alduinien]’s Thingiverse page still only has the files for the assembled mechanism, but he promises to get the files for the individual pieces posted soon. Amateur horologists, warm up your 3D-printers.

Tourbillons are no stranger to these pages, of course. We’ve done an in-depth look at tourbillons for watches, and we’ve even featured a 3D-printed tourbillon clock before. What we like about this one is that it encourages exploration of these remarkable instruments, and we’re looking forward to seeing what people do with this design. For those looking for more background on clock escapements in general, [Manuel] wrote a great article on how we turned repetitive motion into timekeeping.

Continue reading “Hawkeye, The 3D-Printed Tourbillon Movement”

Reflowduino: Put That Toaster Oven To Good Use

There are few scenes in life more moving than the moment the solder paste melts as the component slides smoothly into place. We’re willing to bet the only reason you don’t have a reflow oven is the cost. Why wouldn’t you want one? Fortunately, the vastly cheaper DIY route has become a whole lot easier since the birth of the Reflowduino – an open source controller for reflow ovens.

This Hackaday Prize entry by [Timothy Woo] provides a super quick way to create your own reflow setup, using any cheap means of heating you have lying around. [Tim] uses a toaster oven he paid $21 for, but anything with a suitable thermal mass will do. The hardware of the Reflowduino is all open source and has been very well documented – both on the main hackaday.io page and over on the project’s GitHub.

The board itself is built around the ATMega32u4 and sports an integrated MAX31855 thermocouple interface (for the all-important PID control), LiPo battery charging, a buzzer for alerting you when input is needed, and Bluetooth. Why Bluetooth? An Android app has been developed for easy control of the Reflowduino, and will even graph the temperature profile.

When it comes to controlling the toaster oven/miscellaneous heat source, a “sidekick” board is available, with a solid state relay hooked up to a mains plug. This makes it a breeze to setup any mains appliance for Arduino control.

We actually covered the Reflowduino last year, but since then [Tim] has also created the Reflowduino32 – a backpack for the DOIT ESP32 dev board. There’s also an Indiegogo campaign now, and some new software as well.

If a toaster oven still doesn’t feel hacky enough for you, we’ve got reflowing with hair straighteners, and even car headlights.

Richard Feynman: A Life Of Curiosity And Science

It was World War II and scientists belonging to the Manhattan Project worked on calculations for the atomic bomb. Meanwhile, in one of the buildings, future Nobel Prize winning theoretical physicist Richard Feynman was cracking the combination lock on a safe because doing so intrigued him. That’s as good a broad summary of Feynman as any: scientific integrity with curiosity driving both his work and his fun.

If you’ve heard of him in passing it may be because of his involvement on the Space Shuttle Challenger disaster commission or maybe you’ve learned something from one of his many lectures preserved on YouTube. But did you know he also played with electronics as a kid, and almost became an electrical engineer?

He was the type of person whom you might sum up by saying that he had an interesting life. The problem is, you have to wonder how he fit it all into one lifetime, let alone one article. We’ll just have to let our own curiosity pick and choose what to say about this curious character.

Continue reading “Richard Feynman: A Life Of Curiosity And Science”

Direct CNC Control With The Raspberry Pi

If you’re building a CNC router, laser cutter, or even 3D printer, you’ll usually be looking at a dedicated controller. This board takes commands from a computer, often in the form of G-Code, and interprets that into movement commands to the connected stepper motors. Historically this has been something of a necessary evil, as there was really no way to directly control stepper motors with a computer fast enough to be useful. That may not be the case anymore.

A stepstick driver

Thanks to the Raspberry Pi (and similar boards), we now have Linux computers with plenty of GPIO pins. The only thing missing is the software to interpret the G-Code and command the steppers over GPIO, which thanks to [pantadeusz], we now have. Called raspigcd, this software interprets a subset of G-Code to provide real-time control over connected steppers fast enough to drive a small CNC router.

Of course, you can’t directly control a beefy stepper motor to the GPIO pins of a Pi. You’ll let out all the magic smoke. But you can wire it up directly to a stepper driver board. These little modules connect up to a dedicated power supply and handle the considerable current draw of the steppers, all you need to do is provide them the number of steps and direction of travel.

This method of direct control offers some very interesting possibilities for small, low-cost, CNC projects. Not only can you skip the control board, you could conceivably handle the machine’s user interface (either directly via a touch screen or over the network) on the same Pi.

We’ve seen attempts at creating all-in-one Linux stepper controllers in the past, but the fact that anyone with a Raspberry Pi 2 or 3 (the boards this software has currently been tested on) can get in on the action should really help spur along development. Has anyone used this?