Immersive Stereo Sound Recording With This Binaural Microphone

Sound recording has been a consumer technology for so long now that it is ubiquitous, reaching for a mobile device and firing up an app takes only an instant. Anyone who takes an interest in audio recording further will find that while it’s relatively straightforward to make simple recordings. But, as those among you who have fashioned a pair of Shure SM58s into an X configuration with gaffer tape will know, it can be challenging to create a stereo image when recording outside the studio. In the quest to perfect this, [Kevin Loughin] has created a binaural microphone, which simulates a human head with microphones placed as ears to produce ambient recordings with an almost-immersive stereo image.

Commercial binaural microphones can cost thousands of dollars, but this one opts for a more budget design using an off-the-shelf mannequin head sold for hairdressers. It’s filled with high-density foam, and in its ears [Kevin] placed 3D-printed ear canals with electret microphone capsules. On the back goes a battery and a box for the bias circuitry.

The results as you can hear in the video below the break are impressive, certainly so for the cost. It’s not the first such microphone we’ve shown you, compare it with one using a foam-only head.

Continue reading “Immersive Stereo Sound Recording With This Binaural Microphone”

Winamp Reborn With The Adafruit PyPortal

One look at the default Winamp skin is sure to reawaken fond memories for a certain segment of the community. For those who experienced the MP3 revolution first hand, few audio players stick out in the mind like Winamp and its llama whipping reputation. No, the proprietary Windows-only media player isn’t the sort of thing you’d catch us recommending these days; but it was the 1990s, and things were very different.

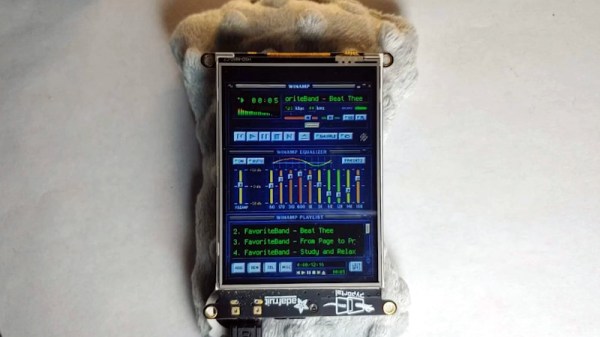
For those who want to relive those heady peer-to-peer days, [Tim C] has posted a tutorial on how to turn Adafruit’s PyPortal into a touch screen MP3 player that faithfully recreates the classic Winamp look. As you can see in the video below it certainly nails the visuals, down to the slightly jerky scrolling of the green track info which we’re only now realizing was probably the developer’s attempt to mimic some kind of a physical display like a VFD.

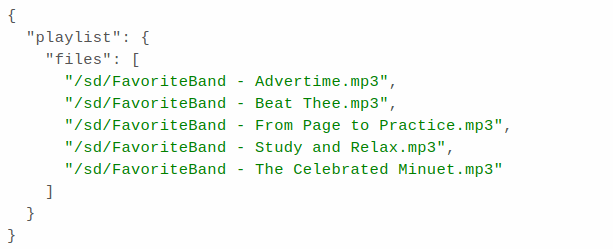
With minimal UI functionality, playlists must be created manually.

[Tim] has even included support for original Winamp themes, although as you might expect, some hoop-jumping is required. In this case, it’s a Python script that you have to run against an image of the original skin pulled from the Winamp Skin Museum. From there, you just need to edit a couple of lines of code to point the player at the right skin files. In other words, switching between skins is kind of a hassle, but you should at least be able to get your favorite flavor from back in the day up and running.

But before you get too excited, there’s a bit of a catch. For one thing, the Winamp UI isn’t actually functional. You can tap the top section of the screen to pause the playback, and tapping down in the lower playlist area lets you change songs, but all the individual buttons and that iconic visual equalizer are just for show. Managing your playlists also requires you to manually edit a JSON file, which even in the 1990s we would have thought was pretty wack, to use the parlance of the times.

Of course, things could easily be streamlined a bit with further revisions to the code, and since [Tim] has released it into the public domain under the Unlicense, anyone can help out. As it stands, it’s still a very slick media display that we certainly wouldn’t mind having on our desk.

Continue reading “Winamp Reborn With The Adafruit PyPortal”

DIY Hydrophone Listens In On The Deep For Cheap

The microphone is a pretty ubiquitous piece of technology that we’re all familiar with, but what if you’re not looking to record audio in the air, and instead want to listen in on what’s happening underwater? That’s a job for a hydrophone! Unfortunately, hydrophones aren’t exactly the kind of thing you’re likely to find at the big-box electronics store. Luckily for us, [Jules Ryckebusch] picked up a few tricks in his 20-year career as a Navy submariner, and has documented his process for building a sensitive hydrophone without needing a military budget.

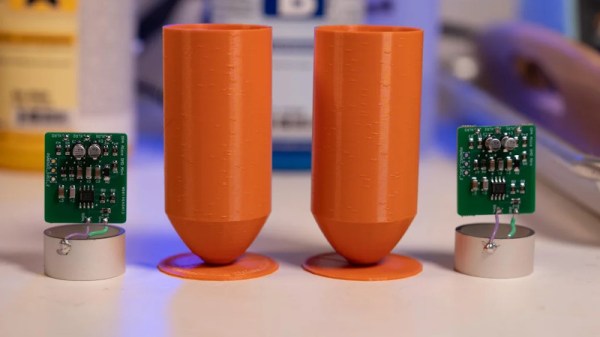
Fascinated by all the incredible sounds he used to hear hanging around the Sonar Shack, [Jules] pored over documents related to hydrophone design from the Navy and the National Oceanic and Atmospheric Administration (NOAA) until he distilled it all down to a surprisingly straightforward build. The key to the whole build is a commercially available cylindrical piezoelectric transducer designed for underwater communication that, incredibly, costs less than $20 USD a pop.

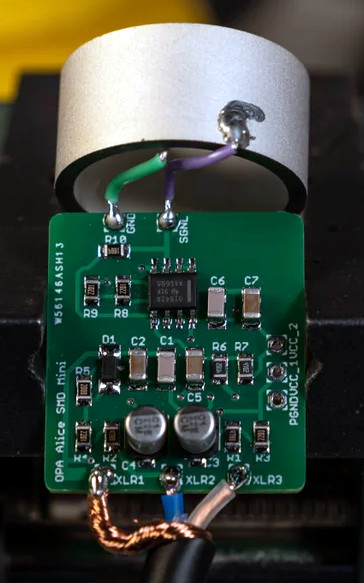
The transducer is connected to an op-amp board of his own design, which has been adapted from his previous work with condenser microphones. [Jules] designed the 29 x 26 mm board to fit neatly within the diameter of the transducer itself. The entire mic and preamp assembly can be cast inside a cylinder of resin. Specifically, he’s found an affordable two-part resin from Smooth-On that has nearly the same specific gravity as seawater. This allows him to encapsulate all the electronics in a way that’s both impervious to water and almost acoustically transparent. A couple of 3D-printed molds later, the hydrophone was ready to cast.

Interestingly, this isn’t the first homebrew hydrophone we’ve seen. But compared to that earlier entry, which basically just waterproofed a standard microphone pickup, we think this more thoughtful approach is likely to have far better performance.

Continue reading “DIY Hydrophone Listens In On The Deep For Cheap”

Classic IPods Are Super Upgradeable In 2022

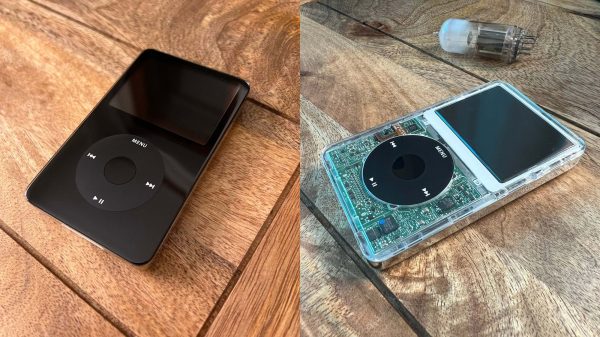
The classic iPod was the MP3 player to beat back in the day, loaded with storage and with its characteristic click-wheel interface. [Ellie] had an iPod Video laying around, one of the more capable models that came out near the end of the product’s run, and set out upgrading it for duty in the pandemic-wracked badlands of 2022. 

The iPod in question was a 5.5th generation model, prized for being the last to feature the Wolfson DAC with its good audio quality. [Ellie] used the ever-helpful iFixit guide to learn how to disassemble the device safely. Careful hands and a spudger are key to avoid marring the pressed-together metal case.

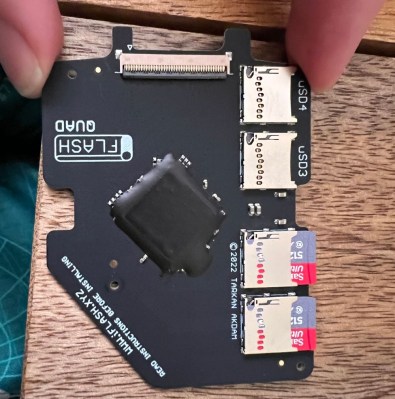
Once opened, an iFlash Quad board was installed inside that lets the iPod use up to four micro SD cards for storage instead of the original hard disk drive. With two 512 GB cards installed, [Ellie] won’t be short of storage. A new battery was then subbed in, along with a fancy clear front casing for the aesthetic charm of it all.

After the hardware modifications were complete, the iPod needed to be restored with iTunes to start working again. She then installed the open source Rockbox firmware, which opens up the capabilities of the hardware immensely. Perhaps best of all, it can play DOOM! Alternatively, you can use the clickwheel to control the volume on your MacBook if you so desire.

[Ellie’s] project goes to show that modifying an iPod these days can be a fun weekend build thanks to the great software and hardware now available. It’s wonderful to see that the platform still has such great support years after it has been discontinued. If you really want to look back though, take a gander at the early prototype of Apple’s breakout MP3 player.

Woodworking, Blinkenlites, And FFT’s Dance To The Music

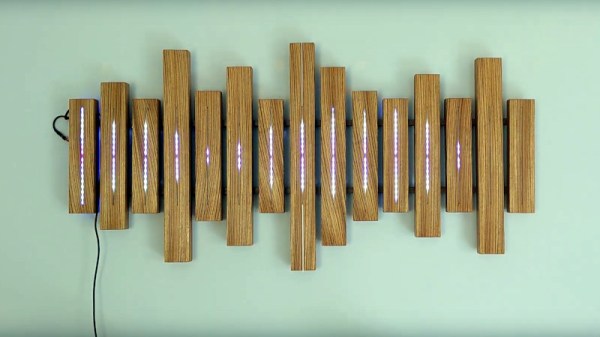
We all have that one project on our minds that we’d love to build if we could just find the right combination of time, energy, and knowledge to dive right in. For [Jonathan], that project was a sound sculpture that’s finally made it from concept to complete. [Jonathan] describes the sound sculpture as the culmination of a decade of learning, and in a moment you’ll understand why.

The sculpture itself is a beautiful display of woodwork mixed with what appear to be individually addressable LED’s. The varying length of the individual enclosures evokes the idea that the sculpture is somehow involved in the sound production, which is a nice touch.

An Adafruit microphone module feeds detected audio into a PSoC 5 microcontroller. You’d expect that [Jonathan] just used one of the FFT libraries that are available. But you’ll recall that this was the culmination of a decade of learning- why so? Because [Jonathan] went through the process of procuring his own grey hairs by writing his own FFT function. A homebrew FFT function and blinkenlites? What’s not to love!

You may also enjoy this discussion of Sine Waves, Square Waves, and FFT’s with our own Bil Herd.

Continue reading “Woodworking, Blinkenlites, And FFT’s Dance To The Music”

A pair of RP2040-based USB microphones

Mico Is A USB Microphone Based On A Pi Pico

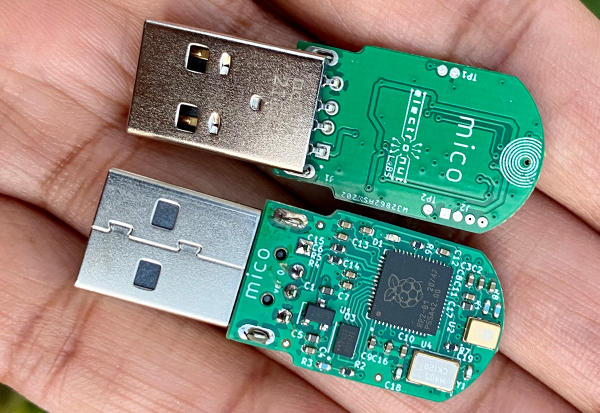
When [Mahesh Venkitachalam] was experimenting with machine learning for audio applications on a Raspberry Pi, he found himself looking for a simple USB microphone. A cheap one was easy to find, but the sound quality and directionality left much to be desired. A large, studio-quality mic would be overkill, so [Mahesh] decided to simply build exactly what was needed: a compact, yet high-quality USB microphone that he called Mico.

The sensing device is a MEMS microphone that outputs a pulse density modulated (PDM) signal. There are chips available to directly interface such a microphone to a USB port, but [Mahesh] found them difficult to work with and therefore settled on something he knew already: the Raspberry Pi Pico platform. Luckily, someone had already figured out how to read out a microphone and present a USB device to a PC, so all that was needed was to put all the bits together into a convenient form factor.

The great thing about the Pico platform is that its main controller chip, the RP2040, is available as a separate component. [Mahesh] designed a sleek little PCB that holds the RP2040 along with the MEMS microphone and a USB connector. The end result looks tidy enough that it might have come out of a mass-produced gizmo. Those don’t usually come with full schematics and source code, but the Mico does: everything is available on its GitHub page for anyone to re-use and improve.

You can judge the sound quality for yourself in the video embedded below. If you like DIY USB microphones, you’re in luck: we’ve featured one based on an STM32 as well as a beautiful recreation of a studio-quality mic.

Continue reading “Mico Is A USB Microphone Based On A Pi Pico”

Know Audio: It All Depends On The DAC

Our trip through the world of audio technology has taken us step-by step from your ears into a typical home Hi-Fi system. We’ve seen the speakers and the amplifier, now it’s time to take a look at what feeds that amplifier.

Here, we encounter the first digital component in our journey outwards from the ear, the Digital to Analogue Converter, or DAC. This circuit, which you’ll find as an integrated circuit, takes the digital information and turns it into the analogue voltage required by the amplifier.

There are many standards for digital audio, but in this context that used by the CD is most common. CDs sample audio at 44.1 kHz 16 bit, which is to say they express the level as a 16-bit number 44100 times per second for each of the stereo channels. There’s an electrical standard called i2s for communicating this data, consisting of a serial data line, a clock line, and an LRclock line that indicates whether the current data is for the left or the right channel. We covered i2s in detail back in 2019, and should you peer into almost any consumer digital audio product you’ll find it somewhere. Continue reading “Know Audio: It All Depends On The DAC”